INITIALIZING
tech blog

5 tips for using GitHub Copilot with issues to boost your productivity

Managing issues in software development can be tedious and time-consuming. But what if your AI peer programmer could streamline this process for you? GitHub Copilot‘s latest issue management features can help developers create, organize, and even solve issues. Below, we’ll dig into these features and how they can save time, reduce friction, and maintain consistency across your projects. 1. Image to issue: Turn screenshots into instant bug reports Writing detailed bug reports is often repetitive and frustrating, leading to inconsistent documentation. Copilot’s image to issue feature significantly reduces this friction. Simply paste a screenshot of the bug into Copilot chat with a brief description prompt Copilot to create an issue for you, then Copilot will analyze the image and generate a comprehensive bug report for you. No more struggling to describe visual glitches or UI problems—the image will speak for itself, and Copilot will handle the documentation. For example, if you encounter a UI alignment issue or a visual glitch that’s hard to describe, just capture a screenshot, paste it into Copilot, and briefly mention the problem. In the animation above, the user’s prompt was “create me a bug issue because markdown tables are not rendering properly in the comments.” Copilot then automatically drafted a report, including steps to reproduce the bug. To get the most out of this feature, consider annotating your screenshots clearly—highlighting or circling the problematic area—to help Copilot generate even more precise issue descriptions. Dive into the documentation to learn more. 2. Get the details right: Templates, tags, and types Projects quickly become disorganized when team members skip adding proper metadata. Incorrect templates, missing labels, or wrong issue types make tracking and prioritization difficult. Copilot solves this by automatically inferring the best template based on your prompt. It also adds appropriate labels and issue types without requiring you to navigate multiple dropdown menus or memorize tagging conventions. Need something specific? Simply ask Copilot to add particular labels or switch templates. If you change templates after drafting, Copilot will automatically reformat your content—no manual copying required. 3. Stay organized with versioning and milestones Keeping issues updated and properly categorized is crucial for clear communication, maintaining project velocity, and ensuring visibility into progress. But with so much else to do, it’s easy to let this work fall by the wayside. With Copilot, adding projects and milestones is as simple as typing a prompt. You can also specify exactly how you want issues organized. For example, ask Copilot to use the “Bug Report” or “Feature Request” template, add labels like priority: high, frontend, or needs-triage, or set the issue type to “Task” or “Epic.” Copilot will apply these details automatically, ensuring your issues are consistently categorized. Additionally, Copilot tracks all changes, making them easily referenceable. You can review issue history and revert changes if needed, ensuring nothing important gets lost. 4. Batch create multiple issues at once Sometimes you need to log several issues after a customer meeting, user testing session, or bug bash. Traditionally, this means repeating the same creation process multiple times. Copilot supports multi-issue drafting, allowing you to create multiple issues in a single conversation. Whether logging feature requests or documenting bugs, batch creation saves significant time. Simply prompt Copilot to create the issues, describe each one, and Copilot will draft them all. For example, you could give the following prompt to create two issues at once: Create me issues for the following features: – Line breaks ignored in rendered Markdown despite double-space – Bold and italic Markdown styles not applied when combined You will still need to review and finalize each one, but the drafting process is streamlined into a single workflow. 5. Let AI help fix your bugs with Copilot coding agent Creating issues is only half the battle—fixing them is where the real work begins. You can now assign issues directly to Copilot. Just ask Copilot coding agent to take ownership of the issue, and your AI coding assistant will start analyzing the bug. Copilot can even suggest draft pull requests with potential fixes. This seamless handoff reduces context-switching and accelerates resolution times, allowing your team to focus on more complex challenges. Beyond Copilot: Issues enhancements on GitHub While Copilot is already revolutionizing issue management, we at GitHub are always looking for ways to enhance the overall issues experience. For example, you can now: Standardize issue types across repositories for consistent tracking and reporting. Break down complex tasks into sub-issues for better progress management. Use advanced search capabilities with logical operators to quickly find exactly what you need. Manage larger projects with expanded limits supporting up to 50,000 items. Kickstart enhanced issue management today Ready to transform your issue management workflow with GitHub Copilot? Head to github.com/copilot and try prompts like: “Create me an issue for…” “Log a bug for…” Or simply upload a screenshot and mention you want to file a bug. Experience firsthand how Copilot makes issue management feel less like administrative overhead and more like a conversation with your AI pair programmer. Learn more about creating issues with Copilot > The post 5 tips for using GitHub Copilot with issues to boost your productivity appeared first on The GitHub Blog. ​ AI & ML, GitHub Copilot, generative AI, GitHub Issues The GitHub Blog

tech blog

GitHub Copilot Spaces: Bring the right context to every suggestion

When generative AI tools guess what you need, the magic only lasts as long as the guesses are right. Add an unfamiliar codebase, a security checklist your team keeps in a wiki, or a one‑off Slack thread that explains why something matters, and even the most and even the most powerful model may fill in gaps with assumptions rather than having access to your specific context and knowledge. GitHub Copilot Spaces fixes that problem by letting you bundle the exact context Copilot should read—code, docs, transcripts, sample queries, you name it—into a reusable “space.” Once a space is created, every Copilot chat, completion, or command is grounded in that curated knowledge, producing answers that feel like they came from your organization’s resident expert instead of a generic model.  In this article, we’ll walk through: A 5‑minute quick‑start guide to creating your first space Tips for personalizing Copilot’s tone, style, and conventions with custom instructions Real‑world recipes for accessibility, data queries, and onboarding Collaboration, security, and what’s next on the roadmap (spoiler: IDE integration and Issues/PR support) Want to learn more? Try our Docs.  We have everything you need to get started—including pro tips on the context that’s most helpful in your workflows. Explore Docs > Why context is the new bottleneck for AI‑assisted development Large language models (LLMs) thrive on patterns, but day‑to‑day engineering work is full of unpatterned edge cases, including: A monorepo that mixes modern React with legacy jQuery Organizational wisdom buried in Slack threads or internal wikis Organization‑specific security guidelines that differ from upstream OSS docs Without that context, an AI assistant can only guess. But with Copilot Spaces, you choose which files, documents, or free‑text snippets matter, drop them into a space, and let Copilot use that context to answer questions or write code. As Kelly Henckel, PM for GitHub Spaces, said in our GitHub Checkout episode, “Spaces make it easy to organize and share context, so Copilot acts like a subject matter expert.” The result? Fewer wrong guesses, less copy-pasting, and code that’s commit-ready. What exactly is a Copilot Space? Think of a space as a secure, shareable container of knowledge plus behavioral instructions: What it holds Why it matters Attachments Code files, entire folders, Markdown docs, transcripts, or any plain text you add Gives Copilot the ground truth for answers Custom instructions Short system prompts to set tone, coding style, or reviewer expectations Lets Copilot match your house rules Sharing & permissions Follows the same role/visibility model you already use on GitHub No new access control lists to manage Live updates Files stay in sync with the branch you referenced Your space stays up to date with your codebase Spaces are available to anyone with a Copilot license (Free, Individual, Business, or Enterprise) while the feature is in public preview. Admins can enable it under Settings  > Copilot > Preview features. TL;DR: A space is like pinning your team’s collective brain to the Copilot sidebar and letting everyone query it in plain language. Quick-start guide: How to build your first space in 5 minutes Navigate to github.com/copilot/spaces and click Create space. Name it clearly. For example, frontend‑styleguide. Add a description so teammates know when—and when not—to use it. Attach context: From repos: Pull in folders like src/components or individual files such as eslint.config.js. Free‑text hack: Paste a Slack thread, video transcript, onboarding checklist, or even a JSON schema into the Text tab. Copilot treats it like any other attachment. Write custom instructions. A sentence or two is enough: “Respond as a senior React reviewer. Enforce our ESLint rules and tailwind class naming conventions.” Save and test it. You’re done. Ask Copilot a question in the Space chat—e.g., “Refactor this <Button> component to match our accessibility checklist”—and watch it cite files you just attached. Pro tip: Keep spaces focused Instead of dumping your entire repo into one space, create smaller, purpose‑built spaces like: Accessibility, Data‑Queries, Auth‑Model, etc. Kelly, the PM behind the feature, uses this pattern internally at GitHub to make subject‑matter expertise reusable.  Personalize Copilot’s coding style (and voice, too)  Custom instructions are the “personality layer” of a space and where spaces shine because they live alongside the attachments. This allows you to do powerful things with a single sentence, including: Enforce conventions  “Always prefer Vue 3 script setup syntax and Composition API for examples.” Adopt a team tone “Answer concisely. Include a one‑line summary before code blocks.” Teach Copilot project‑specific vocabulary  “Call it ‘scenario ID’ (SCID), not test case ID.” During the GitHub Checkout interview, Kelly shared how she built a personal space for a nonprofit side project: She attached only the Vue front‑end folder plus instructions on her preferred conventions, and Copilot delivered commit‑ready code snippets that matched her style guide on the first try. Automate your workflow: three real‑world recipes 1. Accessibility compliance assistant Space ingredients Markdown docs on WCAG criteria and GitHub’s internal “Definition of Done” Custom instruction: “When answering, cite the doc section and provide a code diff if changes are required.” How it helps: Instead of pinging the accessibility lead on Slack, you can use Spaces to ask questions like “What steps are needed for MAS‑C compliance on this new modal?” Copilot summarizes the relevant checkpoints, references the doc anchor, and even suggests ARIA attributes or color‑contrast fixes. GitHub’s own accessibility SME, Katherine, pinned this space in Slack so anyone filing a review gets instant, self‑service guidance. 2. Data‑query helper for complex schemas Space ingredients YAML schema files for 40+ event tables Example KQL snippets saved as .sql files Instruction: “Generate KQL only, no prose explanations unless asked.” How it helps: Product managers and support engineers who don’t know your database structures can ask, “Average PR review time last 7 days?” Copilot autocompletes a valid KQL query with correct joins and lets them iterate. Result: lets PMs and support self-serve without bugging data science teams. 3. Onboarding Hub and knowledge base in one link Space ingredients Key architecture diagrams exported as SVG text ADRs and design docs from multiple repos Custom instruction:

tech blog

Smarter Data Management with Storage Defender for PowerMax

Simplify data management with Storage Defender CDM for PowerMax. Cut costs, boost efficiency, and focus on what drives your business forward.   ​  ​Simplify data management with Storage Defender CDM for PowerMax. Cut costs, boost efficiency, and focus on what drives your business forward. PowerMax Blog | Dell

tech blog

Transforming Your Telecom Network with Dell Managed Services

Learn how managed services, part of the Open Telecom Transformation Program, help CSPs get the most value from transformation.   ​  ​Learn how managed services, part of the Open Telecom Transformation Program, help CSPs get the most value from transformation. Telecommunications Blog | Dell

tech blog

Announcing comprehensive sovereign solutions empowering European organizations

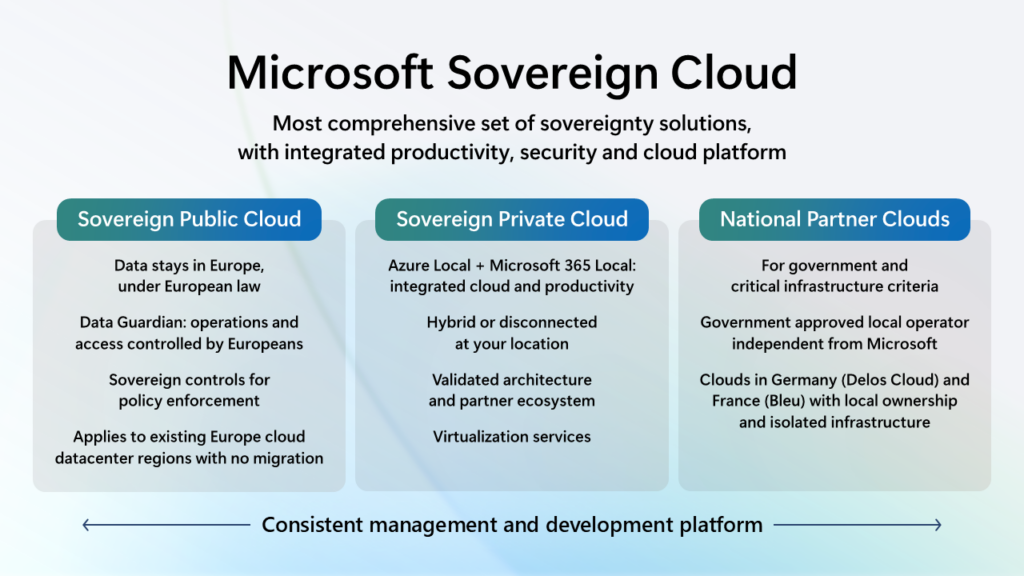
Today, we are taking the next step in strengthening our European Digital Commitments to empower our customers with greater choice, more control over their data privacy and the most robust digital resilience we have ever offered. Building on our 42-year history as a company in Europe, we are expanding our efforts with Microsoft Sovereign Cloud. This offer spans both public cloud and private digital infrastructure, ensuring our customers can choose the right balance of control, compliance and capability for their needs. With this expanded offering we are announcing Data Guardian for European operations, External Key Management for customer-controlled encryption, Regulated Environment Management for simplified configuration and Microsoft 365 Local for critical productivity services in private cloud environments. This brings together comprehensive productivity, security and cloud solutions designed to enable European organizations to grow, compete and lead on their own terms and with more control than ever before across Sovereign Public Cloud, Sovereign Private Cloud and National Partner Clouds. Building on our experience delivering sovereignty solutions that meet the needs of highly regulated customers and government agencies, our Sovereign Public Cloud is an evolution and expansion of the Microsoft Cloud for Sovereignty and will be offered across all existing European datacenter regions, for all European customers, across enterprise services such as Microsoft Azure, Microsoft 365, Microsoft Security and Power Platform. Sovereign Public Cloud ensures customer data stays in Europe, under European Law, with operations and access controlled by European personnel, and encryption is under full control of customers. This is enabled for all customer workloads running in our European datacenter regions requiring no migration. Microsoft’s new Sovereign Private Cloud will support critical collaboration, communication and virtualization services workloads on Azure Local. This solution now integrates Microsoft 365 Local and our security platform with Azure Local, providing consistent capabilities for hybrid or air-gapped environments to meet resiliency and business continuity requirements. In France and Germany, our National Partner Clouds offer comprehensive capabilities of Microsoft 365 and Microsoft Azure in an independently owned and operated environment. In France, we have an agreement with Bleu, a joint venture between Orange and Capgemini, for Bleu to operate a “cloud de confiance” for the French public sector, critical infrastructure providers and essential services providers that is designed to meet SecNumCloud requirements. In Germany, we have an agreement with Delos Cloud, an SAP subsidiary, for Delos Cloud to operate a sovereign cloud for the German public sector that is designed to meet the German government’s Cloud Platform Requirements. Across our Sovereign Public Cloud, Sovereign Private Cloud and support for National Partner Clouds, Microsoft Sovereign Cloud offers the most comprehensive set of sovereignty solutions in the industry for integrated productivity, security and cloud. Sovereign Public Cloud for all Microsoft Cloud customers in Europe Many technology providers have approached sovereignty as niche requirements for a unique set of customers that require a specific deployment approach that at times is at odds with the economics and innovation of public cloud systems. This often requires running duplicate systems and teams, migrating to separate environments and limiting access to cutting-edge technologies like AI. However, Microsoft’s Sovereign Public Cloud builds an evolving set of sovereign capabilities that can be configured to meet specific needs without sacrificing functionality or requiring migration to specialized datacenters. With Microsoft’s Sovereign Public Cloud currently in preview and set to be generally available in all European cloud regions later this year, we will introduce new features and solutions that reinforce this vision. Announcing Data Guardian Our EU Data Boundary already provides an industry-leading commitment to store and process your data on infrastructure located in Europe. Data Guardian will add an additional level of assurance by ensuring that only Microsoft personnel residing in Europe control remote access to these systems. Data Guardian adds additional human and technical oversight whenever engineers outside of Europe need access. All remote access by Microsoft engineers to the systems that store and process your data in Europe is approved and monitored by European resident personnel in real time and will be logged in a tamper-evident ledger. Announcing External Key Management to extend Azure Managed HSM Encryption under the full control of customers provides an additional guarantee of data protection. With external key management, customers can connect Azure to keys stored on their own Hardware Security Module (HSM) on-premises or hosted by a trusted third party. We’re working with major HSM manufacturers such as Futurex, Thales and Utimaco to ensure their support. Announcing Regulated Environment Management The Regulated Environment Management service will allow customers to easily manage all these features in one place (for instance, configuring Data Guardian policies or reviewing access log entries). Regulated Environment Management will be at the center of the customer experience for configuring, deploying and monitoring workloads in support of sovereign operations. Together, these tools will be at the center of the customer experience for configuring, deploying and monitoring workloads in the Sovereign Public Cloud. Sovereign Private Cloud with Azure Local and Microsoft 365 Local While strengthening sovereign controls in public cloud environments is critical, we also understand that some scenarios require certain workloads be run in a physical environment under full customer control to support business continuity risk mitigation. Azure Local delivers Microsoft cloud services in customer locations, enabling organizations to meet specific data residency and sovereignty requirements. It includes core Azure capabilities — such as compute, storage, networking and virtualization services — while providing a consistent management and developer experience. Azure Local is ideal for delivering services closer to where data is generated or regulated, whether in-country, on-premises or in partner-operated datacenters. Microsoft’s Sovereign Private Cloud solution is in preview today and will be generally available later this year. Announcing Microsoft 365 Local Microsoft 365 Local provides customers with additional choice by bringing together Microsoft’s productivity server software into an Azure Local environment that can run entirely in a customer’s own datacenter. This provides a simplified deployment and management framework for organizations to run Microsoft’s trusted productivity servers in environments they fully control. Built on our validated reference

tech blog

GitHub for Beginners: Code review and refactoring with GitHub Copilot

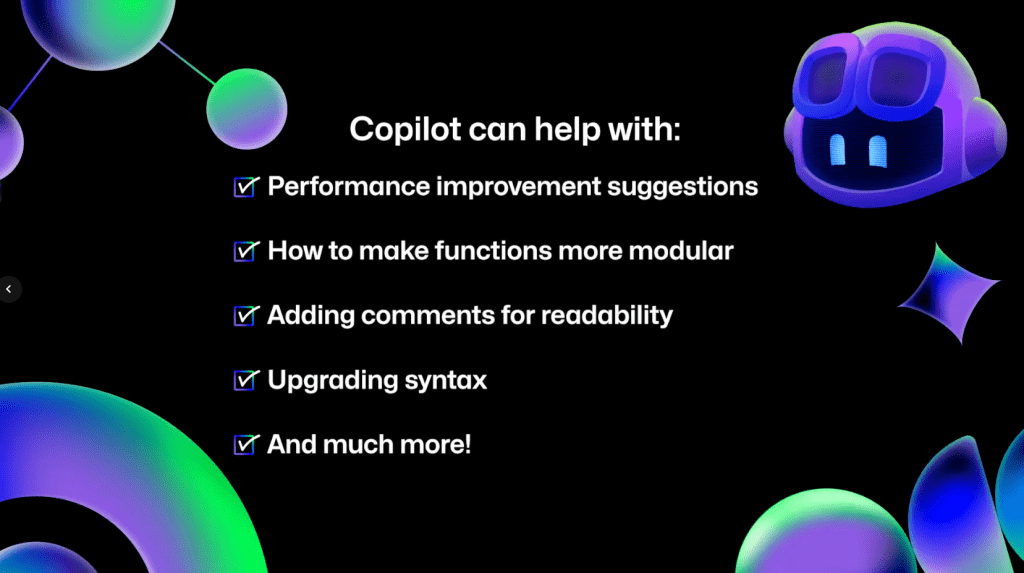
Welcome to the next episode in our GitHub for Beginners series, where we’re diving into the world of GitHub Copilot. This is our eighth and final episode, and it’s been quite a journey. We’ve covered a lot of different topics showcasing the power of GitHub Copilot, and you can check out all our previous episodes on our blog or as videos. Today we’re covering that important step of code review—getting a second pair of eyes on your code. This can help catch bugs, improve code quality, and ensure consistency. We’ll also talk about refactoring code—restructuring existing code without changing its functionality. This can make things more efficient or more readable for those who need to understand it later (even if that’s yourself). In any development project, maintaining a clean and efficient codebase is crucial to make future work easier. But in reality, things can quickly become messy as you’re focused on making it work. That’s where Copilot can come in handy. It doesn’t just assist you in writing code, it also makes the review and refactoring process smoother and more efficient. For the demos in this series, we’re using GitHub Copilot in Visual Studio Code Copilot is available in other IDEs, but the available functionality may vary depending on your environment. Refactoring code Suppose that you have a function that is long and difficult to understand. Refactoring code can make it easier to understand and ensure pieces of it aren’t too unwieldy to follow. To use GitHub Copilot to help you with this refactoring task, open up Copilot Chat and do the following: Highlight the function you want to refactor in your code editor. In Copilot Chat, send the prompt please provide refactoring suggestions. Review the changes that Copilot suggests. It might break the code up into smaller pieces or optimize the logic for better performance. It might even update variable names to be aligned with your naming conventions. Once you’re comfortable with the suggested changes, click the Apply in editor button to apply the changes and have Copilot automatically update the file. This works well for small changes, but there’s no reason to stop there. This is just if you want to focus Copilot’s attention on a specific area of your code. You can also have it look across entire files or your project. For example, take a look at this dashboard component. Let’s say you want to improve it. To do so, open up the component in your editor and send Copilot Chat the following prompt: How can I improve this code? Copilot will then give several suggestions on ways the code can be improved. You can review these suggestions and even ask Copilot to explain each step in greater detail. When you’re finished, click the Apply in editor button to have Copilot make the necessary changes. To see this in action, check out the video version of this episode. Just remember that since Copilot is a generative AI tool, the suggestions you see might not match those in the video exactly. You can take this a step further by asking specific and direct questions. For example, you might want to make the data fetching logic reusable across components by creating a custom hook and centralizing the logic. To do this, create a new chat conversation and ask it the following: How can I extract the data fetching logic into a custom hook? Copilot generates refactored code that allows you to extract the logic out of the Dashboard component into a new hook directory that you can use in multiple components in the app. This makes it much more reusable! To follow through on this: Save the changes in a new file by selecting … > Insert into New File. Import the hook into the dashboard file. Remove the old code. Now what if you wanted Copilot to take a look and make sure you didn’t have a bunch of redundant code in your file? Just ask it. Is there any redundant code in this file? Copilot scans your code and identifies any redundancies that can be corrected. After reviewing the suggestions, go ahead and apply them to tighten up your code and make it a bit cleaner. Reviewing and refactoring your code with GitHub Copilot is a great way to do an initial overview of the work you’ve done. You can also ask Copilot for performance improvement suggestions, how to make functions more modular, have it add comments, or upgrade syntax to be more modern. If you can think of a question, ask Copilot and see what it can do. Code reviews in github.com If you have the proper access, you can also get GitHub Copilot code reviews directly on github.com to make the process even more seamless. First, open up a pull request. Under the “Reviewers” section in the top-right corner, you’ll notice Copilot listed as a possible reviewer. Click Request to have Copilot review your code. Once Copilot finishes the review, scroll down on the pull request to see any suggestions that it makes. It’s important to note that Copilot always leaves a Comment review, and never an Approve or Request changes review. This means that Copilot’s reviews will never be required nor block merges. To accept any of Copilot’s suggestions, click Commit suggestion at the bottom of the specific suggestion you’d like to integrate. This pulls up a context menu. Click Commit changes and GitHub will update your pull request with that change. You can also batch several suggested changes by clicking the Add to batch button under individual suggestions so they are pulled into one change. After you’ve integrated any suggestions and made any changes, you can request another review from Copilot by clicking the circular arrows in the “Reviewers” box next to Copilot’s name. With Copilot code review, you can have Copilot perform a preliminary review of your code before asking your team for that final code review.  Key components and limitations The key components of using Copilot for code review

tech blog

How GitHub engineers tackle platform problems

In my spare time I enjoy building Gundam models, which are model kits to build iconic mechas from the Gundam universe. You might be wondering what this has to do with software engineering. Product engineers can be seen as the engineers who take these kits and build the Gundam itself. They are able to utilize all pieces and build a working product that is fun to collect or even play with! Platform engineers, on the other hand, supply the tools needed to build these kits (like clippers and files) and maybe even build a cool display so everyone can see the final product. They ensure that whoever is constructing it has all the necessary tools, even if they don’t physically build the Gundam themselves. About a year ago, my team at GitHub moved to the infrastructure organization, inheriting new roles and Areas of Responsibility (AoRs). Previously, the team had tackled external customer problems, such as building the new deployment views across environments. This involved interacting with users who depend on GitHub to address challenges within their respective industries. Our new customers as a platform engineering team are internal, which makes our responsibilities different from the product-focused engineering work we were doing before. Going back to my Gundam example, rather than constructing kits, we’re now responsible for building the components of the kits. Adapting to this change meant I had to rethink my approach to code testing and problem solving. Whether you’re working on product engineering or on the platform side, here are a few best practices to tackle platform problems. Understanding your domain One of the most critical steps before tackling problems is understanding the domain. A “domain” is the business and technical subject area in which a team and platform organization operate. This requires gaining an understanding of technical terms and how these systems interact to provide fast and reliable solutions. Here’s how to get up to speed:  Talk to your neighbors: Arrange a handover meeting with a team that has more knowledge and experience with the subject matter. This meeting provides an opportunity to ask questions about terminology and gain a deeper understanding of the problems the team will be addressing.  Investigate old issues: If there is a backlog of issues that are either stale or still persistent, they may give you a better understanding of the system’s current limitations and potential areas for improvement. Read the docs: Documentation is a goldmine of knowledge that can help you understand how the system works.  Bridging concepts to platform-specific skills While the preceding advice offers general guidance applicable to both product and platform teams, platform teams — serving as the foundational layer — necessitate a more in-depth understanding. Networks: Understanding network fundamentals is crucial for all engineers, even those not directly involved in network operations. This includes concepts like TCP, UDP, and L4 load balancing, as well as debugging tools such as dig. A solid grasp of these areas is essential to comprehend how network traffic impacts your platform. Operating systems and hardware: Selecting appropriate virtual machines (VMs) or physical hardware is vital for both scalability and cost management. Making well-informed choices for particular applications requires a strong grasp of both. This is closely linked to choosing the right operating system for your machines, which is important to avoid systems with vulnerabilities or those nearing end of life. Infrastructure as Code (IaC): Automation tools like Terraform, Ansible, and Consul are becoming increasingly essential. Proficiency in these tools is becoming a necessity as they significantly decrease human error during infrastructure provisioning and modifications.  Distributed systems: Dealing with platform issues, particularly in distributed systems, necessitates a deep understanding that failures are inevitable. Consequently, employing proactive solutions like failover and recovery mechanisms is crucial for preserving system reliability and preventing adverse user experiences. The optimal approach for this depends entirely on the specific problem and the desired system behavior. Knowledge sharing By sharing lessons and ideas, engineers can introduce new perspectives that lead to breakthroughs and innovations. Taking the time to understand why a project or solution did or didn’t work and sharing those findings provides new perspectives that we can use going forward. Here are three reasons why knowledge sharing is so important:  Teamwork makes the dream work: Collaboration often results in quicker problem resolution and fosters new solution innovation, as engineers have the opportunity to learn from each other and expand upon existing ideas. Prevent lost knowledge: If we don’t share our lessons learned, we prevent the information from being disseminated across the team or organization. This becomes a problem if an engineer leaves the company or is simply unavailable. Improve our customer success: As engineers, our solutions should effectively serve our customers. By sharing our knowledge and lessons learned, we can help the team build reliable, scalable, and secure platforms, which will enable us to create better products that meet customer needs and expectations! But big differences start to appear between product engineering and infrastructure engineering when it comes to the impact radius and the testing process. Impact radius With platforms being the fundamental building blocks of a system, any change (small or large) can affect a wide range of products. Our team is responsible for DNS, a foundational service that impacts numerous products. Even a minor alteration to this service can have extensive repercussions, potentially disrupting access to content across our site and affecting products ranging from GitHub Pages to GitHub Copilot.  Understand the radius: Or understand the downstream dependencies. Direct communication with teams that depend on our service provides valuable insights into how proposed changes may affect other services. Postmortems: By looking at past incidents related to our platform and asking “What is the impact of this incident?”, we can form more context around what change or failure was introduced, how our platform played a role in it, and how it was fixed. Monitoring and telemetry: Condense important monitoring and logging into a small and quickly digestible medium to give you the general health of the system.

tech blog

GitHub Availability Report: May 2025

In May, we experienced three incidents that resulted in degraded performance across GitHub services. May 1 22:09 UTC (lasting 1 hour and 4 minutes) On May 1, 2025, from 22:09 UTC to 23:13 UTC, the Issues service was degraded and users weren’t able to upload attachments. The root cause was identified to be a new feature which added a custom header to all client-side HTTP requests, causing CORS errors when uploading attachments to our provider. We estimate that ~130k users were impacted by the incident for ~45min. We mitigated the incident by rolling back the feature flag that added the new header at 22:56 UTC. In order to prevent this from happening again, we are adding new metrics to monitor and ensure the safe rollout of changes to client-side requests. We have since deployed an augmented version of the feature based on learnings from this incident that is performing well in production. May 28 09:45 UTC (lasting 5 hours) On May 28, 2025, from approximately 09:45 UTC to 14:45 UTC, GitHub Actions experienced delayed job starts for workflows in public repos using Ubuntu-24 standard hosted runners. This was caused by a misconfiguration in backend caching behavior after a failover, which led to duplicate job assignments reducing overall capacity in the impacted hosted runner pools. Approximately 19.7% of Ubuntu-24 hosted runner jobs on public repos were delayed. Other hosted runners, self-hosted runners, and private repo workflows were unaffected. By 12:45 UTC, the configuration issue was fixed through updates to the backend cache. The pools were also scaled up to more quickly work through the backlog of queued jobs until queuing impact was fully mitigated at 14:45 UTC. We are improving failover resiliency and validation to reduce the likelihood of similar issues in the future. May 30 08:10 UTC (lasting 7 hours and 50 minutes) On May 30, 2025, between 08:10 UTC and 16:00 UTC, the Microsoft Teams GitHub integration service experienced a complete service outage. During this period, the integration was unable to process user requests or deliver notifications, resulting in a 100% error rate across all functionality, with the exception of link previews. This outage was caused by an authentication issue with our downstream authentication provider. While the appropriate monitoring was in place, the alerting thresholds were not sufficiently sensitive to trigger a timely response, resulting in a delay in incident detection and engagement. Once engaged, our team worked closely with the downstream provider to diagnose and resolve the authentication failure. However, longer-than-expected response times from the provider contributed to the extended duration of the outage. We mitigated the incident by working with our provider to restore service functionality and are working to migrate to more durable authentication methods to reduce the risk of similar issues in the future. Please follow our status page for real-time updates on status changes and post-incident recaps. To learn more about what we’re working on, check out the GitHub Engineering Blog. The post GitHub Availability Report: May 2025 appeared first on The GitHub Blog. ​ Company news, News & insights, GitHub Availability Report The GitHub Blog

tech blog

How the GitHub billing team uses the coding agent in GitHub Copilot to continuously burn down technical debt

One of the beautiful things about software is that it’s always evolving. However, each piece carries the weight of past decisions made when it was created. Over time, quick fixes, “temporary” workarounds, and deadline compromises compound into tech debt. Like financial debt, the longer you wait to address it, the more expensive it becomes. It’s challenging to prioritize tech debt fixes when deadlines loom and feature requests keep streaming in. Tech debt work feels like a luxury when you’re constantly in reactive mode. Fixing what’s broken today takes precedence over preventing something from possibly breaking tomorrow. Occasionally that accumulated tech debt even results in full system rewrites, which are time-consuming and costly, just to achieve parity with existing systems. Common approaches to managing tech debt, like gardening weeks (dedicated sprints for tech debt) and extended feature timelines, don’t work well. Gardening weeks treat tech debt as an exception rather than ongoing maintenance, often leaving larger problems unaddressed while teams postpone smaller fixes. Extended timelines create unrealistic estimates that can break trust between engineering and product teams. The fundamental problem is treating tech debt as something that interrupts normal development flow. What if instead you could chip away at tech debt continuously, in parallel with regular work, without disrupting sprint commitments or feature delivery timelines? Using AI agents to routinely tackle tech debt Managing tech debt is a big opportunity for AI agents like the coding agent in GitHub Copilot. With AI agents like the coding agent in GitHub Copilot, tech debt items no longer need to go into the backlog to die. While you’re focusing on the new features and architectural changes that you need to bring to your evolving codebase, you can assign GitHub Copilot to complete tech debt tasks at the same time.  Here are some examples of what the coding agent can do: Improve code test coverage: Have limited code testing coverage but know you’ll never get the buy-in to spend time writing more tests? Assign issues to GitHub Copilot to increase test coverage. The agent will take care of it and ping you when the tests are ready to review. Swap out dependencies: Need to swap out a mocking library for a different one, but know it will be a long process? Assign the issue to swap out the library to GitHub Copilot. It can work through that swap while you’re focusing your attention elsewhere. Standardize patterns across codebases: Are there multiple ways to return and log errors in your codebase, making it hard to investigate issues when they occur and leading to confusion during development? Assign an issue to GitHub Copilot to standardize a single way of returning and logging errors. Optimize frontend loading patterns: Is there an area where you are making more API calls than your application really needs? Ask GitHub Copilot to change the application to only make those API calls when the data is requested, instead of on every page load. Identify and eliminate dead code: Is there anywhere in your project where you may have unused functions, outdated endpoints, or stale config hanging out? Ask GitHub Copilot to look for these and suggest ways to safely remove them. If those examples sound very specific, it’s because they are. These are all real changes that my team has tackled using GitHub Copilot coding agent—and these changes probably wouldn’t have occurred without it. The ability for us to tackle tech debt continuously while delivering features has grown exponentially, and working AI agents into our workflow has proven to be incredibly valuable. We’ve been able to reduce the time it takes to remove tech debt from weeks of intermittent, split focus to a few minutes of writing an issue and a few hours reviewing and iterating on a pull request. What’s the difference between agent mode and coding agent in GitHub Copilot? While they’re both AI agents, they’re tuned for different parts of your day-to-day workflows. See how to use them both to work more efficiently. This isn’t about replacing human engineers; it’s about amplifying what we do best. While agents handle the repetitive, time-consuming work of refactoring legacy code, updating dependencies, and standardizing patterns across codebases, we can focus on architecture decisions, feature innovation, and solving complex business problems. The result is software that stays healthier over time, teams that ship faster, and engineers who spend their time on work that actually energizes them. When AI is your copilot, you still have to do the work The more I learn about AI, the more I realize just how critical humans are in the entire process. AI agents excel at well-defined, repetitive tasks, the kind of tech debt work that’s important but tedious. But when it comes to larger architectural decisions or complex business logic changes, human judgment is still irreplaceable. Since we are engineers, we know the careful planning and tradeoff considerations that come with our craft. One wrong semicolon, and the whole thing can come crashing down. This is why every prompt requires careful consideration and each change to your codebase requires thorough review. Think of it as working with a brilliant partner that can write clean code all day but needs guidance on what actually matters for your application. The AI agent brings speed and consistency; it never gets tired, never cuts corners because it’s Friday afternoon, and can maintain focus across hundreds of changes. But you bring the strategic thinking: knowing which tech debt to tackle first, understanding the business impact of different approaches, and recognizing when a “quick fix” might create bigger problems down the line. The magic happens in the interaction between human judgment and AI execution. You define the problem, set the constraints, and validate the solution. The agent handles the tedious implementation details that would otherwise consume hours of your time. This partnership lets you operate at a higher level while still maintaining quality and control. Tips to make the most of the coding agent in GitHub Copilot Here’s what I’ve learned from using the coding

tech blog

Your AI PC Software Strategy: Build, Buy or Both?

Learn how to maximize the value of your Dell AI PCs by understanding a straightforward AI PC software strategy.   ​  ​Learn how to maximize the value of your Dell AI PCs by understanding a straightforward AI PC software strategy. Artificial Intelligence Blog | Dell

tech blog

Elevating Innovation with Dell’s AI Data Platform

At Dell Technologies World this year, the spotlight was on the next wave of innovation. Breakout sessions took a deep …   ​  ​At Dell Technologies World this year, the spotlight was on the next wave of innovation. Breakout sessions took a deep … PowerScale Blog | Dell

tech blog

Operationalizing Network Transformation to Power Business Growth

Are you facing challenges with telecom cloud operations? Learn how Dell’s Support & Adoption services help CSPs overcome barriers and drive transformation.   ​  ​Are you facing challenges with telecom cloud operations? Learn how Dell’s Support & Adoption services help CSPs overcome barriers and drive transformation. Cloud Transformation Blog | Dell

tech blog

How to create issues and pull requests in record time on GitHub

Software development has always started with a conversation: What problem are we solving, why does it matter, and what does “finished” look like? On GitHub, that conversation crystallizes in an issue. No matter what tools you’re using or who you’re working with, a well-designed issue still sets the agenda for pull requests (PR), reviews, tests, and deploys. That principle hasn’t changed—but how we get from idea to issue to PR is changing fast, with Copilot helping to speed things up. By asking Copilot to draft an issue, you can quickly design a clear plan for moving forward. Then (and here’s the fun part) you can assign that issue directly to the new GitHub Copilot coding agent, which will asynchronously work to execute on the task at hand and give you a PR.  This is a new way of working. But the basic developer experience is simple, familiar and—dare I say—GitHubby.  In this blog, we’ll talk about: Why issues remain the backbone of work on GitHub—whether they’re written by you or drafted by Copilot. Best practices for building great issues when working with your team or Copilot. How a Copilot-oriented workflow helps you move faster, enforces consistency, and tees up the Copilot coding agent for hands‑off fixes. Let’s jump in.  Why great issues and pull requests are critical GitHub Issues and pull requests are some of the core building blocks on GitHub. Each issue describes a discrete piece of work, and offers helpful details, requirements, and more for whoever picks up that piece of work. PRs bundle the completed work for code reviews and merging.  Even in an AI‑accelerated workflow, these two artifacts are how present and future teams understand what happened and why. Regardless of who (or what) authors them, well‑structured issues and pull requests deliver four key benefits: Shared context: One URL captures the problem statement, reproduction steps, and definition of done. Anyone joining next week—or next year—can catch up in minutes. And as we say at GitHub, if it doesn’t have a URL it didn’t happen.  Async coordination: Whether teams are working across timezones, or simply looking to stay heads-down, meetings often add complexity and overhead. Issues free up time by letting developers work asynchronously, meeting only when it will add value.  Audit and analytics: Labels, milestones, and templates feed dashboards, SLAs, and compliance reporting. Automation hooks: Actions workflows, project boards, and agentic tools rely on predictable metadata attached to every issue. Miss the structure and every downstream step—human or AI—slows down. Need an example? Here’s an issue I’ve been looking at today (and no, I’m not going to name and shame anyone): Issue #12609: Found broken link. Please fix! …and that’s it! Just a title with no explanation in the body, no actual link, no context, no environment or version info, and no reproducible example or proposed fix.  As developers, we need well-crafted issues in order to dive into any project we get asked to do, and we need to write good issues to help teammates work effectively. AI is no exception: Large language models perform best when objectives, constraints, and success criteria are explicit. A vague prompt leads to vague output, whether it’s created by a human or a machine. Here’s the thing: By allowing Copilot to assist with issue creation, you get to focus on clarity, not copy pasting, as Copilot locates the relevant references, builds out the initial issue structure, and even adds labels or project assignments. The anatomy of a great GitHub Issue Use this checklist when you create—or review—an issue (yes, Copilot writes these for you, but you’re still in charge): Action‑forward title: Lead with the noun and follow with the verb: “Login button – disable on Safari 17 beta” beats “Some login thing?” Problem or user story: Frame the pain: “As a shopper, I can’t click Buy on mobile Safari, so I abandon the cart and cry.” Expected vs. actual behavior: Two quick bullets: “Should render primary button” vs. “Button unclickable, no CSS pointer‑events.” Reproduction steps or visual evidence: GIFs, screenshots, or command-line specifics—whatever helps a teammate (or Copilot) quickly understand the problem. Acceptance criteria / definition of done: Straightforward pass/fail criteria, such as “all tests pass”, “Lighthouse score > 90”, “feature flag removed”. Scope and constraints: Guardrails to prevent yak‑shaving: perf budgets, browser list, no new dependencies. Metadata (labels, assignee, milestone, project): It’s the secret sauce that powers boards, filters, and Slack notifications. Miss anything and async breaks down. Nail this format and Copilot—and your team—can move fast. How to draft issues on GitHub faster with Copilot Great issues share two traits: they’re fast to write and rich in context. GitHub Copilot’s Create Issue flow gives you both. Instead of hopping between fields or copy‑pasting snippets, you can open Copilot Chat and describe the problem in plain language:  “Create a bug report about a 500 error on the login form in octo-org/octo‑web.” Copilot drafts the title, body, and even suggests labels and an assignee—drawing on your repository’s preferred template so the issue lands in the right format every time. Here’s the step-by-step guide:  Open Copilot Chat’s immersive view at github.com/copilot. Describe what you need. Mention the repo (org/repo) or let Copilot infer it from where you last filed an issue. Drop in a screenshot if a picture tells the story faster; Copilot will embed it in the draft and reference it in the description. Review the draft. Ask follow‑up prompts (“add repro steps,” “switch to the bug template”) or tweak the Markdown directly. Template switches keep your content—no rewriting required. Click Create when it looks good. Tips for building great issues with GitHub Copilot What you do How Copilot helps Why it matters Lead with context (expected vs. actual, repro steps) Parses your wording into the right template sections. Teammates (or Copilot) get clarity. Attach evidence (screens, logs) “Image‑to‑issue” persists the file in the issue body. Future debuggers see exactly what you saw. Tag next actions (“assign to Copilot”, “label frontend”) Adds assignee, labels, milestones in one go. Keeps boards tidy and workflows automated. Batch

tech blog

Assigning and completing issues with coding agent in GitHub Copilot

You’ve used GitHub Copilot to help you write code in your IDE. Now, imagine assigning Copilot an issue, just like you would a teammate—and getting a fully tested pull request in return.  That’s the power of the new coding agent in GitHub Copilot. Built directly into GitHub, this agent starts working as soon as you assign it a GitHub Issue or prompt it in VS Code. Keeping you firmly in the pilot’s seat, the coding agent builds pull requests based on the issues you assign it. This isn’t just autocomplete. It’s a new class of software engineering agents that work asynchronously to help you move faster, clean up tech debt, and focus on the work that really matters. Let’s explore how this coding agent works and how it can help you find new ways of working faster. ✨ Oh, and if you’re a visual learner we have you covered. 👇 Coding agent in GitHub Copilot 101 This new coding agent, which is our first asynchronous software engineering agent, is built on GitHub Actions and works like a teammate. You assign it an issue, let it do the work, and then review its outputs before changing or accepting them. It also incorporates context from related issues or PR discussions and can follow custom repository instructions that your team has already set. You assign Copilot an issue and it plans the work, opens a pull request, writes the code, runs the tests, and then asks for your review. If you leave feedback, it’ll revise the PR and keep going until you approve.  The process isn’t instant—it takes a little time to compute and run. But it’s already helping developers work faster and more efficiently.  What’s the difference between the coding agent and agent mode? Agent mode is a synchronous collaborator that pairs with you as you work: It works inside your IDE of choice, whether VS Code or JetBrains, Eclipse, and Xcode, as a real-time collaborator that iterates on code, runs tests, and fixes its own mistakes in real time. Coding agent is an asynchronous collaborator and works on your behalf like a teammate: It is an SWE agent that runs inside GitHub Actions, picks up issues you assign, explores the repo for context, writes code, passes tests, and opens a pull request for your review. BTW: Both use Copilot premium requests, and coding agent uses GitHub Actions minutes, so plan and budget accordingly with your teams. According to Brittany Ellich, Senior Software Engineer at GitHub, traditional advice for devs has been to do one thing at a time, and do it well. But with the new coding agent, GitHub can now help you do more things well, like: Offloading repetitive, boilerplate tasks like adding and extending unit tests Maintaining better issue hygiene and documentation with quick typo fixes and small refactors Improving user experience by fixing bugs, updating user interface features, and bolstering accessibility By assigning these low- to medium-complexity tasks to the coding agent, you may finally have the bandwidth to focus on higher-level problem solving and design, tackle that tech debt that’s been piling up, learn new skills, and more. Even though Copilot is doing the work, you’re in control the entire time: You decide what to assign, what to approve, and what should be changed. Need help building issues? Copilot’s at the ready. Copilot can also build issues with the preview of Copilot’s Create Issue flow. This new feature enables you to build multiple issues quickly by drawing on the full context of your prompt and project. Learn more > How to get the coding agent to complete an issue Step one: Write and assign the issue to Copilot This is where you’ll be most involved—and this step is crucial for success. Think of writing the issue like briefing a team member: The more context you give, the better the results (like any other prompt).  Make sure to include: Relevant background info: Why this task matters, what it touches, and any important history or context.  Expected outcome: What “done” looks like. Technical details: File names, functions, or components involved. Formatting or linting rules: These are especially important if you use custom scripts or auto-generated files. You can add these instructions for Copilot so it’s automatically reflected in every issue.  Once you’ve written the issue, it’s time to assign it to Copilot—just like you would a teammate. You can do this via github.com, the GitHub Mobile app, or through the GitHub CLI.  Copilot works best with well-scoped tasks, but it can handle larger ones. It just might take a little bit longer. You don’t have to assign only one issue; you can batch-assign multiple issues, which is great for tasks like increasing test coverage or updating documentation. Here are a few tips and tricks that we’ve found helpful: You can use issue templates with fields like “description” and “acceptance criteria” to make writing issues easier and more consistent across your team.  If your repo includes custom instructions (such as which files are auto-generated or how to run formatters), Copilot will use these to improve its output. The agent can actually see images included in its assigned issues on GitHub, so you can easily share images of what you want your new feature to look like, and the agent can run with it.  Step two: Copilot plans the code  Once you assign Copilot an issue, it will add an 👀 emoji reaction. Then it will kick off an agent session using GitHub Actions, which powers the integrated, secure, and fully customizable environment the coding agent is built on.  This environment is where Copilot can explore and analyze your codebase, run tests, and make changes. The coding agent will simultaneously open both a branch and a pull request, which will evolve as Copilot works.  Copilot will read your issue and break it down into a checklist of tasks, then update the pull request with this checklist. As it completes each task, Copilot checks it off and pushes commits to the branch.

Scroll to Top