INITIALIZING
tech blog

Microsoft Ability Summit 2025: Accessibility in the AI era

Today, we hosted the 15th annual Microsoft Ability Summit, with over 20,000 attendees from 164 countries coming together virtually to discuss the future of AI and accessibility. Microsoft has a long-standing commitment to investing in accessibility, grounded in our business model and going back over three decades from the earliest accessibility features in Windows 95 and continuing today with new hardware and software functionalities powered by AI. We are innovating faster than ever before and people with disabilities continue to lead the way. Accessibility is a fundamental right for people with disabilities and makes technology easier for everyone. We see this reflected in how customers are using Microsoft technologies around the world. Copilot for Microsoft 365 is unlocking workplace productivity like never before, more than 10 million people use Edge each month to have the web Read Aloud, over 1 million people use Immersive Reader to make webpages easier to read and partners like Tobii Dynavox and Special Olympics are bringing AI to people with disabilities globally. And these are just some of the highlights of what we shared today! Here’s a quick summary of the new accessibility products, features and programs announced at the 2025 Ability Summit. What’s new in 2025? We announced that the Xbox Adaptive Joystick is now available for purchase exclusively at Microsoft Store. With more than 429 million players with disabilities worldwide, we know each player has unique needs and preferences for how they choose to play. The Xbox Adaptive Joystick is a singular, wired controller primarily designed to meet the needs of players with limited mobility. Its versatility helps players seamlessly incorporate it into their existing gaming setups. Built with the Gaming and Disability community who inform the development of Xbox products from the beginning. The joystick joins our family of adaptive accessories including the mouse, pen, adaptive kit and Xbox Adaptive Controller. For more details visit Xbox Support. And all our Microsoft hardware comes in packaging designed to be accessible and sustainable. No more plastic clamshells! To help others with accessible packaging, today at the Summit, the Packaging and Content Team at Microsoft published its Accessible Packaging Design Guide, which offers practical guidelines, best practices and strategies to create accessible packaging and foster a trusted customer experience. At the Summit, Microsoft teams and partners also shared ways they are working to further advance accessibility through technology: Tobii Dynavox is integrating Microsoft Neural Voice, a capability of Azure AI Speech, into their assistive communication solutions. This AI-powered feature gives more personal options for individuals who use assistive communication devices using eye gaze. Neural Voices are available in over 50 languages within their apps TD Talk and TD Phone. Microsoft Teams will improve for those using Sign Language View. Later this year, Teams will be able to identify when someone is using sign language and feature them prominently as a speaker in the meeting. These video customizations are part of our ongoing product development to help deliver clear and accessible communication for everyone. Copilot is powering neurodiverse talent. Recently, an EY study found that Copilot helped 76% of neurodiverse employees perform better at work by enhancing communication, memory recall and focus. At the Summit, we shared how new simple features like Team Reflow and PowerPoint Designer are helping people do their work. See four early adopters of Copilot in New York share their stories. YouTube Video Click here to load media AI comes to Narrator. Rich image descriptions powered by AI will be coming to Narrator in Windows Insider Preview this spring and Azure AI Foundry announced new UI improvements to reduce cognitive load. Over 5 million learners around the world have participated in our Accessibility Skilling program and we’re grateful to our partners including Teach Access, Computacenter UK and the City of New York. The free, virtual training includes the latest on AI and is available for organizations to use in their learning management systems. Speech recognition improved up to 60%. The Speech Accessibility Project, led by the University of Illinois Urbana-Champaign, unlocked a breakthrough improving accuracy gains for non-standard speech, and the Azure platform team demonstrated how developers can leverage GitHub Copilot to write accessible code. Special Olympics shared how Copilot has been a game-changing training companion for their coaches and athletes with intellectual and development disabilities for the Special Olympics World Winter Games in Turin, Italy. All this progress is possible because of the people who design technology with accessibility in mind. In this way, technology benefits everyone, creating a more productive and efficient workplace. It is beautiful to see that reflected in this profile of Dave Dame, Senior Director of Accessibility and Human Factors at Microsoft, where he shared how accessible technology helps him thrive as a leader. Onward For over 30 years, Microsoft has focused on accessibility in our products. Accessibility makes our tools and technologies easier for everyone and accelerates innovation for the world. From the introduction of Sticky Keys and speech recognition in Windows 95 to Seeing AI in 2016 and beyond, accessibility innovations have benefited people in ways we designed for and ways we could have never expected. Just think about how closed captions are now invaluable for everyone watching videos and calls. AI has the potential to create significant advancements across every sector of our economy and society. We will continue to be grounded and responsible in our approach as we work to get the latest technology to the people who can benefit from it the most. Whether this is your first or fifteenth Ability Summit, thank you for joining and we hope you picked up a new feature, skill or nugget that helps you, your community or your organization get the most out of technology. All content will be available to watch after the event. Let’s move forward together. The post Microsoft Ability Summit 2025: Accessibility in the AI era appeared first on The Official Microsoft Blog. ​Today, we hosted the 15th annual Microsoft Ability Summit, with over 20,000 attendees from 164 countries coming

tech blog

Not just for developers: How product and security teams can use GitHub Copilot

In today’s fast-paced world where collaboration between technical and non-technical teams is vital, tools like GitHub Copilot are proving to be indispensable. These AI-powered tools are no longer just the secret weapons of developers—they’re becoming essential productivity boosters for product managers, program managers, security professionals, scrum masters, community managers, and quality analysts alike. While Copilot is widely praised for its role as a pair programmer, its potential stretches far beyond writing code. From automating tedious tasks to making complex processes more accessible, this tool is transforming how non-technical professionals tackle their daily challenges. Let’s take a look at how GitHub Copilot makes it easier for teams to work smarter, solve problems faster, and accomplish more together. 💪 Generating and reformatting Markdown When working in GitHub, writing Markdown is a necessity. Whether you’re adding documentation, creating a report, opening an issue, or starting a discussion on GitHub, it’s all done in Markdown. This can be overwhelming when getting started, as Markdown requires familiarity with its syntax to add elements like headers, tables, lists, hyperlinks, and images, to name a few. Copilot can significantly ease this process by generating a template to work from, allowing you to focus on the content rather than the formatting. For example, let’s say you’re tasked with creating a fresh new README for your team’s repository. You can quickly generate a template using a prompt like this: Create a README file for my team’s GitHub repo. The file should include sections for our team’s objective, a link to our project’s roadmap, and a team roster. The team roster should include small versions of our GitHub profile pictures, using ashtom as a placeholder, as well as the person’s name and role. https://github.blog/wp-content/uploads/2025/03/1.-Generating-and-reformatting-markdown-1-of-3.mp4#t=0.001 While this is a great start, you can further optimize Copilot by adding some of GitHub’s Markdown syntax documentation to your Copilot custom instructions file. With this change you’ll find that Copilot is more likely to include GitHub-specific Markdown styling like alerts, emojis, and color models that make your content pop. Copilot can also take raw, unstructured data and format it into Markdown. For example, maybe you have some notes captured in a separate application and you’re looking to move those notes into GitHub. Skip the intricate reformatting step by asking Copilot to do it for you: Reformat the following content into Markdown code: <paste in raw unstructured notes> And within seconds you’ll have a new version of your notes that are ready to make their way into a Markdown file, issue, or discussion: Reviewing content with Copilot On top of helping you write and format content, Copilot can review content for typos, style, and clarity. And let’s face it, after working on the same document for hours a second set of eyes can go a long way. To start a Copilot review, highlight all of the text that you want Copilot to analyze, right click and select the Copilot sub-menu and click Review and Comment. You can further customize Copilot’s review instructions by configuring the Copilot Chat settings in VS Code. This is great when you want Copilot to critique your work in specific ways like having Copilot assume a certain role, or encouraging Copilot to think about a specific target audience. Automating reporting and spreadsheet manipulation Working with spreadsheets is a crucial yet time-consuming task for many professionals, especially project managers and security analysts. Whether it’s tracking project progress, generating compliance reports, or analyzing security logs, manually processing data can be a tedious and error-prone process. With GitHub Copilot, you can automate these repetitive tasks, streamline data manipulation, and generate reports faster—all with AI-assisted code suggestions. With just a beginner level understanding of Python, Copilot can teach you how to code as it helps you write a script to process and manipulate your files. Let’s take a look at how to do that in action, starting with a prompt that clarifies your experience and intent: Create a Python script that parses this CSV file and creates new CSV files for each unique Assignee with their tasks. Let’s think step by step. Explain the steps as if I have no prior experience with python. I’m using MacOS. Copilot explains how to perform the data manipulation with Python, as well as how to create and run a Python script. And if you run into an error, Copilot can help explain why it occurred and what you should do about it. https://github.blog/wp-content/uploads/2025/03/5.-Automating-reporting-and-spreadsheet-manipulation-1-of-1.mp4#t=0.001 Understanding code in natural language Non-technical team members often encounter snippets of code that seem like a foreign language. If you’re a community manager, for example, you might need help interpreting code while moderating discussions, assisting users, or collaborating with developers. Copilot Chat can translate that code into clear, simple language, helping you to understand its purpose without a computer science degree: Before: if (user.isAdmin) { grantAccess(); } After Copilot Chat: “This code checks if a user is an admin and grants them access if they are.” Copilot is also great at explaining what a GitHub Actions workflow does. While Actions is a great automation tool, there is certainly a learning curve associated with creating workflows. Copilot can act as a mentor, explaining what each part of the workflow does for those who are new and eager to learn. Take for example, this simple prompt to learn about an Actions workflow that has something to do with stale issues and pull requests: What does this workflow file do? Explain it as if I had no prior GitHub Actions experience. https://github.blog/wp-content/uploads/2025/03/3.-Understanding-code-in-natural-language-1-of-1.mp4#t=0.001 Creating GitHub Issue templates Issue templates are a great way to streamline the collection of information in a consistent fashion by providing a template in Markdown. Issue forms provide a more user-friendly method for gathering that information, but require knowledge of YAML and specific keywords. Copilot can help elevate your issue template game by providing the YAML boilerplate code needed for issue forms. Start by prompting Copilot with an outline of what you want to achieve, being as specific as possible about default labels,

tech blog

GitHub Availability Report: February 2025

In February, we experienced two incidents that resulted in degraded performance across GitHub services. February 25 14:25 UTC (lasting 2 hours and 19 minutes) On February 25, 2025, between 14:25 UTC and 16:44 UTC, email and web notifications experienced delivery delays. At the peak of the incident, the delay resulted in ~10% of all notifications taking over 10 minutes to be delivered, with the remaining ~90% being delivered within 5-10 minutes. This incident was caused by worker pools running too close to capacity at peak times, resulting in a delay in queue processing. We mitigated the incident by scaling out the service to meet the demand. We’ve since established a higher baseline capacity to ensure no further delays occur, and we are improving our capacity planning to proactively manage our pool going forward. February 3 18:01 UTC (lasting 30 minutes) On February 3, 2025, at 18:01 UTC, an incident was declared due to failures in our Migration Tools. The root cause was traced to a deployment of a system component, which led to missing Docker images, causing a 100% outage for all users attempting migrations in this window. The issue was mitigated by rolling back to the previous stable version, restoring service within approximately 30 min. We have enhanced our test coverage and our workflows to ensure validation of critical dependencies. Please follow our status page for real-time updates on status changes and post-incident recaps. To learn more about what we’re working on, check out the GitHub Engineering Blog. The post GitHub Availability Report: February 2025 appeared first on The GitHub Blog.

tech blog

Why Java endures: The foundation of modern enterprise development

Here’s a true story: I learned Java after pretending to be an Android developer when I first started out in software development. While doing that, I quickly learned something important: Java isn’t just a convenient entry point into tech, it’s a strategic career choice. That’s why I want to examine what makes Java so interesting—and how you can either get started or brush up on your skills. After all, when you are trying to break into tech, especially when you’re coming from a non-traditional background like me (I began my career as an Army soldier and construction manager), you need a language that’s both learnable and employable. And, in my experience, knowing your way around Java opens doors that might otherwise stay closed to a newcomer. So, let’s jump in. What is Java? And what’s the difference between Java and JavaScript? When we think about the programming languages that form the backbone of enterprise software development, Java is one of the first names that comes to mind. At its core, Java is a versatile, object-oriented programming language, rooted in its “write once, run anywhere” (WORA) strength. Thanks to the Java Virtual Machine (JVM), it powers the foundation for scalable, secure applications across nearly every industry. Despite sharing part of its name with JavaScript, Java serves a distinctly different purpose. JavaScript is a lightweight language used predominantly for front-end web development, backend work, and full-stack applications. Meanwhile, Java is a general purpose language that is used for everything from backend development to desktop applications, mobile apps, and large-scale enterprise applications. Today, Java powers everything from your Spotify playlist in Android mobile to the Cash App transaction to split your dinner check. In short, Java powers massive systems that process millions of data transactions every day. And let’s clear something up: if you’re picturing verbose enterprise code running on dusty servers, it’s time for an update. Java has evolved from its enterprise roots, where it was largely used for powering payroll systems and customer databases, into a versatile platform driving everything from backend services to gaming to AI-powered applications such as Netflix and LinkedIn. With a history spanning three decades, Java has proven itself as a reliable, versatile, and constantly evolving language that continues to be a top choice for developers around the world. So, what is it about Java that has not only endured but thrived in an environment full of constant change? To understand this resilience and versatility, let’s take a step back and look at where Java came from and how it has grown over the years. The birth of Java: write once, run anywhere Java’s story begins back in 1991 when a team of engineers at Sun Microsystems, led by James Gosling, set out to create a language for interactive television. First developed under the name Oak, the language that would be renamed Java was designed to be simple, robust, and platform independent, using a virtual machine—later called a Java Virtual Machine, or JVM—to run code anywhere. While that original project didn’t quite pan out, it laid the groundwork for something much bigger. In 1995, Java 1.0 was officially released, and with it came a revolutionary promise: “Write Once, Run Anywhere” (WORA). This principle meant Java code could be written once and then run on any device that supports the Java platform, without needing to be recompiled for each operating system. Fun fact 💡 The name “Java” wasn’t the original choice for the language. In 1991, the project was initially called “Oak” by James Gosling and his team at Sun Microsystems, named after an oak tree outside Gosling’s office window. However, they discovered that Oak was already trademarked by another company. To fully appreciate the impact of this shift, it’s helpful to look back at the state of software development in the mid ‘90s. If you were a developer back then and you wanted your application to run on multiple operating systems (Windows, Mac, and Unix), you needed to write separate versions for each one. This meant learning the unique APIs, libraries, and quirks of each operating system—which was even more fun then than it is now (seriously, it was a slog). Updating and fixing had to be done platform by platform in a tedious grind like a messy game of Whac-A-Mole. One fix here, another patch there, and plenty of ways for things to go wrong. This fragmented approach was a significant barrier to building software for a wide, diverse audience. For enterprises looking to deploy applications across multiple environments, Java became an incredibly attractive choice. With the emergence of enterprise-focused frameworks like J2EE and Spring, coupled with strong corporate backing from Sun Microsystems and later Oracle, it provided the reliability and consistency that businesses needed. From complex to clear: Java’s evolution for new developers After 30 years, you might just say that Java has come a long way from its early days. Let’s take the release of Java 23 in September 2024 as an example. This update brought a host of new features and enhancements designed to make developers’ lives easier while keeping Java aligned with the needs of modern development. This included enhancements such as: Primitive types in patterns, instanceof, and switch (Preview – JEP 455), which allows primitive types like int and double to be used seamlessly with pattern matching and switch statements, simplifying code and reducing workarounds Markdown documentation comments (JEP 467), which lets developers write Java Docs using Markdown syntax to create more readable documentation directly in the source code One of the most notable changes was the simplification of the language’s entry point for new developers. The classic “Hello, World!” program, which is often the first thing a developer writes when learning a new language, was streamlined to just a few lines of code. The traditional version required understanding several complex concepts right from the start. Need proof? Here’s the old way: public class HelloWorld { // A class declaration that must match the file name public static void main(String[]


tech blog

Full exposure: A practical approach to handling sensitive data leaks

This post originally appeared in Infosecurity Magazine, and is republished here with permission. In the fast-paced world of software development, accidents can happen—even to the best of us. One such unfortunate event is the accidental leakage of sensitive data such as private or internal source code. When this occurs, companies often find themselves in a frantic rush to assess the situation, leading them down the rabbit hole of trying to determine just how exposed their sensitive data really is. However, this quest for degrees of exposure is a futile endeavor. There’s no such thing as “just a little bit exposed.” Instead, it’s better to opt for the more pragmatic approach: treat the exposure as full and complete from the moment it happens. The futility of chasing degrees of exposure Imagine your company’s sensitive data accidentally ends up in the public domain. An employee, for example, mistakenly posted it to a public repository. Panic sets in, and the first instinct is often to try and measure the extent of the exposure. Who accessed it? For how long? Did anyone download it? These questions are perfectly logical, but they’ll lead you down a time-consuming and fruitless path. The reality is the moment your sensitive data is public, it’s out there for anyone to see. The internet is a vast and anonymous space, and trying to pinpoint the exact degree of exposure can quickly become an exercise in chasing shadows. Treating exposure as inevitable Instead of dwelling on the question of “how exposed” you are, we should assume the worst from the outset. Your sensitive data is fully exposed; consider it a given. Embrace this assumption, and you can start taking practical steps to mitigate the potential fallout. Practical steps for moving forward Rotate exposed secrets: If your sensitive data contained secrets such as API keys or personal access tokens, assume that these have been compromised. Immediately rotate these secrets to prevent unauthorized access. Some data may need to be removed entirely. Assess impact: Focus on understanding the potential impact of the exposure. What vulnerabilities might arise from the leaked sensitive data? Perform a thorough security assessment to identify and address potential risks based on the premise that the sensitive data was fully exposed to the public. Communication: Transparent communication with stakeholders, customers, and the public is essential. Inform them of the situation, the steps you’re taking to mitigate risks, and any potential actions they should take. Legal considerations: Consult with legal experts to understand any legal ramifications of the leak. This could include potential intellectual property issues or contractual obligations. The benefits of treating exposure as full Speed: By assuming full exposure, you can act swiftly to mitigate risks and minimize potential damage. Clarity: There’s no ambiguity. You don’t waste time trying to determine the extent of exposure. Security: Rotating exposed secrets and conducting a thorough security assessment are prudent measures that enhance your overall security posture. Take this with you When it comes to handling sensitive data leaks, it’s time to shift our default mindset. Instead of asking “how exposed,” we should embrace the assumption of full exposure. By doing so, we can respond more effectively and focus on what truly matters: securing our systems, protecting sensitive data, and maintaining the trust of our stakeholders. In the world of cybersecurity, assuming the worst from the outset is a pragmatic approach that benefits developers and organizations alike. Avoid the exposure of private or sensitive data.Check out our best practices for preventing data leaks in your organization. The post Full exposure: A practical approach to handling sensitive data leaks appeared first on The GitHub Blog.

tech blog

Four steps toward building an open source community

Open source projects generally begin with a problem to be solved. If it’s a problem a lot of people have, it may gain traction. Eventually you might have many people contributing. Before you know it, your project might turn into more than just a project, but a community. That requires you as a maintainer to think differently about what you’re doing. It’s no longer just about writing code, but about facilitating relationships. In this article, we’ll explore four steps to take to help your open source project evolve into a healthy community. 1. Lay the ground work early It’s never too early to start thinking about community. The Astro team had community building in mind from the very beginning of the project. “It was one of the first things we focused on once we had a minimum viable product (MVP) together,” Astro co-creator Fred Schott told us in a Q&A on open source community building. There’s quite a bit you can do to prepare before people start showing up. Among the most important is creating contributor guidelines and adopting a code of conduct. “You’d be surprised at how early contributor guidelines come in handy,” Schott says. “You need to answer questions like ‘How do I clone the repo?’ or ‘How do I get the packages installed?’” These basic things might seem obvious. But maintainers have been in their codebases for so long that they forget how hard it can be for new people to get started. Many maintainers think a code of conduct isn’t something they need to worry about when the project is small and conflicts between contributors have yet to arise. But it’s best to have clearly articulated expectations and a plan for what to do if someone violates them before they are needed. “If you care about outside contributions at all, you should have a code of conduct, regardless of size,” Schott says. “It’s more about intent: If your goal is to build a community or encourage outside contributors on your project, then you’ll want a code of conduct. If your repo is meant to be a solo project, then I think you’re fine to skip it.” 2. Meet people where they are Building your own community spaces on platforms like Discord, Slack, and GitHub Discussions is important, but in the early days you need to meet people where they are. Graphile co-maintainer Jem Gillam says the team used F5bot to watch for mentions of Graphile across the web and social media so the team could answer questions and join conversations where they were already taking place. Eventually, as a project grows, a community will cohere in a particular place. Think offline, too. Conferences and meetups are a great way to meet current and potential users and contributors. “I go to conferences and let people know that we’re looking for contributors and that we’ll walk anyone through submitting their first pull request,” says dbatools creator and maintainer Chrissy LeMaire. “I entice people by letting them know they can safely cut their teeth with us.” 3. Lead by example Having a code of conduct is one thing. But it’s more important to conduct yourself the way you want your community to act. Schott emphasizes the importance of being patient with new users. “If you’re dismissive of the problems people face, they’ll leave,” he says. “First impressions are important.” It’s important to set the right tone. “If there’s something that has come up that’s really negative, we tend to give it time—we don’t react in the moment,” Gillam says. The team strives to assume good intent because often people might come across more harshly than they intend, especially if they’re not writing in their native language. “It’s very easy for people to think they have a silly question, but we encourage people to ask them anyway because if one person has a particular question other people probably do as well,” Gillam says. LeMaire recommends being open about what you don’t know and where you personally struggle. She livestreamed her work on Twitch to show people that even as a Microsoft Most Valuable Professional and GitHub Star she still struggled and made mistakes. “I show people that it’s OK not to know everything and that they don’t have to use the most intimidating or complicated tools to be effective,” she says. 4. Spotlight your contributors Be sure to show your appreciation for your contributors. You can thank them in the README file on your repo. LeMaire set up a LinkedIn company for dbatools and told contributors they were welcome to add themselves. It helped contributors spotlight their contributions outside of GitHub, and even helped some find jobs. Don’t forget to recognize the non-code contributors as well. “Our documentation used to assume that core contributors were technical contributors, so we had some technical requirements,” Schott explains. Initially, the Astro project required someone to make “significant code contributions” to become a core contributor. Now the team evalutates non-code contributions when considering whether to promote someone to core contributor status. “People contribute in lots of different ways, from documentation to community support,” Schott says. “We’ve updated our expectations accordingly.” Get started contributing to open source now! The post Four steps toward building an open source community appeared first on The GitHub Blog.

tech blog

Video: How to run dependency audits with GitHub Copilot

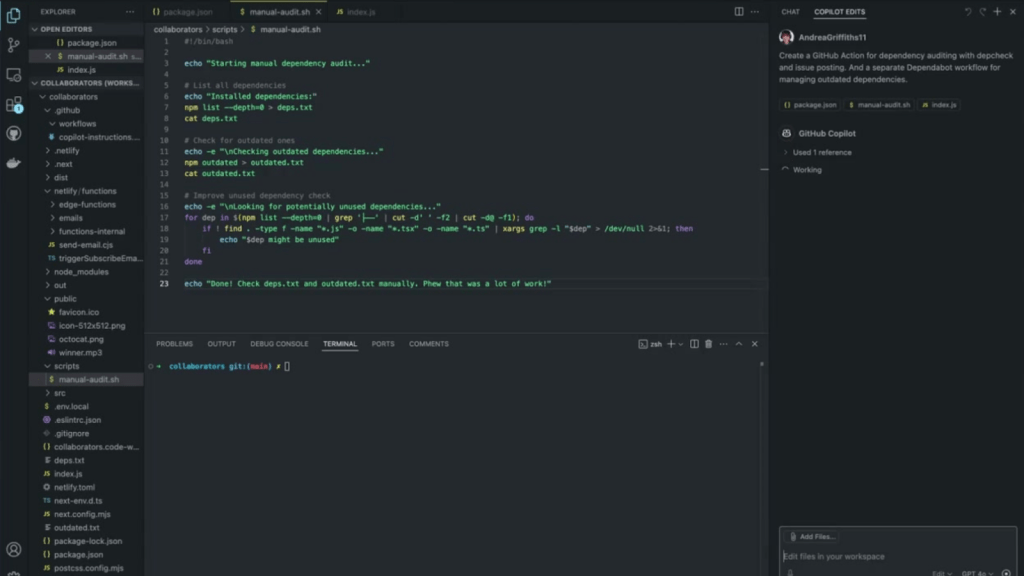
Every software project faces the inevitable challenge of dependency management. Over time, dependencies become outdated, leading to security vulnerabilities. Others go unused, needlessly bloating build times. For many development teams, addressing these issues means running manual scripts, reviewing output files, and hoping nothing falls through the cracks. I recently transformed this error-prone manual process into an automated solution using a few tools on GitHub—GitHub Copilot, GitHub Actions, and Dependabot, to be specific (just in case you’re wondering). Here’s how you can do the same! So, let’s jump in (and make sure to watch the video above, too!). The problem with manual dependency audits Most teams start with a simple approach to dependency management. This often includes a Bash script that runs periodically. Here’s what our manual script looks like: #!/bin/bash echo “Starting manual dependency audit…” # List all dependencies echo “Installed dependencies:” npm list –depth=0 > deps.txt cat deps.txt # Check for outdated ones echo -e “nChecking outdated dependencies…” npm outdated > outdated.txt cat outdated.txt # Guess at unused ones (very crude) echo -e “nLooking for potentially unused dependencies…” for dep in $(npm list –depth=0 | grep ‘├──’ | cut -d’ ‘ -f2 | cut -d@ -f1); do if ! find . -type f -name “*.js” -o -name “*.tsx” -o -name “*.ts” | xargs grep -l “$dep” > /dev/null 2>&1; then echo “$dep might be unused” fi done echo “Done! Check deps.txt and outdated.txt manually. Phew that was a lot of work!” This approach has several limitations, including: It’s manual, so someone has to remember to run it (and let’s be honest, I often forget to run these in my own codebases). The unused dependency check is crude, and often inaccurate. Results are scattered across multiple output files. It’s not integrated with workflows or CI/CD pipelines. There has to be a better way than this—right? How to simplify dependency audits on GitHub Luckily there is, in fact, a better solution than manual Bash script if you’re working on GitHub—and it starts with using a combination of our AI developer tool, GitHub Copilot, our automation and CI/CD tool. GitHub Actions, and Dependabot, our automated dependency tool. Here’s a step-by-step guide you can use to do this. Step 1: Use GitHub Copilot to create the action Agent mode takes GitHub Copilot from suggesting code to owning tasks, like transforming our bash script into a GitHub Actions workflow. Here is our prompt: “Create a GitHub Action for dependency auditing with depcheck and issue posting. And a separate Dependabot workflow for managing outdated dependencies.” Remember our original bash script? With just a prompt, I shared the context (package.json and our manual script) and asked it to create an action that uses the dependency checker tool depcheck for more accurate detection of unused dependencies. Step 2: GitHub Copilot writes the GitHub Action To implement this GitHub Action, GitHub Copilot creates the new workflow file in .github/workflows/dependency-audit.yml. Here’s the workflow file Copilot helped create: name: Dependency Audit on: schedule: – cron: ‘0 0 * * 1′ # Run weekly on Mondays workflow_dispatch: # Allow manual triggering jobs: audit: runs-on: ubuntu-latest steps: – uses: actions/checkout@v4 – name: Set up Node.js uses: actions/setup-node@v4 with: node-version: ’18’ – name: Install dependencies run: npm ci – name: Install depcheck run: npm install -g depcheck – name: Run depcheck for unused dependencies run: depcheck –json > unused-deps.json – name: Run npm audit run: npm audit –json > security-audit.json – name: Generate report run: | echo “# Dependency Audit Report $(date)” > report.md echo “## Unused Dependencies” >> report.md cat unused-deps.json | jq -r ‘.dependencies[]’ >> report.md echo “## Security Issues” >> report.md cat security-audit.json | jq ‘.metadata.vulnerabilities’ >> report.md – name: Create issue if problems found uses: peter-evans/create-issue-from-file@v4 if: ${{ success() }} with: title: Weekly Dependency Audit content-filepath: ./report.md labels: maintenance, dependencies Step 3: Enable Dependabot While our custom action focuses on finding unused dependencies, we can use Dependabot to automatically create pull requests for outdated packages. Dependabot can be configured either via a simple YAML file or automatically by turning it on from your repository settings. Here’s the YAML file that Copilot created: # .github/dependabot.yml version: 2 updates: – package-ecosystem: “npm” directory: “/” schedule: interval: “weekly” open-pull-requests-limit: 10 The result: a fully automated dependency audit With that, our dependency management is now fully automated. Let’s recap how it works: Our custom action uses depcheck to accurately identify unused dependencies. Dependabot creates pull requests for outdated packages, complete with changelogs and risk assessments. Security vulnerabilities are detected and reported weekly. Everything is documented in GitHub Issues for team visibility. This approach not only saves time but also significantly reduces the security risks and performance issues that stem from poorly managed dependencies. By combining the AI capabilities of GitHub Copilot with GitHub Actions and Dependabot, we’ve turned a tedious manual task into an automated, integrated solution that keeps our codebase lean and secure. And I’ll take those time savings to do something more interesting, like unraveling the mystery of those weird goats in the TV show Severance. Or who knows, maybe I’ll finally figure out what macrodata refinement even means in that show (does anyone have any idea yet? Season two is killing me). Try GitHub Copilot free and activate DependabotLearn more about GitHub Copilot for Business or start your free trial of GitHub Enterprise today. The post Video: How to run dependency audits with GitHub Copilot appeared first on The GitHub Blog.

tech blog

GitHub for Beginners: Essential features of GitHub Copilot

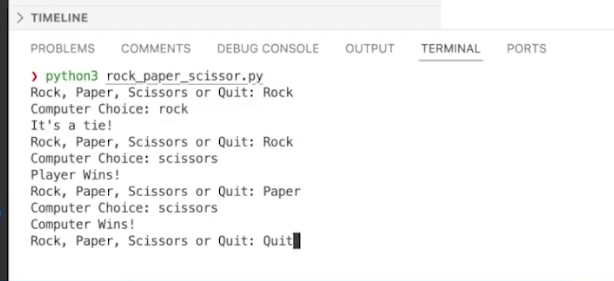
Welcome back to our second GitHub for Beginners series, where we are diving into the world of GitHub Copilot. In our previous episode, we introduced you to GitHub Copilot and gave you some guidance on getting started. Hopefully you’ve had a chance to give it a try! Today we’re going to be looking at some of the essential features of Copilot, and provide you with tips on how to make the most out of your AI coding assistant. For the demos in this series, we’re using GitHub Copilot in Visual Studio Code. Copilot is available in other IDEs, but the available functionality may vary depending on your environment. What is GitHub Copilot? First, let’s go over a quick refresher. GitHub Copilot is an AI pair programmer that helps you write code. It is a generative AI, which means that it is capable of creating new content based on what it has learned. This also means that if you are following along through any demos, Copilot might offer different solutions in response to prompts. This is expected. To use Copilot, you must have a GitHub account and a Copilot license. You can get started with a free license by visiting this link. Once you have access, you need to install the extension in your editor, authenticate it, and you’ll be good to go. For more introductory details, check out our first blog in the series. Now let’s take a look at some of the most essential features. Code completion Let’s say you wanted to create a rock, paper, scissors game in Python. First, create a new file called rock_paper_scissor.py. At the top of the file, add the following comment: Create a Rock Paper Scissors game where the player inputs their choice and plays against a computer that randomly selects its move, with the game showing who won each round. Add a score counter that tracks player and computer wins, and allow the game to continue until the player types ‘quit’. Press the Enter key a couple of times. You will notice some gray, italicized text appearing after your cursor. This is called ghost text, and is the suggestion provided from GitHub Copilot. You can press Tab to accept the suggestion. Continue accepting lines until the suggestion defines a function (that is, starts with the def keyword). https://github.blog/wp-content/uploads/2025/03/01-ghost-text.mp4#t=0.001 When you press the Enter key after the function definition, you’ll see ghost text defining the main function. Hover over the ghost text with your cursor to see different menu options available to you. You can accept a single word, tab through a few completions, or accept the current suggestion. You can also click on the three dots and select “Open Completions Panel.” https://github.blog/wp-content/uploads/2025/03/02-completions-panel.mp4#t=0.001 The Completions panel shows a list of the many ways this code could be implemented. Scroll through the options and choose the suggestion that you want to use. Once you’ve decided on a suggestion, click the associated “Accept suggestion” button. This populates the code into your file. Finally, add a line to invoke the function. Remember that because Copilot is a generative AI, it will not always provide the same suggestions, even with the same prompt! After adding the code, open your terminal and enter python rock_paper_scissor.py to play the game. Try it out as long as you like and enter quit when you’ve decided you’re done. Congratulations! You’ve just made a game with GitHub Copilot! Inline chat Now that we have the base for our game, we want to improve it, and we’re going to use the inline chat feature of GitHub Copilot to accomplish this. In our demo, we had the following line: player_choice = input(‘Rock, Paper, Scissors or Quit: ‘).lower() However, we want players to have a little more flexibility. By highlighting this line of code and pressing either Ctrl + I or Command + I, we open up Copilot Inline Chat where we can enter a prompt. Let’s say we give Copilot this prompt: allow the user to enter r for rock, p for paper, and s for scissors Before sending this prompt to Copilot, notice the dropdown menu at the end of the prompt window. This dropdown enables you to choose which model you’d like to use to respond to the prompt. Copilot Chat uses different models, and new ones are being continuously added. After selecting your model, press enter, and watch as Copilot updates the code. Once the code is updated, you have the option to accept or discard the suggested changes. If you accept the changes, try running the game again in your terminal, and observe that now you can use single letters to make your choice. The inline chat feature is really good at helping you apply quick fixes to your code. If you want to work at a deeper level, you can use the full Copilot Chat experience for that. Copilot Chat GitHub Copilot Chat can help you with code explanations, building out full minimum viable products (MVPs), writing tests, fixing errors in your terminals, and much more. To showcase the capabilities of Copilot Chat, we’re going to use it to create a graphical user interface (GUI) for our rock, paper, scissors game. First, click the chat icon in the left-hand bar of VS Code to open up the chat window. Enter the following prompt into the box provided: Create a simple GUI using a library like Tkinter for the game Note that as long as you keep your rock_paper_scissor.py file open, it will be listed at the bottom of the chat panel as the current file. This is known as the context, and it lets Copilot Chat know which game you are talking about. You could disable this by clicking the Close File icon shown after “Current file”. However, in this case, you want to make sure that Copilot Chat has the context of the correct file. The best practice is to let Copilot have the context of your currently-open file to generate relevant code. Just like with the

tech blog

Highlights from Git 2.49

The open source Git project just released Git 2.49 with features and bug fixes from over 89 contributors, 24 of them new. We last caught up with you on the latest in Git back when 2.48 was released. To celebrate this most recent release, here is GitHub’s look at some of the most interesting features and changes introduced since last time. Faster packing with name-hash v2 Many times over this series of blog posts, we have talked about Git’s object storage model, where objects can be written individually (known as “loose” objects), or grouped together in packfiles. Git uses packfiles in a wide variety of functions, including local storage (when you repack or GC your repository), as well as when sending data to or from another Git repository (like fetching, cloning, or pushing). Storing objects together in packfiles has a couple of benefits over storing them individually as loose. One obvious benefit is that object lookups can be performed much more quickly in pack storage. When looking up a loose object, Git has to make multiple system calls to find the object you’re looking for, open it, read it, and close it. These system calls can be made faster using the operating system’s block cache, but because objects are looked up by a SHA-1 (or SHA-256) of their contents, this pseudo-random access isn’t very cache-efficient. But most interesting to our discussion is that since loose objects are stored individually, we can only compress their contents in isolation, and can’t store objects as deltas of other similar objects that already exist in your repository. For example, say you’re making a series of small changes to a large blob in your repository. When those objects are initially written, they are each stored individually and zlib compressed. But if the majority of the file’s content remains unchanged among edit pairs, Git can further compress these objects by storing successive versions as deltas of earlier ones. Roughly speaking, this allows Git to store the changes made to an object (relative to some other object) instead of multiple copies of nearly identical blobs. But how does Git figure out which pairs of objects are good candidates to store as delta-base pairs? One useful proxy is to compare objects that appear at similar paths. Git does this today by computing what it calls a “name hash”, which is effectively a sortable numeric hash that weights more heavily towards the final 16 non-whitespace characters in a filepath (source). This function comes from Linus all the way back in 2006, and excels at grouping functions with similar extensions (all ending in .c, .h, etc.), or files that were moved from one directory to another (a/foo.txt to b/foo.txt). But the existing name-hash implementation can lead to poor compression when there are many files that have the same basename but very different contents, like having many CHANGELOG.md files for different subsystems stored together in your repository. Git 2.49 introduces a new variant of the hash function that takes more of the directory structure into account when computing its hash. Among other changes, each layer of the directory hierarchy gets its own hash, which is downshifted and then XORed into the overall hash. This creates a hash function which is more sensitive to the whole path, not just the final 16 characters. This can lead to significant improvements both in packing performance, but also in the resulting pack’s overall size. For instance, using the new hash function was able to improve the time it took to repack microsoft/fluentui from ~96 seconds to ~34 seconds, and slimming down the resulting pack’s size from 439 MiB to just 160 MiB (source). While this feature isn’t (yet) compatible with Git’s reachability bitmaps feature, you can try it out for yourself using either git repack’s or git pack-objects’s new –name-hash-version flag via the latest release. [source] Backfill historical blobs in partial clones Have you ever been working in a partial clone and gotten this unfriendly output? $ git blame README.md remote: Enumerating objects: 1, done. remote: Counting objects: 100% (1/1), done. remote: Total 1 (delta 0), reused 0 (delta 0), pack-reused 0 (from 0) Receiving objects: 100% (1/1), 1.64 KiB | 8.10 MiB/s, done. remote: Enumerating objects: 1, done. remote: Counting objects: 100% (1/1), done. remote: Total 1 (delta 0), reused 0 (delta 0), pack-reused 0 (from 0) Receiving objects: 100% (1/1), 1.64 KiB | 7.30 MiB/s, done. […] What happened here? To understand the answer to that question, let’s work through an example scenario: Suppose that you are working in a partial clone that you cloned with –filter=blob:none. In this case, your repository is going to have all of its trees, commit, and annotated tag objects, but only the set of blobs which are immediately reachable from HEAD. Put otherwise, your local clone only has the set of blobs it needs to populate a full checkout at the latest revision, and loading any historical blobs will fault in any missing objects from wherever you cloned your repository. In the above example, we asked for a blame of the file at path README.md. In order to construct that blame, however, we need to see every historical version of the file in order to compute the diff at each layer to figure out whether or not a revision modified a given line. But here we see Git loading in each historical version of the object one by one, leading to bloated storage and poor performance. Git 2.49 introduces a new tool, git backfill, which can fault in any missing historical blobs from a –filter=blob:none clone in a small number of batches. These requests use the new path-walk API (also introduced in Git 2.49) to group together objects that appear at the same path, resulting in much better delta compression in the packfile(s) sent back from the server. Since these requests are sent in batches instead of one-by-one, we can easily backfill all missing blobs in only a few packs instead of one pack per blob.

Scroll to Top