
Completing urgent fixes anywhere with GitHub Copilot coding agent and mobile
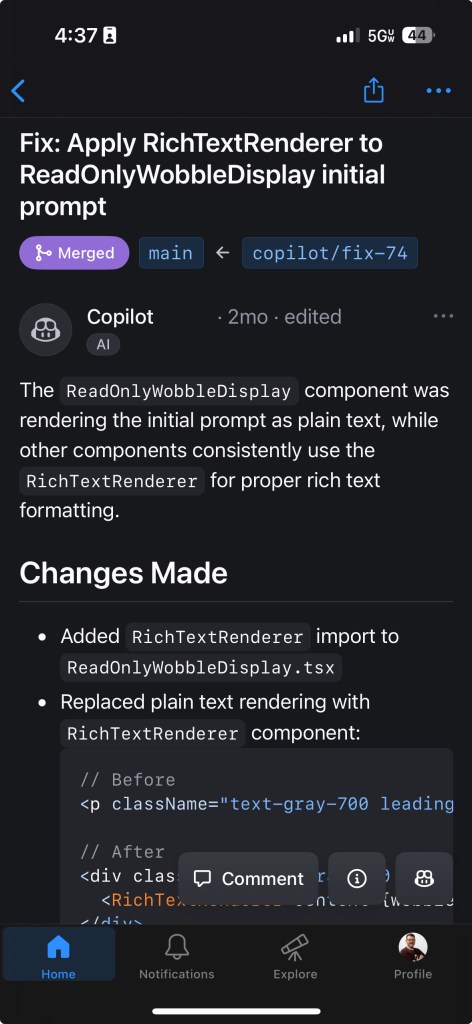
In a video game, a single upgrade enhances your abilities, while combining multiple can create an unstoppable power-up. In the world of software development, this combined power does something similar: At GitHub, we believe it can empower developers with an incredible force to tackle any challenge, whether that’s fixing a critical bug, adding a new feature, or shipping your release to production. My recent quest “Stay a while and listen,” as the old Diablo line goes. One morning, while on a walk, I received an urgent call. A critical feature on a website I collaborate on was displaying errors. This happened just before a high-visibility demo. I was miles from my laptop, and a traditional fix seemed hours away. That would be far too late to address this immediate need. Rolling back wasn’t an option, as it would remove functionality vital for the presentation. The only tool I had available was my cell phone. Instead of rushing home, I realized I could leverage two powerful GitHub features: GitHub Copilot coding agent and the GitHub Mobile app. I could quickly create an issue on mobile and delegate the problem to Copilot, in order to expedite a resolution. From GitHub Mobile, I scanned recent pull requests and identified a likely culprit: a pull request that added markdown rendering and a rich text editor. I created a new issue, describing the problem and referencing the suspicious pull requests, while also relying on my repository’s copilot-instructions to help guide the agent. With a few taps, I assigned the issue to GitHub Copilot coding agent. Just six minutes later, a notification appeared on GitHub Mobile. GitHub Copilot had generated a pull request with a fix! I reviewed it immediately from my phone. It was a clear, simple solution to the problem. Leveraging existing workflows, I could even test the fix on a preview branch right from my mobile device. Satisfied, I approved the pull request, which was deployed to production through automated workflows managed with GitHub Actions in my repository. By the time I reached my car, the director confirmed the issue was resolved, and they were ready to proceed with their demo. This experience, all managed from my phone, revealed a powerful capability within the GitHub Platform. Combining these two features—GitHub Copilot coding agent and GitHub Mobile—unlocked a new ability for me, and prompted me to explore what other combinations within the platform could further power-up my work. Here is a view from my phone using the GitHub Mobile app after reviewing the pull request and approving. We see a summary of Copilot’s fixes for the issue. Using the right tool at the right time It’s important to clarify that I’m not suggesting you delegate all development to Copilot from your mobile device, nor that every fix can be approved instantly from your phone. However, my experience highlights a crucial point: having the right tools for the right situation makes all the difference. GitHub Copilot as an AI pair programmer is a game-changer. By incorporating GitHub Copilot coding agent and GitHub Mobile into my workflow, alongside existing features like GitHub Issues and GitHub Actions, I’ve discovered a new level of efficiency. Here’s how you can gain this same power-up. Keys to unlock this power-up Key 1: Leverage instructions files There is a plethora of knowledge available on how you can effectively use GitHub Copilot. One area you’ll certainly come across is custom instructions for GitHub Copilot. These instructions are the guidelines and rules that can influence the results you get from Copilot. A well-defined set of instructions can go a long way. In my scenario, I used repository custom instructions to give Copilot additional context for understanding important information about my repository. This included the core purpose of the repository, the tech stack used, architecture constraints, coding standards, testing strategy, dependency management, observability, documentation, error handling, and more. It’s important to define the things that are important for GitHub Copilot to have and to understand about your project. For me, identifying things like directory structure, coding standards, and project dependencies were important for identifying a fix with less churn. Custom instructions are written using markdown and including them provide specific guidance to GitHub Copilot Coding Agent, Copilot Chat, and Copilot code review. It’s important to note that instructions in this file apply to all chat requests for the repository. This file exists in the .github directory in your repository right off of the root level. EXAMPLE: Here’s an example of an instructions file you might see in the .github/copilot-instructions.md file. Remember to tailor these to your project. # Copilot Instructions – Use Next.js App Router with React and TypeScript across the project. – Use pnpm for all package management commands (not npm or yarn). – Use Tailwind CSS v4 with a mobile-first approach; enhance with sm:/md:/lg:/xl: as needed. – Prefer shadcn/ui components before creating new UI; place shadcn/ui in src/components/ui and shared components in src/components/shared. – Always use next/link for internal navigation and next/image for images. – Prefer server components by default; add “use client” only when needed (event handlers, browser APIs). – Implement server actions where appropriate; place them in src/lib/actions. – Put utilities in src/utils and Supabase utilities in src/utils/supabase; define shared types in src/types. – Write tests with Vitest for critical business logic and components; place tests in __tests__ directories. – Follow Next.js performance best practices and implement proper error boundaries and error handling. – Use environment variables (NEXT_PUBLIC_ for client exposure); keep secrets server-side only. – Use Vercel for deploys and GitHub Actions for CI/CD with pnpm scripts (pnpm dev/build/test). – Keep code idiomatic: functional components + hooks, async/await for async, and idiomatic Next.js/React patterns. ## Folder structure reference (high-level) “`text . ├─ app/ # Next.js App Router: route groups, page.tsx, layout.tsx, loading.tsx, error.tsx, route.ts ├─ public/ # Static assets served at / ├─ src/ │ ├─ components/ │ │ ├─ ui/ # shadcn/ui components │ │ └─ shared/ # Shared app-specific components │ ├─ lib/ │ │ └─