Author name: ITMAITY

tech blog

CVE-2025-53367: An exploitable out-of-bounds write in DjVuLibre

DjVuLibre version 3.5.29 was released today. It fixes CVE-2025-53367 (GHSL-2025-055), an out-of-bounds (OOB) write in the MMRDecoder::scanruns method. The vulnerability could be exploited to gain code execution on a Linux Desktop system when the user tries to open a crafted document. DjVu is a document file format that can be used for similar purposes to PDF. It is supported by Evince and Papers, the default document viewers on many Linux distributions. In fact, even when a DjVu file is given a filename with a .pdf extension, Evince/Papers will automatically detect that it is a DjVu document and run DjVuLibre to decode it. Antonio found this vulnerability while researching the Evince document reader. He found the bug with fuzzing. Kev has developed a proof of concept exploit for the vulnerability, as demoed in this video. The POC works on a fully up-to-date Ubuntu 25.04 (x86_64) with all the standard security protections enabled. To explain what’s happening in the video: Kev clicks on a malicious DjVu document in his ~/Downloads directory. The file is named poc.pdf, but it’s actually in DjVu format. The default document viewer (/usr/bin/papers) loads the document, detects that it’s in DjVu format, and uses DjVuLibre to decode it. The file exploits the OOB write vulnerability and triggers a call to system(“google-chrome https://www.youtube.com/…”). Rick Astley appears. Although the POC is able to bypass ASLR, it’s somewhat unreliable: it’ll work 10 times in a row and then suddenly stop working for several minutes. But this is only a first version, and we believe it’s possible to create an exploit that’s significantly more reliable. You may be wondering: why Astley, and not a calculator? That’s because /usr/bin/papers runs under an AppArmor profile. The profile prohibits you from starting an arbitrary process but makes an exception for google-chrome. So it was easier to play a YouTube video than pop a calc. But the AppArmor profile is not particularly restrictive. For example, it lets you write arbitrary files to the user’s home directory, except for the really obvious one like ~/.bashrc. So it wouldn’t prevent a determined attacker from gaining code execution. Vulnerability Details The MMRDecoder::scanruns method is affected by an OOB-write vulnerability, because it doesn’t check that the xr pointer stays within the bounds of the allocated buffer. During the decoding process, run-length encoded data is written into two buffers: lineruns and prevruns: //libdjvu/MMRDecoder.h class DJVUAPI MMRDecoder : public GPEnabled { … public: unsigned short *lineruns; … unsigned short *prevruns; … } The variables named pr and xr point to the current locations in those buffers.  scanruns does not check that those pointers remain within the bounds of the allocated buffers. //libdjvu/MMRDecoder.cpp const unsigned short * MMRDecoder::scanruns(const unsigned short **endptr) { … // Swap run buffers unsigned short *pr = lineruns; unsigned short *xr = prevruns; prevruns = pr; lineruns = xr; … for(a0=0,rle=0,b1=*pr++;a0 < width;) { … *xr = rle; xr++; rle = 0; … *xr = rle; xr++; rle = 0; … *xr = inc+rle-a0; xr++; } This can lead to writes beyond the allocated memory, resulting in a heap corruption condition. An out-of-bounds read with pr is also possible for the same reason. We will publish the source code of our proof of concept exploit in a couple of weeks’ time in the GitHub Security Lab repository. Acknowledgements We would like to thank Léon Bottou and Bill Riemers for responding incredibly quickly and releasing a fix less than two days after we first contacted them! Timeline 2025-07-01: Reported via email to the authors: Léon Bottou, Bill Riemers, Yann LeCun. 2025-07-01: Responses received from Bill Riemers and Léon Bottou. 2025-07-02: Fix commit added by Léon Bottou: https://sourceforge.net/p/djvu/djvulibre-git/ci/33f645196593d70bd5e37f55b63886c31c82c3da/ 2025-07-03: DjVuLibre version 3.5.29 released: https://sourceforge.net/p/djvu/www-git/ci/9748b43794440aff40bae066132aa5c22e7fd6a3/  The post CVE-2025-53367: An exploitable out-of-bounds write in DjVuLibre appeared first on The GitHub Blog. ​ Security, Vulnerability research, CVE, GitHub Security Lab, linux, open source The GitHub Blog

tech blog

From idea to PR: A guide to GitHub Copilot’s agentic workflows

I got into software to ship ideas, not to chase down hard-coded strings after a late-breaking feature request. Unfortunately, many of our day-to-day tasks as developers involve branches working on boilerplate code, refactoring, and the “pre-work” to get to the fun stuff: shipping new features. So I turned to Copilot’s agentic workflows to help speed along some of that grunt work. In my latest Rubber Duck Thursdays live stream, I put that theory to the test in a project where I wanted to localize an application that used: Tech stack: a Next.js web app and a matching SwiftUI iOS app living in two separate GitHub repos. Environment: spun up rapidly in Codespaces (on-demand dev environment) and Xcode 16 for the mobile portion. Task: an issue built from a couple of paragraphs to “Add English, French, and Spanish localization.” Copilot tools: coding agent (to turn that issue into a PR), a custom planning chat mode (to try out the new preview capabilities in VS Code), and the new remote GitHub MCP server (so we can avoid managing those dependencies in our dev environment). By the end of my stream, that idea became a GitHub issue, which turned into a fully tested, review-ready PR while I fielded chat questions, and learned about the preview custom chat mode features in VS Code. Let’s dive in. Why I use agentic workflows Even seasoned developers and teams still burn hours on jobs like: Turning vague requests into well-scoped issues Hunting down every file in a cross-cutting refactor Writing the same unit-test scaffolding again and again Copilot’s ability to create issues, along with its coding agent, custom chat modes in VS Code, and the new remote MCP backend fold those chores into one tight loop—issue to PR—while you stay firmly in the driver’s seat. You still review, tweak, and decide when to merge, but you skip the drudgery. Key capabilities covered in this livestream  Capability What it does Why it matters How to enable and use it Coding agent Turns any GitHub Issue you assign to Copilot into a PR, and works on that task asynchronously. Allows you to offload the boilerplate work while you focus on reviews and edge case logic. Learn how to enable Copilot coding agent.  Create issues with Copilot Converts a natural-language prompt into a well-structured Issue with title, body, acceptance criteria, and file hints. Saves PM/eng refining and sets team members, or Copilot coding agent, up with the context they need to work effectively. Navigate to github.com/copilot and write a prompt to create an issue. Learn more about using Copilot to create issues. Custom chat modes (in preview in VS Code) Lets you script repeatable AI workflows (e.g., Planning, Refactor, Test-Writer) that appear alongside the default Ask / Edit / Agent chat modes. Allows you to package instructions and relevant tools for easier use, helping your team follow similar conventions. Add a .chatmode.md file to your repo; available in preview in VS Code release 1.101. Learn more about custom chat modes in VS Code. Remote GitHub MCP Server Allows AI tools to access live GitHub context and tools, like issues, pull requests and code files. With the remote GitHub MCP server, you don’t need to install it locally, and can even authenticate with OAuth 2.0. Provides a smooth experience to accessing the GitHub MCP server, reducing the management overhead of a local server. Update your MCP configuration with the example shown in the remote GitHub MCP Server documentation.  Copilot agent mode Copilot agent mode is a real‑time collaborator that sits in your editor, works with you, and edits files based on your needs. Unlike the coding agent, Copilot agent mode works synchronously with you. Think of agent mode as the senior dev pair programming with you. It has access to several tools (like reading/writing code, running commands in the terminal, executing tools on MCP servers), and works alongside you. Copilot agent mode is available in several IDEs including VS Code, Visual Studio, JetBrains (public preview), Eclipse (public preview) and Xcode (public preview). What you need to achieve a similar outcome A GitHub repo you can push to A Copilot subscription with coding agent enabled. (Did you know it’s now available for all paid tiers of GitHub Copilot including Copilot Business and Copilot Pro?) VS Code 1.101+ with the latest Copilot extension. Either: GitHub Remote MCP server (update your MCP configuration), or a local GitHub MCP server. Walk-through: localizing a Next.js app Here’s the exact flow I demoed on the most recent Rubber Duck Thursdays stream. 1. Capture the request as a GitHub Issue Go to the immersive view of Copilot Chat. At the bottom of the page, in the “Ask Copilot” box, describe what you want. For example, below is the prompt that I used.  Create a GitHub Issue that brings i11n capability to the application. We must support English, French and Spanish. The user must be able to change their language in their profile page. When they change the language, it must apply immediately across the site. Please include an overview/problem statement in the issue, a set of acceptance criteria, and pointers on which files need updating/creating. Copilot drafts that into an issue, which includes a title, acceptance criteria, and a loose action plan. From there, you can assign that issue to Copilot, and let it cook in the background.  2. Let the coding agent turn the issue into a PR Shortly after assignment, the coding agent: Creates a branch Starts a new session. If you have a copilot-setup-steps.yml configured, then a development environment will be configured before Copilot gets to work. Reviews the task at hand, explores the current state of the codebase, and forms a plan to complete the task. If you have any custom instructions configured, then the coding agent will also use those as context. For example, we specify that npm run lint and npm run test should pass before committing. Once complete, it opens a draft PR for your review. While that runs, you

tech blog

5 ways to transform your workflow using GitHub Copilot and MCP

Traditional AI coding assistants typically operate in isolation, limited to the code in your current workspace. Now with the introduction of the Model Context Protocol (MCP), AI development workflows are further evolving to incorporate more tools and context.  MCP can enable AI assistants to interact with external systems like knowledge bases, data stores, and testing applications. What is MCP, anyway? The Model Context Protocol (MCP) is an open standard developed by Anthropic that helps AI assistants like GitHub Copilot securely connect to external data sources and tools. MCP addresses a common challenge with Large Language Models (LLMs): providing the right context to generate accurate and useful responses. MCP standardizes how AI tools access external context—such as your codebase, documentation, or design specifications—and makes it easier to bring this context into your development workflow. For a deeper dive into MCP and why it’s gaining popularity, check out Cassidy Williams’s article on the GitHub Blog. The real value of MCP integration is that you can now perform tasks that previously required multiple tools, context switching, and manual effort—all directly in your IDE. That means you can save time, maintain focus, and ship code faster. In this article, we’ll explore five practical ways MCP integrations with GitHub Copilot can streamline your workflow. We’ll follow a realistic scenario: implementing a secure JWT (JSON Web Token) authentication system for a web application, illustrating an end-to-end workflow with MCP. Let’s jump in.  1. Using MCP to bridge design and development with Figma  The gap between design and development has long been a source of friction in product teams. MCP provides a standardized way for GitHub Copilot to securely access and interpret design specifications directly.  Instead of manually translating design details into code, MCP enables Copilot to automatically retrieve exact design parameters—such as colors, spacing, typography, and component states—and generate accurate, ready-to-use code. This integration reduces guesswork and streamlines the handoff between designers and developers. Explore GitHub Copilot’s agentic capabilities GitHub Copilot comes with two powerful agentic workflows that can be used with MCP: Agent mode (in your IDE): Turn Copilot Chat into a real-time collaborator that works with you. Give it a goal (“add OAuth & tests”), and it plans, edits files, runs the suite, reads failures, fixes them, and loops until everything is green—all right in front of you, with the option to pause or steer at any step. Coding agent (in your GitHub projects): Hand an Issue to Copilot and walk away. It spins up a protected workspace with GitHub Actions, writes code, runs linters/tests, and opens a pull request for you to review. Perfect for well-scoped tickets you’d give a junior dev (docs, tests, small refactors) while you stay focused elsewhere.  TL;DR: Think of Agent mode as a co-driver at your keyboard; the Coding agent is the valet that brings the finished work to your repo. Learn more > We’ll start developing our new JWT authentication system by taking a look at the user-facing side. Let’s say the design team updated the authentication UI components in Figma, including login forms, error states, loading spinners, and success messages. Now, you need to implement these changes to match the new design system. Start by asking Copilot, “What are the latest design updates for the login form and authentication components?” It will then retrieve specs for the elements that need to change. Then you can prompt it to create React components for each element: LoginForm with exact spacing, colors, typography AuthErrorMessage component with proper error styling TokenRefreshNotification component Copilot will then give you ready-to-use code that maintains consistency with the design specifications from Figma. Learn more about Figma’s MCP server beta > 2. Tap into your Obsidian knowledge base with MCP When implementing complex features like JWT authentication, you often need to reference past decisions, architectural notes, and research findings scattered across your knowledge base. The unofficial, community-maintained Obsidian MCP server bridges this gap by connecting GitHub Copilot directly to your Obsidian vault. Let’s say you’re implementing JWT token validation and need to understand your team’s previous security decisions. You tell Copilot: “Search for all files where JWT or token validation is mentioned and explain the context.” With that, Copilot can: Search across all Markdown files in your vault for relevant security patterns Retrieve contents from specific architecture decision records (ADR) Access meeting notes from previous security reviews Pull implementation guidelines from your team’s coding standards You might follow up with the following prompt: “Get the contents of the last architecture call note about authentication and summarize the key decisions.” Copilot will locate the relevant file and extract the critical information you need to inform your implementation approach. Once you’ve gathered the necessary context, you can ask Copilot to synthesize this information: “Create a new note called ‘jwt-implementation-summary.md’ that combines our authentication standards with the new JWT approach.” Copilot will create this documentation directly in your vault, helping maintain your team’s knowledge base. Setup note: This integration requires the community “Obsidian Local REST API” plugin and an API key. With your research complete and documented, you can proceed to test your application. Learn more about accessing Obsidian through MCP > 3. Test your code with Playwright Integrating MCP with Playwright transforms test creation from a manual, error-prone process into a simple, guided experience. Modern web applications often involve complex user journeys, asynchronous operations, and dynamic content. Authentication flows are particularly challenging to test comprehensively. Continuing with our JWT authentication system, you need to test the complete authentication flow including login, token refresh, and secure route access. To do this, you’ll start by giving Copilot a prompt like this: “Test the JWT authentication flow including login, automatic token refresh, and access to protected routes.” From there, Copilot will analyze your authentication implementation and generate comprehensive test coverage. But it doesn’t stop there. Copilot then runs the tests with Playwright and provides immediate feedback on failures, suggesting fixes for common issues, like timing problems or selector changes. Learn more about the Playwright MCP server > 4. File

tech blog

Shaping the Future with AI: Dell’s Vision in Action

Discover how Dell Technologies is driving AI innovation in government, energy and education to empower a brighter future.   ​  ​Discover how Dell Technologies is driving AI innovation in government, energy and education to empower a brighter future. Government Blog | Dell

tech blog

Dell Delivers Market’s First NVIDIA GB300 NVL72 to CoreWeave

Dell is leading the way in AI innovation. Discover how we’re setting a new standard as the first to deliver Dell Integrated Racks featuring NVIDIA GB300 NVL72, empowering industries to tackle tomorrow’s challenges today.   ​  ​Dell is leading the way in AI innovation. Discover how we’re setting a new standard as the first to deliver Dell Integrated Racks featuring NVIDIA GB300 NVL72, empowering industries to tackle tomorrow’s challenges today. Partners Blog | Dell

tech blog

Why developer expertise matters more than ever in the age of AI

Editor’s note: This piece was originally published in our LinkedIn newsletter, Branching Out_. Sign up now for more career-focused content >  AI tools seem to be everywhere. With the tap of a key, they provide ready answers to queries, autocomplete faster than our brains can, and even suggest entire blocks of code. Research has shown that GitHub Copilot enables developers to code up to 55% faster. Junior developers, specifically, may see a 27% to 39% increase in output with AI assistance according to MIT, showing even greater productivity gains from their adoption of AI than more experienced developers.  But here’s the question: you may be coding faster with AI, but when was the last time you asked yourself why before adopting a suggestion from an AI coding assistant?  Being a developer is not just about producing code. It’s about understanding why the code works, how it fits into the bigger picture, and what happens when things break down. The best developers know how to think critically about new problems and take a systems view of solving them. That kind of expertise is what keeps software resilient, scalable, and secure, especially as AI accelerates how quickly we ship. Without it, we risk building faster but breaking more. Our CEO, Thomas Dohmke, put it bluntly at VivaTech: “Startups can launch with AI‑generated code, but they can’t scale without experienced developers.” Developer expertise is the multiplier on AI, not the bottleneck. We’re not saying you have to reject AI to be a great developer. At GitHub, we believe AI is a superpower, one that helps you move faster and build better when used thoughtfully. Your role as a developer in the age of AI is to be the human-in-the-loop: the person who knows why code works, why it sometimes doesn’t, what the key requirements in your environment are, and how to debug, guide AI tools, and go beyond vibe coding.  After all, AI can help you write code a lot faster, but only developer expertise turns that speed into resilient, scalable, and secure software. TL;DR: AI pair‑programming makes you faster, but it can’t replace the judgment that keeps software safe and maintainable. This article offers three concrete ways to level‑up your expertises. AI’s productivity dividend + developer experience = greater impact Benefit How human judgment multiplies the value ⏱️ Faster commits (up to 55 % quicker task completion) Devs run thoughtful code reviews, write tests, and surface edge cases so speed never comes at the cost of quality. 🧠 Lower cognitive load Freed-up mental bandwidth lets developers design better architectures, mentor teammates, and solve higher-order problems. 🌱 Easier onboarding for juniors Senior engineers provide context, establish standards, and turn AI suggestions into teachable moments building long-term expertise. 🤖 Automated boilerplate Devs tailor scaffolding to real project needs, question assumptions, and refactor early to keep tech-debt in check and systems secure. Speed without judgment can mean: Security vulnerabilities that static analysis can’t spot on its own. Architecture choices that don’t scale beyond the demo. Documentation drift that leaves humans and models guessing. The remedy? Double down on the fundamentals that AI still can’t master. Mastering the fundamentals: 3 key parts of your workflow to focus on when using AI As the home for all developers, we’ve seen it again and again: becoming AI-savvy starts with the old-school basics. You know, the classic tools and features you used before AI became a thing (we know, it’s hard to remember such a time!). We believe that only by mastering the fundamentals can you get the most value, at scale, out of AI developer tools like GitHub Copilot.  A junior developer who jumps into their first AI-assisted project without having a foundational understanding of the basics (like pull requests, code reviews, and documentation) may ship fast, but without context or structure, they risk introducing bugs, missing edge cases, or confusing collaborators. That’s not an AI problem. It’s a fundamentals problem. Let’s revisit the core skills every developer should bring to the table, AI or not. With the help of a few of our experts, we’ll show you how to level them up so you can dominate in the age of AI. 1. Push for excellence in the pull request At the heart of developer collaboration, pull requests are about clearly communicating your intent, explaining your reasoning, and making it easier for others (humans and AI alike!) to engage with your work. A well‑scoped PR communicates why a change exists—not just what changed. That context feeds human reviewers and Copilot alike. As GitHub developer advocate Kedasha Kerr advises, start by keeping your pull requests small and focused. A tight, purposeful pull request is easier to review, less likely to introduce bugs, and faster to merge. It also gives your reviewers, as well as AI tools like Copilot, a clean scope to work with. Your pull request description is where clarity counts. Don’t just list what changed—explain why it changed. Include links to related issues, conversations, or tracking tickets to give your teammates the full picture. If your changes span multiple files, suggest where to start reviewing. And be explicit about what kind of feedback you’re looking for: a quick sanity check? A deep dive? Let your reviewers know. Before you ask for a review, review it yourself. Kedasha recommends running your tests, previewing your changes, and catching anything unclear or unpolished. This not only respects your reviewers’ time, it improves the quality of your code and deepens your understanding of the work. A thoughtful pull request is a signal of craftsmanship. It builds trust with your team, strengthens your communication skills, and gives Copilot better context to support you going forward. That’s a win for you, your team, and your future self. Here’s a quick 5‑item PR checklist to reference as you work:  Scope ≤ 300 lines (or break it up). Title = verb + object (e.g., Refactor auth middleware to async). Description answers “why now?” and links to the issue. Highlight breaking changes with ⚠️ BREAKING in bold. Request

tech blog

From pair to peer programmer: Our vision for agentic workflows in GitHub Copilot

Software development has always been a deeply human, collaborative process. When we introduced GitHub Copilot in 2021 as an “AI pair programmer,” it was designed to help developers stay in the flow, reduce boilerplate work, and accelerate coding. But what if Copilot could be more than just an assistant? What if it could actively collaborate with you—working alongside you on synchronous tasks, tackling issues independently, and even reviewing your code? That’s the future we’re building. Our vision for what’s next  Today, AI agents in GitHub Copilot don’t just assist developers but actively solve problems through multi-step reasoning and execution. These agents are capable of: Independent problem solving: Copilot will break down complex tasks and take the necessary steps to solve them, providing updates along the way. Adaptive collaboration: Whether working in sync with you or independently in the background, Copilot will iterate on its own outputs to drive progress. Proactive code quality: Copilot will proactively assist with tasks like issue resolution, testing, and code reviews, ensuring higher-quality, maintainable code. Rather than fitting neatly into synchronous or asynchronous categories, the future of Copilot lies in its ability to flexibly transition between modes—executing tasks independently while keeping you informed and in control. This evolution will allow you to focus on higher-level decision-making while Copilot takes on more of the execution. Let’s explore what’s already here—and what’s coming next. Why independent agents—and why now? Modern development isn’t linear. We context switch between features, bug fixes, dependency bumps, and reviews every day. A truly useful AI must: Act independently: plan multi‑step tasks and execute them without hand holding. Stay transparent: share its plan and progress, so you can intervene instantly. Earn trust: test its own work and explain every change. Copilot’s new agentic architecture is designed around these guardrails. Copilot in action: Taking steps toward our vision  Agent mode: A real-time AI teammate inside your IDE If you’ve used agent mode with GitHub Copilot (and you should, because it’s fantastic), you’ve already experienced an independent AI agent at work.  Agent mode lives where you code and feels like handing your computer to a teammate for a minute: it types on your screen while you look on, and can grab the mouse. When you prompt it, the agent takes control, works through the problem, and reports its work back to you with regular check-in points. It can: Read your entire workspace to understand context. Plan multi‑step fixes or refactors (and show you the plan first). Apply changes, run tests, and iterate in a tight feedback loop. Ask for guidance whenever intent is ambiguous. Run and refine its own work through an “agentic loop”—planning, applying changes, testing, and iterating. Rather than just responding to requests, Copilot in agent mode actively works toward your goal. You define the outcome, and it determines the best approach—seeking feedback from you as needed, testing its own solutions, and refining its work in real time.  Think of it as pair programming in fast forward: you’re watching the task unfold in real time, free to jump in or redirect at any step. ✨ Coding agent: An AI teammate that works while you don’t  Not all coding happens in real time. Sometimes, you need to hand off tasks to a teammate and check back later. That’s where our coding agent comes in—and it’s our first step in transforming Copilot into an independent agent. Coding agent spins up its own secure dev environment in the cloud. You can assign multiple issues to Copilot, then dive into other work (or grab a cup of coffee!) while it handles the heavy lifting. It can: Clone your repo and bootstrap tooling in isolation. Break the issue into steps, implement changes, and write or update tests. Validate its work by running your tests and linter. Open a draft PR and iterate based on your PR review comments. Stream progress updates so you can peek in—or jump in—any time. Working with coding agent is like asking a teammate in another room—with their own laptop and setup—to tackle an issue. You’re free to work on something else, but you can pop in for status or feedback whenever you like. Less TODO, more done: The next stage of Copilot’s agentic future The next stage of Copilot is being built on three converging pillars: Smarter, leaner models. Ongoing breakthroughs in large language models keep driving accuracy up while pushing latency and cost down. Expanded context windows now span entire monoliths, giving Copilot the long-range “memory” it needs to reason through complex codebases and return answers grounded in your real code. Deeper contextual awareness. Copilot increasingly understands the full story behind your work—issues, pull-request history, dependency graphs, even private runbooks and API specs (via MCP). By tapping this richer context, it can suggest changes that align with project intent, not just syntax. Open, composable foundation. We’re designing Copilot to slot into your stack—not the other way around. You choose the editor, models, and tools; Copilot plugs in, learns your patterns, and amplifies them. You’re in the driver’s seat, steering the AI to build, test, and ship code faster than ever. Taken together, these pillars move Copilot beyond a single assistant toward a flexible AI teammate—one that can help any team, from three developers in a garage to thousands in a global enterprise, plan, code, test, and ship with less friction and more speed. So, get ready for what’s next. The next wave is already on its way.  Learn more about GitHub Copilot > The post From pair to peer programmer: Our vision for agentic workflows in GitHub Copilot appeared first on The GitHub Blog. ​ News & insights, Product, agentic AI, generative AI, GitHub Copilot The GitHub Blog

tech blog

Understand your software’s supply chain with GitHub’s dependency graph

What if you could spot the weakest link in your software supply chain before it breaks? With GitHub’s dependency graph, you can. By providing a clear, complete view of the external packages your code depends on, both directly and indirectly, it allows you to understand, secure, and manage your project’s true footprint. If you’re like me and sometimes lose track of what’s actually powering your applications (we’ve all been there!), GitHub’s dependency graph is about to become your new best friend.  What is the dependency graph? Here’s the thing: Every modern software project is basically an iceberg. That small manifest file with your direct dependencies seems quite harmless at first glance. But underneath? There’s this massive, hidden world of transitive dependencies that most of us never think about. The GitHub dependency graph maps this entire underwater world. Think of it like a family tree, but for your code. Each package is a family member, and each dependency relationship shows who’s related to whom (and trust me, some of these family trees get really complicated). Each package is a node. Each dependency relationship is an edge. The result? A full visual and structured representation of your software’s external codebase. In some cases, 95–97% of your code is actually someone else’s. The dependency graph helps you make sense of that reality. GitHub engineer Eric Sorenson Let that sink in for a moment. We’re basically curators of other people’s work, and the dependency graph finally helps us make sense of that reality. Why it matters When vulnerabilities are discovered in open source packages, the consequences ripple downstream. If you don’t know a vulnerable dependency is part of your project, it’s hard to take action. The dependency graph isn’t just a cool visualization (though it is pretty neat to look at). It’s the foundation that makes Dependabot alerts possible. When a security issue is found in any of your dependencies (even a transitive one), GitHub notifies you. You get the full picture of what’s in your supply chain, how it got there, and what you can actually do about it. See it in action: From 21 to 1,000 dependencies Eric showed us a project that looked innocent enough: 21 direct dependencies (the ones actually listed in package.json) 1,000 total dependencies (including everything that got pulled in along the way) With the dependency graph, you can finally: Understand which dependencies are direct vs. transitive Trace how a package like Log4j ended up in your codebase. (Spoiler: it probably came along for the ride with something else.) Know what’s yours to fix and what depends on an upstream maintainer Tighten your supply chain with Dependabot Dependabot runs on top of the dependency graph—so enabling the graph is what makes Dependabot’s vulnerability alerts and automatic fix suggestions possible.  Pro tip: Filter for direct dependencies first. These are the ones you can actually control, so focus your energy there instead of pulling your hair out over transitive dependencies that are someone else’s responsibility. How to enable the dependency graph You can enable the dependency graph in your repository settings under Security > Dependency Graph. If you turn on Dependabot, the graph will be enabled automatically. Using GitHub Actions? Community-maintained actions can generate a Software Bill of Materials (SBOM) and submit it to GitHub’s Dependency submission API, even if your language ecosystem doesn’t support auto-discovery. ✅ The best part? Dependency graph is free for all public repositories. Private repos need GitHub Advanced Security to use Dependabot alerts, but the graph itself is free. TL;DR You can’t secure what you can’t see. GitHub’s dependency graph gives you visibility into the 90%+ of your codebase that comes from open source libraries and helps you take action when it counts. Enable it today (seriously, do it now) Use it with Dependabot for automated alerts and fixes Finally discover what’s actually in your software supply chain Your future self (and your security team) will thank you. Want to learn more about the GitHub dependency graph? Explore the documentation > The post Understand your software’s supply chain with GitHub’s dependency graph appeared first on The GitHub Blog. ​ Security, Supply chain security, Dependabot, dependency graph, supply chain The GitHub Blog

tech blog

GitHub Advisory Database by the numbers: Known security vulnerabilities and what you can do about them

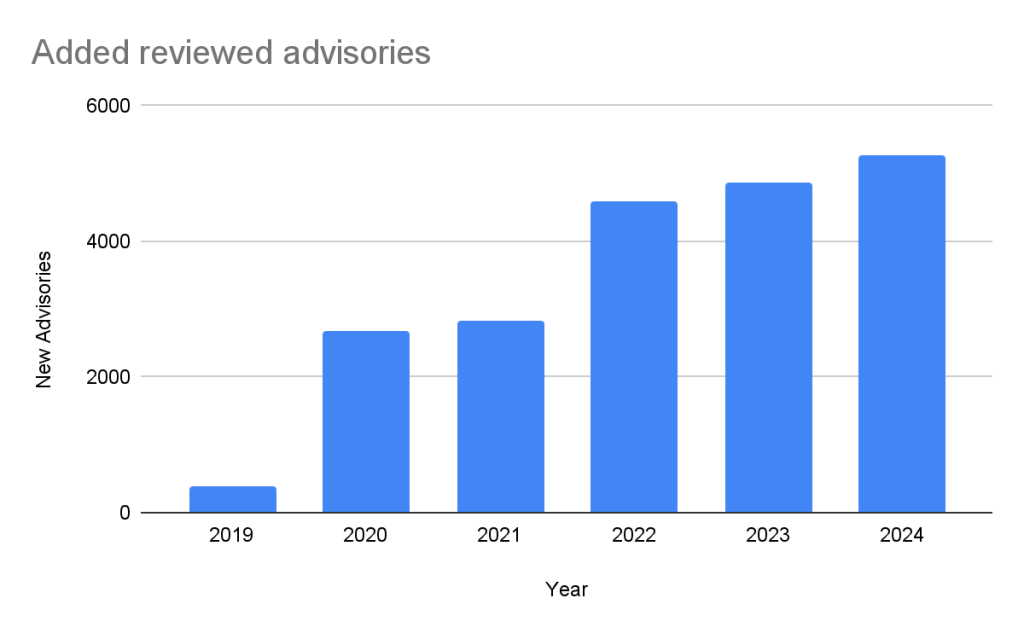
The GitHub Advisory Database (Advisory DB) is a vital resource for developers, providing a comprehensive list of known security vulnerabilities and malware affecting open source packages. This post analyzes trends in the Advisory DB, highlighting the growth in reviewed advisories, ecosystem coverage, and source contributions in 2024. We’ll delve into how GitHub provides actionable data to secure software projects. Advisories The GitHub Advisory Database contains a list of known security vulnerabilities and malware, grouped in three categories:  GitHub-reviewed advisories: Manually reviewed advisories in software packages that GitHub supports. Unreviewed advisories: These are automatically pulled from the National Vulnerability Database (NVD) and are either in the process of being reviewed, do not affect a supported package, or do not discuss a valid vulnerability. Malware advisories: These are specific to malware threats identified by the npm security team. Reviewed advisories GitHub-reviewed advisories are security vulnerabilities that have been mapped to packages in ecosystems we support. We carefully review each advisory for validity and ensure that they have a full description, and contain both ecosystem and package information. Every year, GitHub increases the number of advisories we publish. We have been able to do this due to the increase in advisories coming from our sources (see Sources section below), expanding our ecosystem coverage (also described below), and review campaigns of advisories published before we started the database.  In the past five years, the database has gone from fewer than 400 reviewed advisories to over 20,000 reviewed advisories in October of 2024. Unreviewed advisories Unreviewed advisories are security vulnerabilities that we publish automatically into the GitHub Advisory Database directly from the National Vulnerability Database feed. The name is a bit of a misnomer as many of these advisories have actually been reviewed by a GitHub analyst. The reason why they fall into this category is because they are not found in a package in one of the supported ecosystems or are not discussing a valid vulnerability, and all have been reviewed by analysts other than someone from the GitHub Security Lab. Even though most of these advisories will never turn into a reviewed advisory, we still publish them so that you do not have to look in multiple databases at once. Malware Malware advisories relate to vulnerabilities caused by malware, and are security advisories that GitHub publishes automatically into the GitHub Advisory Database directly from information provided by the npm security team. Malware advisories are currently exclusive to the npm ecosystem. GitHub doesn’t edit or accept community contributions on these advisories. Ecosystem coverage GitHub-reviewed advisories include security vulnerabilities that have been mapped to packages in ecosystems we support. Generally, we name our supported ecosystems after the software programming language’s associated package registry. We review advisories if they are for a vulnerability in a package that comes from a supported registry. Ecosystem Total advisories Vulnerable packages First added pip (registry: https://pypi.org/) 3378 1044 2019-04-19 Maven (registry: https://repo.maven.apache.org/maven2) 5171 955 2019-04-22 Composer (registry: https://packagist.org/) 4238 812 2019-04-26 npm (registry: https://www.npmjs.com/) 3653 2652 2019-04-26 RubyGems (registry: https://rubygems.org/) 840 371 2019-04-26 NuGet (registry: https://www.nuget.org/) 651 489 2019-04-26 Go (registry: https://pkg.go.dev/) 2011 865 2021-04-01 Rust (registry: https://crates.io/) 857 553 2021-05-25 Erlang (registry: https://hex.pm/) 31 26 2022-01-27 GitHub Actions (https://github.com/marketplace?type=actions/) 21 21 2022-07-29 Pub (registry: https://pub.dev/packages/registry) 10 9 2022-08-04 Swift (registry: N/A) 33 21 2023-05-10 Vulnerabilities in Maven and Composer packages are nearly half of the advisories in the database. npm, pip, and Go make up much of the rest, while the other ecosystems have a much smaller footprint. This has not always been the case. When the database was initially launched, NPM advisories dominated the database, but as we have expanded our coverage and added support for new ecosystems, the distribution mix has changed. Sources: Where do the advisories come from? We add advisories to the GitHub Advisory Database from the following sources: Source Advisories Reviewed advisories Sole source Coverage NVD 267429 18295 7450 6.84% GitHub Repository Advisories 12247 5311 564 43.37% Community Contributions 4512 4160 10 92.20% PyPA Advisories 3040 2739 14 90.10% Go Vulncheck 1581 1528 7 96.65% NPM Advisories 1411 1408 629 99.79% FriendsOfPHP 1406 1396 400 99.29% RustSec 943 849 171 90.03% RubySec 873 861 4 98.63% NVD: This is a huge source of vulnerabilities covering all types of software. We publish all NVD advisories but only review those relevant to our supported ecosystems, which reduces noise for our users. GitHub Repository Advisories: The second largest source is made up of advisories published through GitHub’s repository security advisory feature. Similar to NVD, these aren’t restricted to our supported ecosystems. However, we provide better coverage of the repository advisories because they focus exclusively on open source software. Community Contributions: These are reports from the community that are almost exclusively requesting updates to existing advisories. Other Specialized Sources: Sources like PyPA Advisories (for Python) and Go Vulncheck (for Go) that focus on specific ecosystems. Because they only cover packages within our supported ecosystems, most of their advisories are relevant to us and get reviewed. If you add up the number of reviewed advisories from each source, you will find that total is more than the total reviewed advisories. This is because each source can publish an advisory for the same vulnerability. In fact, over half of our advisories have more than one source. Of the advisories with a single source, nearly all of them come from NVD/CVE. This justifies NVD/CVE as a source, even though it is by far the noisiest. 2024 saw a significant increase (39%) in the number of advisories imported from our sources. This is for the most part caused by an increase in the number of CVE records published. CVE Numbering Authority In addition to publishing advisories in the GitHub Advisory Database, we are also a CVE Numbering Authority (CNA) for any repository on GitHub. This means that we issue CVE IDs for vulnerabilities reported to us by maintainers, and we publish the vulnerabilities to the CVE database once the corresponding repository advisory is published. GitHub published over 2,000 CVE records in

tech blog

Nokia and Dell Invite You to Experience Cloud RAN

Dell and Nokia help CSPs explore Cloud RAN, driving 5G innovation with scalable, flexible and cost-efficient telecom solutions.   ​  ​Dell and Nokia help CSPs explore Cloud RAN, driving 5G innovation with scalable, flexible and cost-efficient telecom solutions. Telecommunications Blog | Dell

tech blog

Secure the Future with Dell Commercial AI PCs

Security is in Dell’s DNA. Learn how we set the benchmark for AI PC design with adaptive security.   ​  ​Security is in Dell’s DNA. Learn how we set the benchmark for AI PC design with adaptive security. Endpoint Security Blog | Dell

tech blog

Collaborating for an AI-Driven Future in Government

Discover how AI-driven innovation in government collaboration solves big challenges and explore strategies shaping tomorrow’s breakthroughs.   ​  ​Discover how AI-driven innovation in government collaboration solves big challenges and explore strategies shaping tomorrow’s breakthroughs. Public Advocacy Blog | Dell

tech blog

Transforming IT with a Subscription Experience

Discover how Dell Subscription Experience can help revolutionize your IT lifecycle management. Access cutting-edge technology, optimize costs, and achieve long-term growth with choice and flexibility.   ​  ​Discover how Dell Subscription Experience can help revolutionize your IT lifecycle management. Access cutting-edge technology, optimize costs, and achieve long-term growth with choice and flexibility. Payment Solutions Blog | Dell

tech blog

The Smarter Data Strategy is a Tiered Data Strategy

PowerScale announces new Hybrid and Archive series nodes delivering future-ready support for higher density HAMR technology and upgraded compute modules.   ​  ​PowerScale announces new Hybrid and Archive series nodes delivering future-ready support for higher density HAMR technology and upgraded compute modules. PowerScale Blog | Dell

tech blog

Highlights from Git 2.50

The open source Git project just released Git 2.50 with features and bug fixes from 98 contributors, 35 of them new. We last caught up with you on the latest in Git back when 2.49 was released. 💡 Before we get into the details of this latest release, we wanted to remind you that Git Merge, the conference for Git users and developers is back this year on September 29-30, in San Francisco. Git Merge will feature talks from developers working on Git, and in the Git ecosystem. Tickets are on sale now; check out the website to learn more. With that out of the way, let’s take a look at some of the most interesting features and changes from Git 2.50. Improvements for multiple cruft packs When we covered Git 2.43, we talked about newly added support for multiple cruft packs. Git 2.50 improves on that with better command-line ergonomics, and some important bugfixes. In case you’re new to the series, need a refresher, or aren’t familiar with cruft packs, here’s a brief overview: Git objects may be either reachable or unreachable. The set of reachable objects is everything you can walk to starting from one of your repository’s references: traversing from commits to their parent(s), trees to their sub-tree(s), and so on. Any object that you didn’t visit by repeating that process over all of your references is unreachable. In Git 2.37, Git introduced cruft packs, a new way to store your repository’s unreachable objects. A cruft pack looks like an ordinary packfile with the addition of an .mtimes file, which is used to keep track of when each object was most recently written in order to determine when it is safe1 to discard it. However, updating the cruft pack could be cumbersome–particularly in repositories with many unreachable objects–since a repository’s cruft pack must be rewritten in order to add new objects. Git 2.43 began to address this through a new command-line option: git repack –max-cruft-size. This option was designed to split unreachable objects across multiple packs, each no larger than the value specified by –max-cruft-size. But there were a couple of problems: If you’re familiar with git repack’s –max-pack-size option, –max-cruft-size’s behavior is quite confusing. The former option specifies the maximum size an individual pack can be, while the latter involves how and when to move objects between multiple packs. The feature was broken to begin with! Since –max-cruft-size also imposes on cruft packs the same pack-size constraints as –max-pack-size does on non-cruft packs, it is often impossible to get the behavior you want. For example, suppose you had two 100 MiB cruft packs and ran git repack –max-cruft-size=200M. You might expect Git to merge them into a single 200 MiB pack. But since –max-cruft-size also dictates the maximum size of the output pack, Git will refuse to combine them, or worse: rewrite the same pack repeatedly. Git 2.50 addresses both of these issues with a new option: –combine-cruft-below-size. Instead of specifying the maximum size of the output pack, it determines which existing cruft pack(s) are eligible to be combined. This is particularly helpful for repositories that have accumulated many unreachable objects spread across multiple cruft packs. With this new option, you can gradually reduce the number of cruft packs in your repository over time by combining existing ones together. With the introduction of –combine-cruft-below-size, Git 2.50 repurposed –max-cruft-size to behave as a cruft pack-specific override for –max-pack-size. Now –max-cruft-size only determines the size of the outgoing pack, not which packs get combined into it. Along the way, a bug was uncovered that prevented objects stored in multiple cruft packs from being “freshened” in certain circumstances. In other words, some unreachable objects don’t have their modification times updated when they are rewritten, leading to them being removed from the repository earlier than they otherwise would have been. Git 2.50 squashes this bug, meaning that you can now efficiently manage multiple cruft packs and freshen their objects to your heart’s content. [source, source] Incremental multi-pack reachability bitmaps ​​Back in our coverage of Git 2.47, we talked about preliminary support for incremental multi-pack indexes. Multi-pack indexes (MIDXs) act like a single pack *.idx file for objects spread across multiple packs. Multi-pack indexes are extremely useful to accelerate object lookup performance in large repositories by binary searching through a single index containing most of your repository’s contents, rather than repeatedly searching through each individual packfile. But multi-pack indexes aren’t just useful for accelerating object lookups. They’re also the basis for multi-pack reachability bitmaps, the MIDX-specific analogue of classic single-pack reachability bitmaps. If neither of those are familiar to you, don’t worry; here’s a brief refresher. Single-pack reachability bitmaps store a collection of bitmaps corresponding to a selection of commits. Each bit position in a pack bitmap refers to one object in that pack. In each individual commit’s bitmap, the set bits correspond to objects that are reachable from that commit, and the unset bits represent those that are not. Multi-pack bitmaps were introduced to take advantage of the substantial performance increase afforded to us by reachability bitmaps. Instead of having bitmaps whose bit positions correspond to the set of objects in a single pack, a multi-pack bitmap’s bit positions correspond to the set of objects in a multi-pack index, which may include objects from arbitrarily many individual packs. If you’re curious to learn more about how multi-pack bitmaps work, you can read our earlier post Scaling monorepo maintenance. However, like cruft packs above, multi-pack indexes can be cumbersome to update as your repository grows larger, since each update requires rewriting the entire multi-pack index and its corresponding bitmap, regardless of how many objects or packs are being added. In Git 2.47, the file format for multi-pack indexes became incremental, allowing multiple multi-pack index layers to be layered on top of one another forming a chain of MIDXs. This made it much easier to add objects to your repository’s MIDX, but the incremental MIDX format at the time did not

tech blog

5 tips for using GitHub Copilot with issues to boost your productivity

Managing issues in software development can be tedious and time-consuming. But what if your AI peer programmer could streamline this process for you? GitHub Copilot‘s latest issue management features can help developers create, organize, and even solve issues. Below, we’ll dig into these features and how they can save time, reduce friction, and maintain consistency across your projects. 1. Image to issue: Turn screenshots into instant bug reports Writing detailed bug reports is often repetitive and frustrating, leading to inconsistent documentation. Copilot’s image to issue feature significantly reduces this friction. Simply paste a screenshot of the bug into Copilot chat with a brief description prompt Copilot to create an issue for you, then Copilot will analyze the image and generate a comprehensive bug report for you. No more struggling to describe visual glitches or UI problems—the image will speak for itself, and Copilot will handle the documentation. For example, if you encounter a UI alignment issue or a visual glitch that’s hard to describe, just capture a screenshot, paste it into Copilot, and briefly mention the problem. In the animation above, the user’s prompt was “create me a bug issue because markdown tables are not rendering properly in the comments.” Copilot then automatically drafted a report, including steps to reproduce the bug. To get the most out of this feature, consider annotating your screenshots clearly—highlighting or circling the problematic area—to help Copilot generate even more precise issue descriptions. Dive into the documentation to learn more. 2. Get the details right: Templates, tags, and types Projects quickly become disorganized when team members skip adding proper metadata. Incorrect templates, missing labels, or wrong issue types make tracking and prioritization difficult. Copilot solves this by automatically inferring the best template based on your prompt. It also adds appropriate labels and issue types without requiring you to navigate multiple dropdown menus or memorize tagging conventions. Need something specific? Simply ask Copilot to add particular labels or switch templates. If you change templates after drafting, Copilot will automatically reformat your content—no manual copying required. 3. Stay organized with versioning and milestones Keeping issues updated and properly categorized is crucial for clear communication, maintaining project velocity, and ensuring visibility into progress. But with so much else to do, it’s easy to let this work fall by the wayside. With Copilot, adding projects and milestones is as simple as typing a prompt. You can also specify exactly how you want issues organized. For example, ask Copilot to use the “Bug Report” or “Feature Request” template, add labels like priority: high, frontend, or needs-triage, or set the issue type to “Task” or “Epic.” Copilot will apply these details automatically, ensuring your issues are consistently categorized. Additionally, Copilot tracks all changes, making them easily referenceable. You can review issue history and revert changes if needed, ensuring nothing important gets lost. 4. Batch create multiple issues at once Sometimes you need to log several issues after a customer meeting, user testing session, or bug bash. Traditionally, this means repeating the same creation process multiple times. Copilot supports multi-issue drafting, allowing you to create multiple issues in a single conversation. Whether logging feature requests or documenting bugs, batch creation saves significant time. Simply prompt Copilot to create the issues, describe each one, and Copilot will draft them all. For example, you could give the following prompt to create two issues at once: Create me issues for the following features: – Line breaks ignored in rendered Markdown despite double-space – Bold and italic Markdown styles not applied when combined You will still need to review and finalize each one, but the drafting process is streamlined into a single workflow. 5. Let AI help fix your bugs with Copilot coding agent Creating issues is only half the battle—fixing them is where the real work begins. You can now assign issues directly to Copilot. Just ask Copilot coding agent to take ownership of the issue, and your AI coding assistant will start analyzing the bug. Copilot can even suggest draft pull requests with potential fixes. This seamless handoff reduces context-switching and accelerates resolution times, allowing your team to focus on more complex challenges. Beyond Copilot: Issues enhancements on GitHub While Copilot is already revolutionizing issue management, we at GitHub are always looking for ways to enhance the overall issues experience. For example, you can now: Standardize issue types across repositories for consistent tracking and reporting. Break down complex tasks into sub-issues for better progress management. Use advanced search capabilities with logical operators to quickly find exactly what you need. Manage larger projects with expanded limits supporting up to 50,000 items. Kickstart enhanced issue management today Ready to transform your issue management workflow with GitHub Copilot? Head to github.com/copilot and try prompts like: “Create me an issue for…” “Log a bug for…” Or simply upload a screenshot and mention you want to file a bug. Experience firsthand how Copilot makes issue management feel less like administrative overhead and more like a conversation with your AI pair programmer. Learn more about creating issues with Copilot > The post 5 tips for using GitHub Copilot with issues to boost your productivity appeared first on The GitHub Blog. ​ AI & ML, GitHub Copilot, generative AI, GitHub Issues The GitHub Blog

tech blog

GitHub Copilot Spaces: Bring the right context to every suggestion

When generative AI tools guess what you need, the magic only lasts as long as the guesses are right. Add an unfamiliar codebase, a security checklist your team keeps in a wiki, or a one‑off Slack thread that explains why something matters, and even the most and even the most powerful model may fill in gaps with assumptions rather than having access to your specific context and knowledge. GitHub Copilot Spaces fixes that problem by letting you bundle the exact context Copilot should read—code, docs, transcripts, sample queries, you name it—into a reusable “space.” Once a space is created, every Copilot chat, completion, or command is grounded in that curated knowledge, producing answers that feel like they came from your organization’s resident expert instead of a generic model.  In this article, we’ll walk through: A 5‑minute quick‑start guide to creating your first space Tips for personalizing Copilot’s tone, style, and conventions with custom instructions Real‑world recipes for accessibility, data queries, and onboarding Collaboration, security, and what’s next on the roadmap (spoiler: IDE integration and Issues/PR support) Want to learn more? Try our Docs.  We have everything you need to get started—including pro tips on the context that’s most helpful in your workflows. Explore Docs > Why context is the new bottleneck for AI‑assisted development Large language models (LLMs) thrive on patterns, but day‑to‑day engineering work is full of unpatterned edge cases, including: A monorepo that mixes modern React with legacy jQuery Organizational wisdom buried in Slack threads or internal wikis Organization‑specific security guidelines that differ from upstream OSS docs Without that context, an AI assistant can only guess. But with Copilot Spaces, you choose which files, documents, or free‑text snippets matter, drop them into a space, and let Copilot use that context to answer questions or write code. As Kelly Henckel, PM for GitHub Spaces, said in our GitHub Checkout episode, “Spaces make it easy to organize and share context, so Copilot acts like a subject matter expert.” The result? Fewer wrong guesses, less copy-pasting, and code that’s commit-ready. What exactly is a Copilot Space? Think of a space as a secure, shareable container of knowledge plus behavioral instructions: What it holds Why it matters Attachments Code files, entire folders, Markdown docs, transcripts, or any plain text you add Gives Copilot the ground truth for answers Custom instructions Short system prompts to set tone, coding style, or reviewer expectations Lets Copilot match your house rules Sharing & permissions Follows the same role/visibility model you already use on GitHub No new access control lists to manage Live updates Files stay in sync with the branch you referenced Your space stays up to date with your codebase Spaces are available to anyone with a Copilot license (Free, Individual, Business, or Enterprise) while the feature is in public preview. Admins can enable it under Settings  > Copilot > Preview features. TL;DR: A space is like pinning your team’s collective brain to the Copilot sidebar and letting everyone query it in plain language. Quick-start guide: How to build your first space in 5 minutes Navigate to github.com/copilot/spaces and click Create space. Name it clearly. For example, frontend‑styleguide. Add a description so teammates know when—and when not—to use it. Attach context: From repos: Pull in folders like src/components or individual files such as eslint.config.js. Free‑text hack: Paste a Slack thread, video transcript, onboarding checklist, or even a JSON schema into the Text tab. Copilot treats it like any other attachment. Write custom instructions. A sentence or two is enough: “Respond as a senior React reviewer. Enforce our ESLint rules and tailwind class naming conventions.” Save and test it. You’re done. Ask Copilot a question in the Space chat—e.g., “Refactor this <Button> component to match our accessibility checklist”—and watch it cite files you just attached. Pro tip: Keep spaces focused Instead of dumping your entire repo into one space, create smaller, purpose‑built spaces like: Accessibility, Data‑Queries, Auth‑Model, etc. Kelly, the PM behind the feature, uses this pattern internally at GitHub to make subject‑matter expertise reusable.  Personalize Copilot’s coding style (and voice, too)  Custom instructions are the “personality layer” of a space and where spaces shine because they live alongside the attachments. This allows you to do powerful things with a single sentence, including: Enforce conventions  “Always prefer Vue 3 script setup syntax and Composition API for examples.” Adopt a team tone “Answer concisely. Include a one‑line summary before code blocks.” Teach Copilot project‑specific vocabulary  “Call it ‘scenario ID’ (SCID), not test case ID.” During the GitHub Checkout interview, Kelly shared how she built a personal space for a nonprofit side project: She attached only the Vue front‑end folder plus instructions on her preferred conventions, and Copilot delivered commit‑ready code snippets that matched her style guide on the first try. Automate your workflow: three real‑world recipes 1. Accessibility compliance assistant Space ingredients Markdown docs on WCAG criteria and GitHub’s internal “Definition of Done” Custom instruction: “When answering, cite the doc section and provide a code diff if changes are required.” How it helps: Instead of pinging the accessibility lead on Slack, you can use Spaces to ask questions like “What steps are needed for MAS‑C compliance on this new modal?” Copilot summarizes the relevant checkpoints, references the doc anchor, and even suggests ARIA attributes or color‑contrast fixes. GitHub’s own accessibility SME, Katherine, pinned this space in Slack so anyone filing a review gets instant, self‑service guidance. 2. Data‑query helper for complex schemas Space ingredients YAML schema files for 40+ event tables Example KQL snippets saved as .sql files Instruction: “Generate KQL only, no prose explanations unless asked.” How it helps: Product managers and support engineers who don’t know your database structures can ask, “Average PR review time last 7 days?” Copilot autocompletes a valid KQL query with correct joins and lets them iterate. Result: lets PMs and support self-serve without bugging data science teams. 3. Onboarding Hub and knowledge base in one link Space ingredients Key architecture diagrams exported as SVG text ADRs and design docs from multiple repos Custom instruction:

Scroll to Top