Author name: ITMAITY

tech blog

From MCP to multi-agents: The top 10 new open source AI projects on GitHub right now and why they matter

Every day, new public and open source repositories appear on GitHub, and navigating the sheer amount of activity can be a challenge for the best of us. Luckily, we’ve done the heavy lifting for you. Together with our panel of GitHub experts—who have experience across open source and developer relations—we analyzed every open source project created in the last 99 days (as of March 29, 2025), and ranked them in consideration of a number of factors including stars-per-day, forks, traffic spikes, and contributor velocity. Our GitHub panel includes: Abigail Cabunoc Mayes, aka @abbycabs, who works on open source maintainer programs and serves as a Director on the OpenJS foundation. Kara Sowles, aka @karasowles, who works with maintainers and the open source community. Kevin Crosby, aka @kevincrosby, who runs GitHub’s open source funding program. Jeff Luszcz, aka @jeffrey-luszcz, who helps manage GitHub’s open source program office (OSPO). Below, we’ll give you a rundown of these projects—and also discuss why we believe they’re the ones developers keep coming back to. Let’s dive in. Top trends, at a glance Agents are becoming key: A year ago the question was “What model can I fine tune?” Now it’s “What agent can I put to work?” Model Context Protocol (MCP) is helping integrate AI (and becoming the USB‑C of AI tooling): More projects are exposing their functions via MCP so any LLM can call them. Multi‑agent orchestration is no longer research only: Frameworks like OWL let several specialized agents cooperate on a task. Speech generation is leveling up: Projects push TTS/STT beyond “read this text aloud” into precise duration control and natural rhythm and sound. An increasing number of experiments with digital twins: There’s interest in personal AI that carries your context and voice across apps. Get the full analysis > 1. Open WebUI MCP: simplifying AI tool integrations 🔌 Website Source Python 📜 MIT license First up is a proxy server that turns MCP tools into OpenAPI-compatible HTTP servers. Developers building AI-powered apps are using the server to easily connect MCP-based tools with anything that uses standard RESTful OpenAPI interfaces. Why it matters “This new project from OpenWebUI (an alumni of 2024 GitHub Accelerator) is a great example of a growing trend in AI around integration—especially its use of MCP,” explains Abigail. “It’s highlighting that people in AI need more integration, and more standards like MCP will help.” 2. Unbody: the “Supabase of AI” 🧩 Website Source TypeScript 📜 Apache 2.0 license Think Supabase, but for AI: that’s Unbody in a nutshell. It’s a modular backend that lets you build AI-native software that actually understands and reasons about knowledge, instead of just shuffling data around. The project breaks things down into four layers that you can mix and match: Perception: Ingests, parses, enhances, and vectorizes raw data. Memory: Stores structured knowledge in vector databases and persistent storage. Reasoning: Generates content, calls functions, and plans actions. Action: Exposes knowledge via APIs, SDKs, and triggers. Why it matters “It’s an interesting question: How does agent coding become more abstracted from the backend?” asks Kevin. “With Unbody, you can write in any framework and get a backend that’s automatically managed. If you look at companies like E2E, you see work being done to create much more advanced agents that show how the backend stack is being abstracted.” 3. OWL: multi-agent collaboration in action 🦉 Source Python 📜 Apache 2.0 license When one AI agent isn’t enough, OWL enters the chat. Built on the CAMEL-AI framework—best known for popularizing multi-agent role-play and releasing a trove of synthetic “task + data” bundles—OWL lets several specialized agents cooperate through browsers, terminals, function calls, and MCP tools. It even tops the open-source leaderboard on the GAIA benchmark (58.18). Why it matters “It’s not just agentic, it’s also multi-model—and multi-agent architectures like OWL,” notes Abigail. “A year ago, it was all about people building models—now it’s all about agents and what they can do. OWL is doing multi-agent work which is quickly emerging.” 4. F/mcptools: Command-line power for MCP developers 💻 Source Go 📜 MIT license CLI fans: Here’s a command-line interface for working with MCP servers that’ll make you feel right at home. Built by GitHub Star Fatih Kadir Akin (who also shipped the GitHub Copilot prompts feature), it lets you discover and call tools, access resources, and manage prompts from any MCP-compatible server. MCP Tools supports input/output over stdin/stdout or HTTP, and spits out results in JSON or table views. It even lets you create mock servers for testing or proxy MCP requests to shell scripts. Why it matters This turns MCP into something you can “git clone && mcp call.” It offers a familiar CLI workflow plus a built-in guard mode that lets you prototype tools fast and lock them down for prod. 5. Nutlope/self.so: Build your personal site with AI in seconds ⚡ Website Source TypeScript 📜 MIT license If putting together a personal website isn’t your idea of fun, Nutlope/self.so can lend a hand. Upload your résumé or LinkedIn profile, and the tool will pull together a straightforward site for you, using AI to handle the layout so you can skip the CSS headaches. The tech stack includes Together.ai for language modeling, Vercel’s AI SDK, Clerk for auth, Next.js for the framework, Helicone for observability, S3 for storage, Upstash Redis for the database, and Vercel for hosting. Why it matters The project speaks to composable “AI Lego” stacks. That’s because it chains Vercel AI SDK, Clerk auth, Upstash Redis, S3, and Tailwind—with each service doing one job well—which illustrates how modern AI apps are often stitched together from small, specialized services instead of monoliths. 6. VoiceStar: precise control for text-to-speech applications 🎙️ Source Python 📜 MIT code license, CC-BY-4.0 model license If your project needs speech that lands within a specific time window, VoiceStar’s duration-controllable synthesis can help. It lets developers set target lengths so voice output fits time-sensitive use cases—like fixed-length prompts or narration—without extra audio editing. The project includes both CLI and Gradio interfaces

tech blog

The AI-powered DevOps revolution: Redefining developer collaboration

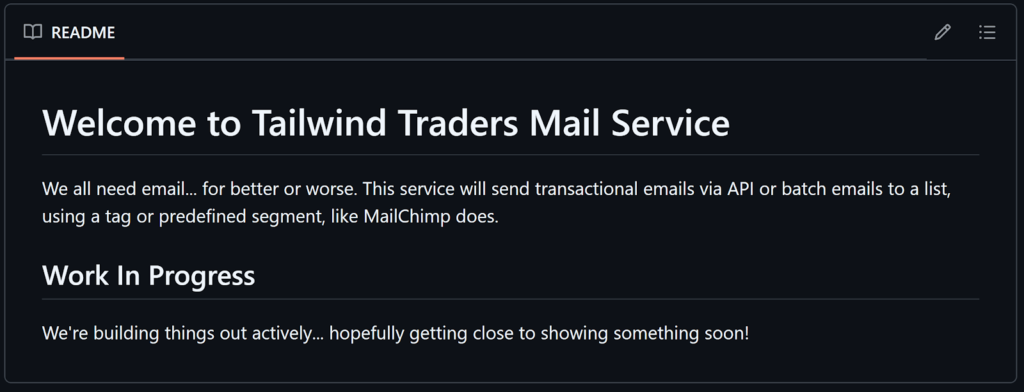
When it comes to mastering DevOps, it’s often not the technical skills that trip us up, but rather the more critical aspects of collaboration and communication. Communication challenges, vague requirements, and missing documentation can leave us guessing on stakeholder intent. Plus, siloed workflows can cause teams to face inconsistencies in their processes, tooling, and time to delivery, as there are so many moving parts. This all works against DevOps best practices. In this blog, we will look at ways that we can enhance team productivity, reduce cognitive load, and implement a more seamless collaboration across teams and tools to improve code quality and create faster delivery cycles. Adding a bit of AI into our workflows will get us on the right path. 💡 Tip: When using Copilot (or any generative AI), it’s always a good idea to review any suggestions before accepting them. There’s a reason we refer to GitHub Copilot as an assistant. It is meant to augment your abilities, not serve as a replacement for your skills. Filling in communication gaps and documentation When I get started on a new project, the first thing I do is seek out the README or documentation, if there is any. While we should be writing documentation for our code as we go, the reality is that we often do not. This gap, between intention and practice, creates consistent challenges for our teams as we try to onboard new members or revisit older projects. Nowadays, to get the documentation that I need, whether it’s working on a legacy code base or joining a new community project, I start by opening either GitHub Copilot Chat in VSCode or in the github.com immersive chat experience to ask Copilot to explain the codebase to me. And when the existing README is lacking, I can then ask Copilot to help me to write a better one. For example, here’s a typical placeholder README: Beyond a brief description, there’s not much information. I opened up VSCode and GitHub Copilot Chat, attaching the existing README file to give Copilot context, and asked it to simply make my README more detailed. After asking Copilot to help create a better README, here’s how it looked: GitHub Copilot provided a project overview, installation and configuration steps, and some usage instructions. This gives me, and anyone else who visits this project, a better understanding of what the project is doing and how to get started. You can use GitHub Copilot not only to generate a README once you’ve written your code, but also function and class descriptions. Copilot can improve readability of code by generating descriptions, adding context around what your code is doing, and writing documentation that can reduce the learning curve and onboarding time. For example, check out this bit of code where Copilot helped write inline comments: Oftentimes, the various technical teams (operations, security, and development) operate independently, not fully aware of other teams’ standards, dependencies, or changes. Using Copilot to create better documentation and code comments can help us to break down these silos. AI-powered code reviews and pull requests So, when we do make a code change that impacts other teams, how can we better review those changes to ensure a more seamless and secure delivery? Let’s take a look. You know when you submit your pull request and you’re in a rush because of task overload? In the example above, we used docstrings to explain our functions and that is extremely helpful when you’re working with complex functions. Copilot can help write your docstrings to provide clear parameter explanations, detailed method descriptions, and context about usage. This helps to reduce the ambiguity for your code reviewers and provides context to the changes that were made. When you get ready to submit your commit, instead of having to think of a funny and witty commit message yourself, select the AI-enhanced commit option and let Copilot generate a clear, concise summary of your changes for you: How often when we are reviewing a pull request there is little to no description? We can use Copilot to help with that, too! After I have committed my code, I can use the “summary” option to generate a summary of my pull request: Copilot reviews the commit and the files changed, and then outputs a thorough summary of the changes with links to the changed files. Oftentimes, we submit a pull request and expect the reviewer to figure out what changes were made, as if they had a crystal ball. In this example, I’ve used Copilot to generate a short summary of the changes in my commit, as well as a longer, more detailed summary of the pull request. This saved me time, but more importantly, it has provided a much higher quality output than I would have been able to do on my own. Copilot’s ability to summarize and document can be hugely beneficial in creating consistent terminology and communication across teams, eliminating collaboration breakdowns and enhancing code reviews. Along with using Copilot to summarize my pull request before I send up our commit, I can also set Copilot as one of my reviewers by clicking “Reviewers” in the top right hand corner of my screen. Once I do that, Copilot reviews my pull request before my other team members, allowing me to find typos and other errors, and iterate my code before asking others to review it. This enables me to iterate faster, getting direct feedback more quickly on my changes and lessening the time my teammates need to take to review my code. It also allows me to learn how to improve my code quality, too. Resolving merge conflicts with Copilot So far, I’ve used Copilot to better define the project README, add inline comments and documentation, and generate more relevant, thorough, and precise commit messages and precise pull request summaries. But most of these changes have been me acting alone—what about when I’m collaborating with my team and I run into a merge conflict? GitHub Copilot

tech blog

Partnering to Shape Telecom’s Future at MWC 2025

At MWC25, Dell unveiled innovative solutions with partners, empowering operators with scalability, innovation, and efficiency.   ​  ​At MWC25, Dell unveiled innovative solutions with partners, empowering operators with scalability, innovation, and efficiency. Telecommunications Blog | Dell

tech blog

GitHub for Beginners: Building a REST API with Copilot

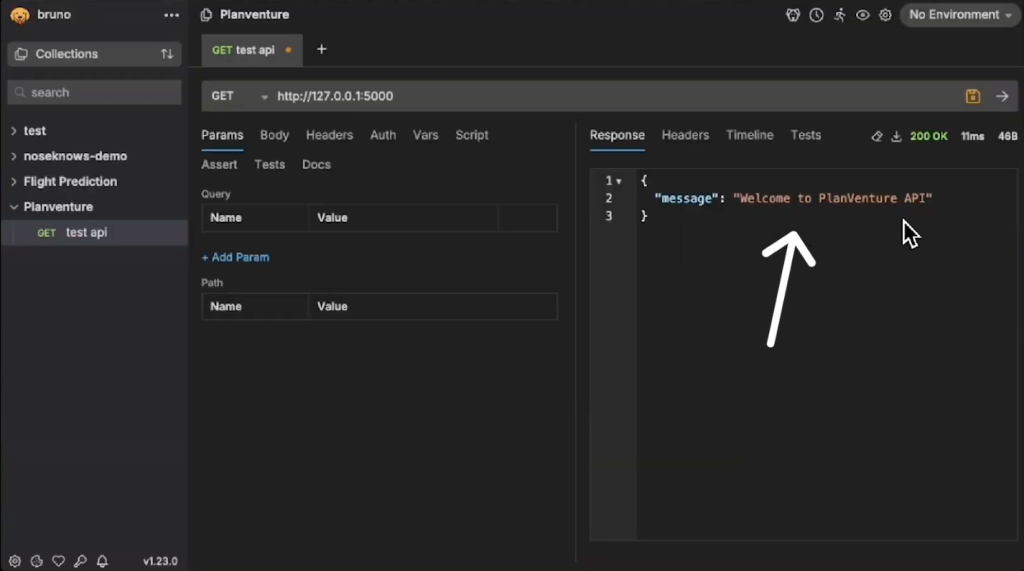
Welcome to the next episode in our GitHub for Beginners series, where we’re diving into the world of GitHub Copilot. This is our fifth episode, and we’ve already talked about Copilot in general, some of its essential features, how to write good prompts, and a bit about security best practices. We have all the previous episodes on our blog and available as videos. Today we’re diving a little deeper—we’re using GitHub Copilot to help us build a backend REST API. We’ll walk through how to build the backend for Planventure, a travel itinerary builder that helps users plan their trips. You can find a full description of what we’ll be building in this repository. For the demos in this series, we’re using GitHub Copilot in Visual Studio Code Copilot is available in other IDEs, but the available functionality may vary depending on your environment. What you’ll need and what we’re building Before we get started, here’s what you’ll need to install: A code editor like VS Code Python SQLite Viewer to view database tables An API client like Bruno to test your routes Access to GitHub Copilot — sign up for free! What we’re building: We’re creating a minimum viable product (MVP) for Planventure’s backend API. In the next episode, we’ll build the frontend to connect to the API. Here’s what we’ll include: REST API built with Flask Database support using SQLAlchemy User authentication (with password hashing and JWTs) Full CRUD functionality for trips Each trip will include: Destination Start and end dates A basic itinerary with location coordinates (perfect for maps) At the end of this, we want to have a working API that handles user authentication and basic trip management. Step 1: Setting up the environment Fork and clone the planventure repository. Once you’ve done that, cd into the planventure-api directory in your code editor. git clone https://github.com/github-samples/planventure cd planventure-api Open up your terminal and run the following commands to create and activate a virtual environment. python3 -m venv venv source venv/bin/activate Assuming you’re using VS Code, you’ll see venv in the status bar at the bottom. If you’re using another editor, be sure to verify that you’re in your virtual environment. Staying in your terminal, run this command to install dependencies: pip install -r requirements.txt Run the following command in your terminal to start the server: flask run –debug You should see your server running on 127.0.0.1:5000. Use Bruno to make a GET request to that URL and you should see the following welcome message: Remember to add venv/ to your .gitignore! Step 2: Create the Database Now that you’ve got your environment created, it’s time to start using Copilot to generate some code. We’ll use Copilot Chat and Copilot Edits to generate our database setup. Open the app.py file and Copilot Chat, choose the Ask option, and enter the following prompt: @workspace Update the Flask app with SQLAlchemy and basic configurations At the bottom of the chat window, click the model selector and select the Claude 3.5 Sonnet model and send the prompt. Copilot will provide a plan, a code block, and a summary of suggested changes. Whenever you receive code suggestions from Copilot, it’s important to review them and understand the changes it’s suggesting. After reviewing the changes, hover over the code block and click the Apply in editor button—the first button in the top-right of the suggested code. Select the option to apply the changes into the active editor. Copilot will make these updates in the open file. Click Accept to add those changes. https://github.blog/wp-content/uploads/2025/04/apply_in_editor_vid.mp4#t=0.001 If Copilot provided suggestions that need to be in a new file, hover over the change and select the three dots, then select Insert into New File and save. https://github.blog/wp-content/uploads/2025/04/insert_new_file.mp4#t=0.001 Now we need to update our dependencies. Go back to Copilot Chat and enter the following prompt: @workspace update requirements.txt with the necessary packages for Flask API with SQLAlchemy and JWT Open the requirements.txt file. Hover over the suggested changes, click the Apply in editor button, and once again select the option to apply the changes into the active editor. Just like before, accept the changes and save the file. Step 3: Time to create some models Now it’s time to create our User and Trip models. This GitHub issue describes our requirements. According to the issue, the User model needs an email, a password, and must include password hashing and timestamps. The Trip model needs to have a destination, start and end dates, coordinates, and an itinerary with a user relationship. To do all of this, we’re going to use Copilot Edits. Click on the chat icon in your editor, and from the dropdown, select Edits. Open your app.py and requirements.txt file and drag them into the chat window. Then choose the Claude 3.5 Sonnet model from the model picker. Now send the following prompt to Copilot Edits: Create SQLAlchemy User model with email, password_hash, and timestamps. Add code in new files. Copilot Edits will then create a plan to do what you asked. It creates some new files and folders, as well as updates existing files. Accept the changes, review the code, and make any corrections necessary before saving the files. https://github.blog/wp-content/uploads/2025/04/edits_prompt_flow.mp4#t=0.001 Check the video for examples of things to look for, but remember that your changes might be different. Copilot can provide different suggestions for the same prompts. Now create a python script to create the database tables. Send Copilot Edits the following prompt: Update code to be able to create the db tables with a python shell script. As before, Copilot Edits will go to work and create or edit files as necessary. Accept the code and review the changes, making sure these changes address your needs. After saving the reviewed changes, go back to your terminal and initialize the database by running: python3 init_db.py If Copilot Edits created a different filename than init_db.py, use the filename in your project. After the script runs, you’ll see a new planventure.db file in your project. However,

tech blog

Cutting through the noise: How to prioritize Dependabot alerts

Let’s be honest: that flood of security alerts in your inbox can feel completely overwhelming. We’ve been there too. As a developer advocate and a product manager focused on security at GitHub, we’ve seen firsthand how overwhelming it can be to triage vulnerability alerts. Dependabot is fantastic at spotting vulnerabilities, but without a smart way to prioritize them, you might be burning time on minor issues or (worse) missing the critical ones buried in the pile. So, we’ve combined our perspectives—one from the security trenches and one from the developer workflow side—to share how we use Exploit Prediction Scoring System (EPSS) scores and repository properties to transform the chaos into clarity and make informed prioritization decisions. Understanding software supply chain security If you’re building software today, you’re not just writing code—you’re assembling it from countless open source packages. In fact, 96% of modern applications are powered by open source software. With such widespread adoption, open source software has become a prime target for malicious actors looking to exploit vulnerabilities at scale. Attackers continuously probe these projects for weaknesses, contributing to the thousands of Common Vulnerabilities and Exposures (CVEs) reported each year. But not all vulnerabilities carry the same level of risk. The key question becomes not just how to address vulnerabilities, but how to intelligently prioritize them based on your specific application architecture, deployment context, and business needs. Understanding EPSS: probability of exploitation with severity if it happens When it comes to prioritization, many teams still rely solely on severity scores like the Common Vulnerability Scoring System (CVSS). But not all “critical” vulnerabilities are equally likely to be exploited. That’s where EPSS comes in—it tells you the probability that a vulnerability will actually be exploited in the wild within the next 30 days. Think of it this way: CVSS tells you how bad the damage could be if someone broke into your house, while EPSS tells you how likely it is that someone is actually going to try. Both pieces of information are crucial! This approach allows you to focus resources effectively. As security pro Daniel Miessler points out in Efficient Security Principle, “The security baseline of an offering or system faces continuous downward pressure from customer excitement about, or reliance on, the offering in question.” Translation? We’re always balancing security with usability, and we need to be smart about where we focus our limited time and energy. EPSS helps us spot the vulnerabilities with a higher likelihood of exploitation, allowing us to fix the most pressing risks first. Smart prioritization steps 1. Combine EPSS with CVSS One approach is to look at both likelihood (EPSS) and potential impact (CVSS) together. It’s like comparing weather forecasts—you care about both the chance of rain and how severe the storm might be. For example, when prioritizing what to fix first, a vulnerability with: EPSS: 85% (highly likelihood of exploitation) CVSS: 9.8 (critical severity) …should almost always take priority over one with: EPSS: 0.5% (much less likely to be exploited) CVSS: 9.0 (critical severity) Despite both having red-alert CVSS ratings, the first vulnerability is the one keeping us up at night. 2. Leverage repository properties for context-aware prioritization Not all code is created equal when it comes to security risk. Ask yourself: Is this repo public or private? (Public repositories expose vulnerabilities to potential attackers) Does it handle sensitive data like customer info or payments? How often do you deploy? (Frequent deployments face tighter remediation times) One way to provide context-aware prioritization systematically is with custom repository properties, which allow you to add contextual information about your repositories with information such as compliance frameworks, data sensitivity, or project details. By applying these custom properties to your repositories, you create a structured classification system that helps you identify the “repos that matter,” so you can prioritize Dependabot alerts for your production code rather than getting distracted by your totally-not-a-priority test-vulnerabilities-local repo. 3. Establish clear response Service Level Agreements (SLAs) based on risk levels Once you’ve done your homework on both the vulnerability characteristics and your repository context in your organization, you can establish clear timelines for responses that make sense for your organization resources and risk tolerance. Let’s see how this works in real life: Here’s an example risk matrix that combines both EPSS (likelihood of exploitation) and CVSS (severity of impact). EPSS ↓ / CVSS → Low Medium High Low ✅ When convenient ⏳ Next sprint ⚠️ Fix Soon Medium ⏳ Next sprint ⚠️ Fix soon 🔥 Fix soon High ⚠️ Fix Soon 🔥 Fix soon 🚨 Fix first Say you get an alert about a vulnerability in your payment processing library that has both a high EPSS score and high CVSS rating. Red alert! Looking at our matrix, that’s a “Fix first” situation. You’ll probably drop what you’re doing, and put in some quick mitigations while the team works on a proper fix. But what about that low-risk vulnerability in some testing utility that nobody even uses in production? Low EPSS, low CVSS… that can probably wait until “when convenient” within the next few weeks. No need to sound the alarm or pull developers off important feature work. This kind of prioritization just makes sense. Applying the same urgency to every single vulnerability just leads to alert fatigue and wasted resources, and having clear guidelines helps your team know where to focus first. Integration with enterprise governance For enterprise organizations, GitHub’s auto-triage rules help provide consistent management of security alerts at scale across multiple teams and repositories. Auto-triage rules allow you to create custom criteria for automatically handling alerts based on factors like severity, EPSS, scope, package name, CVE, ecosystem, and manifest location. You can create your own custom rules to control how Dependabot auto-dismisses and reopens alerts, so you can focus on the alerts that matter. These rules are particularly powerful because they: Apply to both existing and future alerts. Allow for proactive filtering of false positives. Enable “snooze until patch” functionality for vulnerabilities without a fix available. Provide visibility

tech blog

How agentic AI is driving AI-first business transformation for customers to achieve more

The role of agentic AI has grown rapidly over the past several months as organizational leaders seek ways to accelerate AI Transformation. We firmly believe that Agents + Copilot + Human Ambition can deliver real AI differentiation for our customers. By putting the autonomous capabilities of an agent to work for their businesses, our customers are unlocking AI opportunity to realize greater value. The recent introduction of Microsoft 365 Copilot Chat is delivering on our promise of “Copilot for all” by providing frontline workers with a free, secure and enterprise-ready AI chat interface. Our customers are building their own custom agents with the no-code, low-code features of Microsoft Copilot Studio, allowing citizen and professional developers to extend the capabilities of Copilot and deliver on the unique needs of their industry. We also offer the best prebuilt agent framework right out-of-the-box, such as Sales Agent that works autonomously to help sellers build pipeline and close more deals with greater speed. Similarly, we recently announced general purpose reasoning agents — such as Researcher and Analyst — and invite all of our Microsoft 365 Copilot users to try these in their environments. It is exciting to see how agents are driving pragmatic AI innovation for our customers by increasing productivity, creating capacity across every role and function and improving business processes. Below are a few highlights from the past quarter that underscore the impact of an agentic AI approach — from improving employee experiences to streamlined workflows and significant cost savings. Agentic service management software provider Atomicwork leveraged Azure AI Foundry to create Atom — an AI agent that transforms the digital workplace experience for employees and automates service delivery. Adopters of this agentic management platform recognize significant benefits, such as reduced operational costs and increased employee satisfaction, with one customer achieving a 65% deflection rate within six months of implementation and projections of 80% by the end of the year. Integration within Microsoft Teams and other enterprise tools have further streamlined service delivery, allowing employees easier access to information and support. The company’s AI-driven approach has resulted in a 20% increase in accuracy and 75% reduction in response latency when compared to competing solutions. To support employees as they manage the high demand of internal requests and to create a more satisfying work environment, BDO Colombia used Copilot Studio and Power Platform to develop BeTic 2.0 — an agent that centralizes and automates key payroll and finance processes. The agent reduced operational workload by 50%, optimized 78% of internal processes and showed 99.9% accuracy in managed requests. It also helped reduce duplicative work, optimized workflows, improved the employee-client experience and continues to serve as a competitive differentiator for the company in the market. Dow is using agents to automate the shipping invoice analysis process and streamline its global supply chain to unlock new efficiencies and value. Receiving more than 100,000 shipping invoices via PDF each year, Dow built an autonomous agent in Copilot Studio to scan for billing inaccuracies and surface them in a dashboard for employee review. Using Freight Agent — a second agent built in Copilot Studio — employees can investigate further by “dialoguing with the data” in natural language. The agents are helping employees solve the challenge of hidden losses autonomously within minutes rather than weeks or months. Dow expects to save millions of dollars on shipping costs through increased accuracy in logistic rates and billing within the first year. As a leading provider of sustainable energy in Belgium, Eneco serves over 1.5 million customers. Facing performance issues with their existing chatbot, Eneco developed a new AI-driven agent using the no-code, graphical interface in Copilot Studio. This multilingual agent was deployed on the company website in just three months, integrating seamlessly with its live chat platform. The new agent manages 24,000 chats per month — an increase of 140% over the previous solution — and resolves 70% more customer conversations without a handoff to a live representative. For requests that do require escalation, the agent provides an AI-generated summary of the conversation for a more optimized call center experience. To reimagine trend forecasting and consumer marketing, The Estée Lauder Companies Inc. leveraged Copilot Studio to develop ConsumerIQ — an agent that centralizes and streamlines consumer data to enable instant access to actionable insights. Using natural language prompts, the agent reduced the time required for marketers to gather data from hours to seconds, while accelerating decision-making and helping prevent duplicated research. Together with Azure OpenAI Service and Azure AI Search, teams can gather data, identify trends, build marketing assets, inform research and move products to market faster. To create proposals and streamline knowledge retrieval and organization, Fujitsu leveraged Azure AI Agent Service within Azure AI Foundry to develop an intelligent, scalable AI agent for sales automation. The agent boosted productivity of sales teams by 67% while addressing knowledge gaps and allowing them to build stronger customer relationships. This transformation allowed teams to shift from time-intensive tasks to strategic planning and customer relationship building, while also supporting new hires with product information and strategic guidance. To reduce manual tasks and help employees deliver exceptional experiences, global baker Grupo Bimbo established its first ever technology Center of Excellence. Using Power Platform solutions and Copilot Studio, teams created 7,000 power apps, 18,000 processes and 650 agents to reduce busy work and enhance consumer service. By automating low-value tasks, the company saved tens of millions of dollars annually in development efforts and operational efficiencies. Grupo Bimbo also migrated to Azure for its AI capabilities, scalability, security and rapid time to market for apps. KPMG developed Comply AI — an agent that helps identify environment, social and governance compliance. Using Microsoft AI technologies, the agent helps identify relevant obligations, generate statements in natural language, assess control effectiveness and redraft control descriptions. This has already helped one of its customers achieve 70% improvement in Controls and Risks descriptions, an 18-month reduction in compliance program timelines and a 50% cut in ongoing compliance efforts. KPMG is also using

tech blog

A guide to deciding what AI model to use in GitHub Copilot

To ensure that you have access to the best technology available, we’re continuously adding support for new models to GitHub Copilot. That being said, we know it can be hard to keep up with so many new models being released all the time. All of this raises an obvious question: Which model should you use? You can read our recent blog post for an overview of the models currently available in Copilot and their strengths, or check out our documentation for a deep dive comparing different models and tasks. But the AI landscape moves quickly. In this article we’ll explore a framework—including a few strategies—for evaluating whether any given AI model is a good fit for your use, even as new models continue to appear at a rapid pace. It’s hard to go wrong with our base model, which has been fine-tuned specifically for programming-related tasks. But depending on what you’re working on, you likely have varying needs and preferences. There’s no single “best” model. Some may favor a more verbose model for chat, while others prefer a terse one, for example. We spoke with several developers about their model selection process. Keep reading to discover how to apply their strategies to your own needs. 💡 Watch the video below for tips on prompt engineering to get the best results. Why use multiple models? There’s no reason you have to pick one model and stick with it. Since you can easily switch between models for both chat and code completion with GitHub Copilot, you can use different models for different use cases. It’s kind of like dogfooding your own stack: You won’t know if it really fits your workflow until you’ve shipped some real code with it. – Anand Chowdhary, FirstQuadrant CTO and co-founder Chat vs. code completion Using one model for chat and another for autocomplete is one of the most common patterns we see among developers. Generally, developers prefer autocompletion models because they’re fast and responsive, which they need if they’re looking for suggestions as they think and type. Developers are more tolerant of latency in chat, when they’re in more of an exploratory state of mind (like considering a complex refactoring job, for instance). Reasoning models for certain programming tasks Reasoning models like OpenAI o1 often respond slower than traditional LLMs such as GPT-4o or Claude Sonnet 3.5. That’s in large part because these models break a prompt down into parts and consider multiple approaches to a problem. That introduces latency in their response times, but makes them more effective at completing complex tasks. Many developers prefer these more deliberative models for particular tasks. For instance, Fatih Kadir Akın, a developer relations manager, uses o1 when starting new projects from scratch. “Reasoning models better ‘understand’ my vision and create more structured projects than non-reasoning models,” he explains. FirstQuadrant CTO and co-founder Anand Chowdhary favors reasoning models for large-scale code refactoring jobs. “A model that rewrites complex backend code without careful reasoning is rarely accurate the first time,” he says. “Seeing the thought process also helps me understand the changes.” When creating technical interview questions for her newsletter, GitHub Senior Director of Developer Advocacy, Cassidy Williams mixes models for certain tasks. When she writes a question, she uses GPT-4o to refine the prose, and then Claude 3.7 Sonnet Thinking to verify code accuracy. “Reasoning models help ensure technical correctness because of their multi-step process,” she says. “If they initially get something wrong, they often correct themselves in later steps so the final answer is more accurate.” There’s some subjectivity, but I compare model output based on the code structure, patterns, comments, and adherence to best practices. – Portilla Edo, cloud infrastructure engineering lead What to look for in a new AI model Let’s say a new model just dropped and you’re ready to try it out. Here are a few things to consider before making it your new go-to. Recentness Different models use different training data. That means one model might have more recent data than another, and therefore might be trained on new versions of the programming languages, frameworks, and libraries you use. “When I’m trying out a new model, one of the first things I do is check how up to date it is,” says Xavier Portilla Edo, a cloud infrastructure engineering lead. He typically does this by creating a project manifest file for the project to see what version numbers Copilot autocomplete suggests. “If the versions are quite old, I’ll move on,” he says. Speed and responsiveness As mentioned, developers tend to tolerate more latency in a chat than in autocomplete. But responsiveness is still important in chat. “I enjoy bouncing ideas off a model and getting feedback,” says Rishab Kumar, a staff developer evangelist at Twilio. “For that type of interaction, I need fast responses so I can stay in the flow.” Accuracy Naturally, you need to evaluate which models produce the best code. “There’s some subjectivity, but I compare model output based on the code structure, patterns, comments, and adherence to best practices,” Portilla Edo says. “I also look at how readable and maintainable the code is—does it follow naming conventions? Is it modular? Are the comments helpful or just restating what the code does? These are all signals of quality that go beyond whether the code simply runs.” How to test an AI model in your workflow OK, so now you know what to look for in a model. But how do you actually evaluate it for responsiveness and correctness? You use it, of course. Start with a simple app Akın will generally start with a simple todo app written in vanilla JavaScript. “I just check the code, and how well it’s structured,” he says. Similarly, Kumar will start with a websocket server in Python. The idea is to start with something that you understand well enough to evaluate, and then layer on more complexity. “Eventually I’ll see if it can build something in 3D using 3js,” Akın says. Portilla Edo

triangular-image
tech blog

How the GitHub CLI can now enable triangular workflows

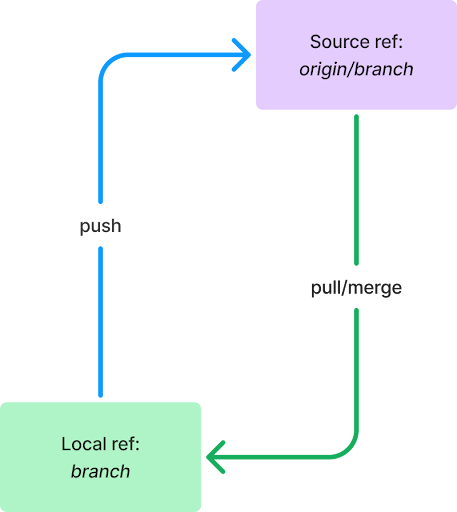
Most developers are familiar with the standard Git workflow. You create a branch, make changes, and push those changes back to the same branch on the main repository. Git calls this a centralized workflow. It’s straightforward and works well for many projects. However, sometimes you might want to pull changes from a different branch directly into your feature branch to help you keep your branch updated without constantly needing to merge or rebase. However, you’ll still want to push local changes to your own branch. This is where triangular workflows come in. It’s possible that some of you have already used triangular workflows, even without knowing it. When you fork a repo, contribute to your fork, then open a pull request back to the original repo, you’re working in a triangular workflow. While this can work seamlessly on github.com, the process hasn’t always been seamless with the GitHub CLI. The GitHub CLI team has recently made improvements (released in v2.71.2) to better support these triangular workflows, ensuring that the gh pr commands work smoothly with your Git configurations. So, whether you’re working on a centralized workflow or a more complex triangular one, the GitHub CLI will be better equipped to handle your needs. If you’re already familiar with how Git handles triangular workflows, feel free to skip ahead to learn about how to use gh pr commands with triangular workflows. Otherwise, let’s get into the details of how Git and the GitHub CLI have historically differed, and how four-and-a-half years after it was first requested, we have finally unlocked managing pull requests using triangular workflows in the GitHub CLI. First, a lesson in Git fundamentals To provide a framework for what we set out to do, it’s important to first understand some Git basics. Git, at its core, is a way to store and catalog changes on a repository and communicate those changes between copies of that repository. This workflow typically looks like the diagram below: Figure 1: A typical git branch setup The building blocks of this diagram illustrate two important Git concepts you likely use every day, a ref and push/pull. Refs A ref is a reference to a repository and branch. It has two parts: the remote, usually a name like origin or upstream, and the branch. If the remote is the local repository, it is blank. So, in the example above, origin/branch in the purple box is a remote ref, referring to a branch named branch on the repository name origin, while branch in the green box is a local ref, referring to a branch named branch on the local machine. While working with GitHub, the remote ref is usually the repository you are hosting on GitHub. In the diagram above, you can consider the purple box GitHub and the green box your local machine. Pushing and pulling A push and a pull refer to the same action, but from two different perspectives. Whether you are pushing or pulling is determined by whether you are sending or receiving the changes. I can push a commit to your repo, or you can pull that commit from my repo, and the references to that action would be the same. To disambiguate this, we will refer to different refs as the headRef or baseRef, where the headRef is sending the changes (pushing them) and the baseRef is receiving the changes (pulling them). Figure 2: Disambiguating headRef and baseRef for push/pull operations When dealing with a branch, we’ll often refer to the headRef of its pull operations as its pullRef and the baseRef of its push operations as its pushRef. That’s because, in these instances, the working branch is the pull’s baseRef and the push’s headRef, so they’re already disambiguated. The @{push} revision syntax Turns out, Git has a handy built-in tool for referring to the pushRef for a branch: the @{push} revision syntax. You can usually determine a branch’s pushRef by running the following command: git rev-parse –abbrev-ref @{push} This will result in a human-readable ref, like origin/branch, if one can be determined. Pull Requests On GitHub, a pull request is a proposal to integrate changes from one ref to another. In particular, they act as a simple “pause” before performing the actual integration operation, often called a merge, when changes are being pushed from ref to another. This pause allows for humans (code reviews) and robots (GitHub Copilot reviews and GitHub Actions workflows) to check the code before the changes are integrated. The name pull request came from this language specifically: You are requesting that a ref pulls your changes into itself. Figure 3: Demonstrating how GitHub Pull Requests correspond to pushing and pulling Common Git workflows Now that you understand the basics, let’s talk about the workflows we typically use with Git every day. A centralized workflow is how most folks interact with Git and GitHub. In this configuration, any given branch is pushing and pulling from a remote ref with the same branch name. For most of us, this type of configuration is set up by default when we clone a repo and push a branch. It is the situation shown in Figure 1. In contrast, a triangular workflow pushes to and pulls from different refs. A common use case for this configuration is to pull directly from a remote repository’s default branch into your local feature branch, eliminating the need to run commands like git rebase <default> or git merge <default> on your feature branch to ensure the branch you’re working on is always up to date with the default branch. However, when pushing changes, this configuration will typically push to a remote ref with the same branch name as the feature branch. Figure 4: juxtaposing centralized workflows from triangular workflows. We complete the triangle when considering pull requests: the headRef is the pushRef for the local ref and the baseRef is the pullRef for the local branch: Figure 5: a triangular workflow We can go one step further and set up triangular workflows

gettyimages
tech blog

Dell AI Factory and NVIDIA NeMo for Agentic AI

Organizations can now leverage new AI abilities with Dell AI Factory with NVIDIA and NeMo Microservices, to boost productivity.   ​  ​Organizations can now leverage new AI abilities with Dell AI Factory with NVIDIA and NeMo Microservices, to boost productivity. AI Solutions Blog | Dell

iStock
tech blog

The Essential AI PC App: Does It Even Exist?

What’s the one app that makes an AI PC invaluable? Learn how AI PCs quietly transform everyday tasks into powerful experiences.   ​  ​What’s the one app that makes an AI PC invaluable? Learn how AI PCs quietly transform everyday tasks into powerful experiences. AI Solutions Blog | Dell

tech blog

The 2025 Annual Work Trend Index: The Frontier Firm is born

We are entering a new reality — one in which AI can reason and solve problems in remarkable ways. This intelligence on tap will rewrite the rules of business and transform knowledge work as we know it. Like the Industrial Revolution and the internet era, this transformation will take decades to show its full promise — and will bring broad technological, societal and economic change. The 2025 Work Trend Index Annual Report is designed to prepare leaders and employees for this shift. As in previous years, it draws on a large global survey, Microsoft 365 telemetry and LinkedIn hiring and labor trends. New this year are insights from AI-native startups, economists, scientists and academics — all pointing to a seismic shift already underway. In fact, 82% of leaders say this is a pivotal year to rethink core aspects of strategy and operations. The data reveals the emergence of a new kind of organization: the Frontier Firm — built around intelligence on tap, human-agent teams and a new role for everyone: agent boss. While the shift ahead is profound, human ambition, creativity and ingenuity will continue to create new economic value and opportunity. In fact, 71% of workers at these firms say their company is thriving, compared to just 37% globally. You can buy intelligence on tap Imagine if you knew, before the internet took off, just how much it would reshape business. That’s where we are with AI. Intelligence is no longer bound by headcount or expertise. It’s an essential durable good: abundant, affordable and scalable on-demand. As economic and shareholder pressures grow, this on-demand intelligence offers a new lever for growth — one that can close the growing gap between business demands and human capacity. While 53% of leaders say productivity must increase, 80% of the global workforce reports lacking the time or energy to do their job. And on average, employees are interrupted by a meeting, email or ping every 2 minutes. To bridge this Capacity Gap, 82% of leaders expect to use digital labor to expand their workforce in the next 12 to 18 months. Digital labor will spur the reinvention of even the most established firms — and the birth of new companies we haven’t even thought of yet. On LinkedIn, top AI startups are hiring at 2X the rate of Big Tech. Much of that talent is flowing out of Big Tech and staying in the startup world, pointing to a deeper shift where innovation — and opportunity — are rising. As incumbents adapt and challengers scale, like we saw in the .com boom, the rules of talent and competition are being rewritten in real time. Human-agent teams will upend the org chart As AI continues to democratize expertise, we’re seeing a move from rigid org charts to more fluid, outcome-driven Work Charts. These structures flex with the needs of the business, drawing on the right mix of humans and agents to get the job done. While every function will evolve at a different pace and scale, 46% of leaders say their organization is using agents to fully automate workstreams or business processes — with customer service, marketing and product development as the top AI investment priorities. To maximize the impact of these human-agent teams, organizations need a new metric: the human-agent ratio. Leaders must ask two critical questions: How many agents are needed for which roles and tasks? And how many humans are needed to guide them? Getting that ratio right will be critical — and task-specific. Organizations will need to consider if there are times when human and digital labor outperform AI alone, when customers prefer a human touch or when society expects people to be responsible for the consequences — like a high-stakes product or finance decision. Whether it’s a customer conversation, a strategic decision or a product launch, knowing how to staff the right mix of humans and agents will define how work gets done — and how success is measured. Every employee becomes an agent boss As agents increasingly join the workforce, we’ll see the rise of the agent boss: someone who builds, delegates to and manages agents to amplify their impact and take control of their career in the age of AI. From the boardroom to the frontline, every worker will need to think like the CEO of an agent-powered startup. In fact, leaders expect their teams will be training (41%) and managing (36%) agents within five years. For those ready to lean in, AI will be a career accelerator — but leaders are ahead. We measured the agent boss mindset across seven indicators — from regular use and trust to career impact. Leaders outpace employees on every measure: 67% are familiar with agents (vs. 40% of employees) and 79% believe AI will accelerate their careers (vs. 67%). But this shift won’t stop at the top. As agents become embedded into daily work, roles across every level and function will evolve — along with the broader workforce. While 33% of leaders are considering headcount reductions, 78% are considering hiring for new AI roles. And 83% say AI will enable employees to take on more complex and strategic work earlier in their careers. This shift is multifaceted — every industry and role will evolve differently as the technology diffuses across business and society. Just as the internet era created billions of new knowledge jobs — from social media managers to UX designers — the AI era is already giving rise to new roles, with many more to come. Preparing for what’s next is no longer optional. Employees must build AI skills and companies must support them with the right tools and training. This moment calls for honest conversations, intentional communication and real investment in reskilling. The companies that invest now won’t just keep up — they’ll shape what comes next. Copilot is the new UI for AI Today we’re announcing the Microsoft 365 Copilot Wave 2 Spring release — designed to power the next era of human–agent collaboration. The Microsoft 365 Copilot app is now your window into the world of agents, with new capabilities for this next phase — driven by more advanced models, adaptive memory and reasoning agents that work alongside you. Updates include: Researcher and Analyst agents powered by OpenAI’s deep reasoning models rolling

tech blog

How to take climate action with your code

Climate change is one of the most pressing issues of this century. We are working with developers to leverage technology to create a greener world. So, this Earth Day, we’re excited to launch the Climate Action Plan for Developers. We’ve curated tools and projects to help you kick-start your climate action journey and contribute to achieving net zero carbon emissions. Explore over 60,000 green software and climate-focused repositories on GitHub. Not sure where to start? Take a look below at a few highlights that can help you start to green your code today. 🚀 Speed & Scale Speed & Scale is a global initiative to move leaders to act on the climate crisis. Their team has developed a net zero action plan, with 10 objectives and 49 key results that track yearly progress. Learn about their action plan ⚡️ Electricity Maps Electricity Maps is the leading electricity grid API, offering a single source for accessing carbon intensity and energy mix globally. As a developer you can go beyond just viewing the maps to pull data from their API, download data files, and even contribute to their open source project. Access the Electricity Maps API 🖥️ CodeCarbon CodeCarbon is a lightweight software package that allows for integration into any Python project to track and reduce CO2 emissions from your computing. Get started with using the software package and check out the opportunities to help support this open source project. Get started with the software package 🌳 ClimateTriage, by OpenSustain.Tech ClimateTriage helps developers discover a meaningful way to contribute to open source projects focused on climate technology and sustainability. Harness the power of open source collaboration to tackle environmental challenges such as climate change, clean energy, biodiversity, and natural resource conservation. Whether you’re an experienced developer, a scientist, or a newcomer looking to contribute, connect you with opportunities to use your skills to create a sustainable future. Get started with a Good First Issue 💪 Use GitHub Copilot and CodeCarbon for greener code Computational tasks, especially in AI, have a growing carbon footprint. Learn how CodeCarbon, an open-source Python library, helps measure CO2 emissions from your code. Together with GitHub Copilot, integrate CodeCarbon into your projects, allowing you to track energy use and optimize for sustainability. Get started with GitHub Copilot for free today Learn more about how you can take climate action today. The post How to take climate action with your code appeared first on The GitHub Blog. ​ Open Source, Social impact, social impact The GitHub Blog

GitHub-MCP-Server
tech blog

Racing into 2025 with new GitHub Innovation Graph data

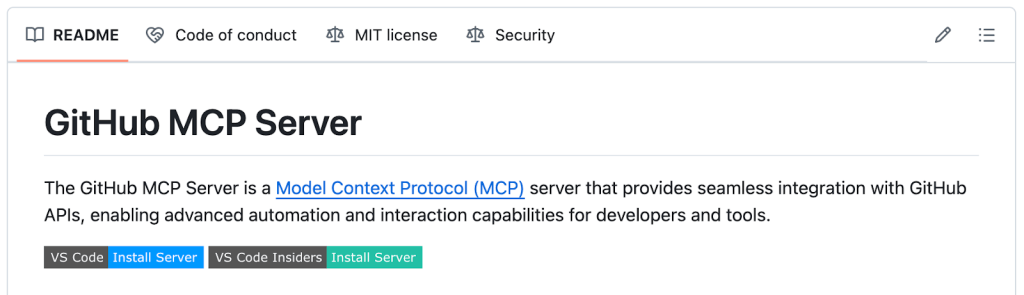
We launched the GitHub Innovation Graph to give developers, researchers, and policymakers an easy way to analyze trends in public software collaboration activity around the world. With today’s quarterly1 release, updated through December 2024, we now have five full years of data. To help us celebrate, we’ve created some animated bar charts showcasing the growth in developers and pushes of some of the top economies around the world over time. Enjoy! Animated bar charts https://github.blog/wp-content/uploads/2025/04/bar_chart_race_global_with_eu_git_pushes_desktop.mp4#t=0.001 What a photo finish! The European Union surpassing the United States in cumulative git pushes was certainly a highlight, but we’d also note the significant movements of Brazil and Korea in climbing up the rankings. https://github.blog/wp-content/uploads/2025/04/bar_chart_race_global_with_eu_repositories_desktop.mp4#t=0.001 Another close race, this time showing India outpacing the European Union in repositories between Q2 and Q3 2024. https://github.blog/wp-content/uploads/2025/04/bar_chart_race_apac_developers_desktop.mp4#t=0.001 Zooming into economies in APAC, we can appreciate the speed of developer growth in India, more than quadrupling in just 5 years. https://github.blog/wp-content/uploads/2025/04/bar_chart_race_emea_developers_desktop.mp4#t=0.001 Flying over to EMEA, we saw very impressive growth from Nigeria, which rose up from rank 20 in Q1 2020 to rank 11 in Q4 2024. https://github.blog/wp-content/uploads/2025/04/bar_chart_race_latam_developers_desktop.mp4#t=0.001 Finally, in LATAM, it was exciting to see how close most of the economies are in developer counts (with the exception of Brazil), with frequent back-and-forth swaps in rankings between economies like Argentina and Colombia, or Guatemala and Bolivia. Want to explore more? Dive into the datasets yourself. We can’t wait to check out what you build. Global line charts We’ve also made a feature update that will enable you to quickly understand the global scale of some of the metrics we publish, including the numbers of public git pushes, repositories, developers, and organizations on GitHub worldwide. Simply follow the installation steps for our newly released GitHub MCP Server, and you’ll be able to prompt GitHub Copilot in agent mode within VS Code to retrieve the CSVs from the data repo using the get_file_contents tool. Then, you can have the agent sum up the latest values for you. Afterward, you can double-check its results with these handy charts that we’ve added to their respective global metrics pages for git pushes, repositories, developers, and organizations. Check them out below. Click to view slideshow. The GitHub Innovation Graph reports metrics according to calendar year quarters, which correspond to the following: Q1: January 1 to March 31; Q2: April 1 to June 30; July 1 to September 30; and Q4: October 1 to December 31. ↩ The post Racing into 2025 with new GitHub Innovation Graph data appeared first on The GitHub Blog. ​ News & insights, Policy, Innovation Graph The GitHub Blog

tech blog

Exploring GitHub CLI: How to interact with GitHub’s GraphQL API endpoint

You might have heard of the GitHub CLI and all of the awesome things you can do with it. However, one of its hidden superpowers is the ability to execute complex queries and mutations through GitHub’s GraphQL API. This post will walk you through what GitHub’s GraphQL API endpoint is and how to query it with the GitHub CLI. What is GraphQL? Let’s start with the basics: GraphQL is a query language for APIs and a runtime for executing those queries against your data. Unlike traditional REST APIs that provide fixed data structures from predefined endpoints, GraphQL allows clients to request exactly the data they need in a single request. This single-request approach reduces network overhead, speeds up application performance, and simplifies client-side logic by eliminating the need to reconcile multiple API responses—a capability that has been openly available since the specification was open sourced in 2015. GraphQL operations come in two primary types: queries and mutations. Queries are read-only operations that retrieve data without making any changes—similar to GET requests in REST. Mutations, on the other hand, are used to modify server-side data (create, update, or delete)—comparable to POST, PATCH, PUT, and DELETE in REST APIs. This clear separation between reading and writing operations makes GraphQL interactions predictable while maintaining the flexibility to precisely specify what data should be returned after a change is made. How is GraphQL used at GitHub? GitHub implemented GraphQL in 2016 to address limitations of RESTful APIs. This adoption has significantly enhanced the developer experience when working with GitHub data. With the GraphQL endpoint, you can retrieve a repository’s issues, its labels, assignees, and comments with a single GraphQL query. Using our REST APIs, this would have otherwise taken several sets of nested calls. Some GitHub data and operations are only accessible through the GraphQL API (such as discussions, projects, and some enterprise settings), others exclusively through REST APIs (such as querying actions workflows, runners, or logs), and some using either endpoint (such as repositories, issues, pull requests, and user information). GitHub’s GraphQL endpoint is accessible at api.github.com/graphql and you can explore the full schema in our GraphQL documentation or through the interactive GraphQL Explorer. A key consideration when choosing between the REST API and the GraphQL API is how the rate limits are calculated. As a quick summary for how this is implemented: REST API: Limited by number of requests (typically 5,000 requests per hour for authenticated users and up to 15,000 for GitHub Apps installed in an Enterprise) GraphQL API: Limited by “points” (typically 5,000 points per hour for authenticated users but can go up to 10,000-12,500 points per hour for GitHub Apps) Each GraphQL query costs at least one point, but the cost increases based on the complexity of your query (number of nodes requested, connections traversed, etc.). The GraphQL API provides a rateLimit field you can include in your queries to check your current limit status. For scenarios where you need to fetch related data that would otherwise require multiple REST calls, GraphQL is often more rate limit friendly because: One complex GraphQL query might cost 5-10 points but replace 5-10 separate REST API calls. You avoid “over-fetching” data you don’t need, which indirectly helps with rate limits. The GraphQL API allows for more granular field selection, potentially reducing the complexity and point cost. However, poorly optimized GraphQL queries that request large amounts of nested data could potentially use up your rate limit faster than equivalent REST requests—and quickly run into secondary rate limit issues. A quick rule of thumb on deciding between which to use: For querying relational objects, such as GitHub Projects and their issues, GraphQL is often more effective, especially if it’s a discrete number of items. For bulk data of one type or single data points, such as pulling in a list of repository names in an organization, the REST API is often preferred. Sometimes there isn’t a right or wrong answer; so as long as the object exists, try one out! Why use GitHub CLI for GraphQL? While many developers start with GitHub’s GraphQL Explorer on the web, curl, or other API querying tools, there’s a more streamlined approach: using built-in GraphQL support in the GitHub CLI. Before diving into the how-to, let’s understand why GitHub CLI is often my go-to tool for GraphQL queries and mutations: Authentication is handled automatically: No need to manage personal access tokens manually. Streamlined syntax: Simpler than crafting curl commands. Local development friendly: Run queries and mutations right from your terminal. JSON processing: Built-in options for filtering and formatting results. Pagination support: Ability to work with cursor-based pagination in GraphQL responses. Consistent experience: Same tool you’re likely using for other GitHub tasks. How to get started with gh api graphql First, ensure you have GitHub CLI installed and authenticated with gh auth login. The basic syntax for making a GraphQL query with gh api graphql is: gh api graphql -H X-Github-Next-Global-ID:1 -f query=’ query { viewer { login name bio } } ‘ This simple query returns your GitHub username, the name you have defined in your profile, and your bio. The -f flag defines form variables, with query= being the GraphQL query itself. Here’s our example output: { “data”: { “viewer”: { “login”: “joshjohanning”, “name”: “Josh Johanning”, “bio”: “DevOps Architect | GitHub” } } } Running queries and mutations Basic query example Let’s try something more practical—fetching information about a repository. To get started, we’ll use the following query: gh api graphql -H X-Github-Next-Global-ID:1 -f query=’ query($owner:String!, $repo:String!) { repository(owner:$owner, name:$repo) { name description id stargazerCount forkCount issues(states:OPEN) { totalCount } } } ‘ -F owner=octocat -F repo=Hello-World The -F flag sets variable values that are referenced in the query with $variable. Here’s our example output: { “data”: { “repository”: { “name”: “Hello-World”, “description”: “My first repository on GitHub!”, “id”: “R_kgDOABPHjQ”, “stargazerCount”: 2894, “forkCount”: 2843, “issues”: { “totalCount”: 1055 } } } } 💡 Tip: The -H X-Github-Next-Global-ID:1 parameter sets an HTTP header that instructs GitHub’s GraphQL

copilot-claude-prd-design
tech blog

From prompt to production: Building a landing page with Copilot agent mode

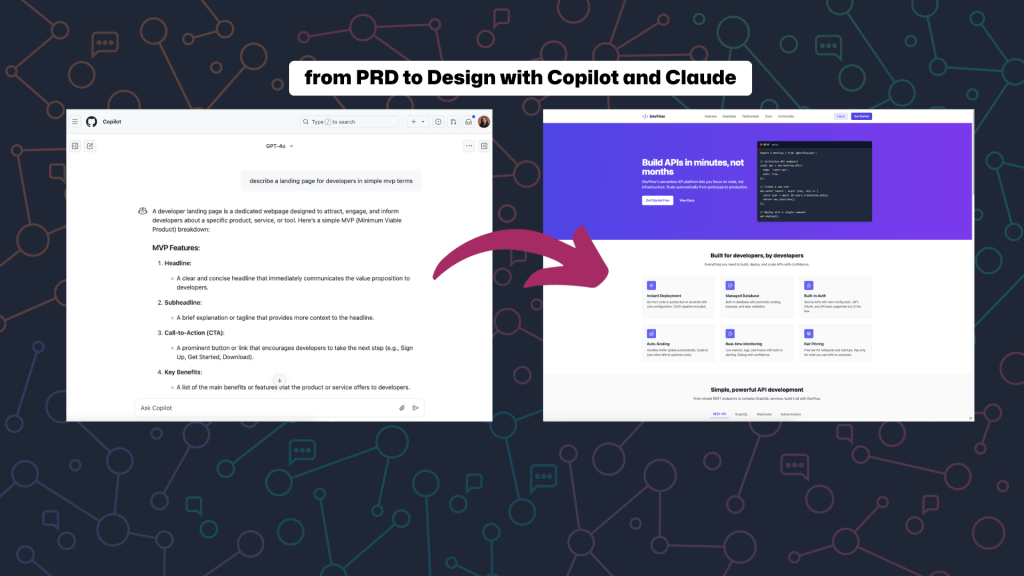
GitHub Copilot has quickly become an integral part of how I build. Whether I’m exploring new ideas or scaffolding full pages, using Copilot’s agent mode in my IDE helps me move faster—and more confidently—through each step of the development process. GitHub Copilot agent mode is an interactive chat experience built right into your IDE that turns Copilot into an active participant in your development workflow. After you give it a prompt, agent mode streamlines complex coding tasks by autonomously iterating on its own code, identifying and fixing errors, suggesting and executing terminal commands, and resolving runtime issues with self-healing capabilities. And here’s the best part: You can attach images, reference files, and give natural language instructions, and Copilot will generate and modify code directly in your project! In this post, I’ll walk you through how I built a developer-focused landing page—from product requirements to code—using GitHub Copilot agent mode and the Claude 3.5 Sonnet model. This kind of build could easily take a few hours if I did it all by myself. But with Copilot, I had a working prototype in under 30 minutes! You’ll see how I used design artifacts, inline chat, and Copilot’s awareness of context to go from idea → design → code, with minimal friction. You can also watch the full build in the video above! Not sure how to use agent mode in GitHub Copilot? Don’t sweat it—we have a guide for you on everything you need to know to get started (plus, details on how to use other GitHub Copilot features, too). Learn more > Designing with AI: From PRD to UI Before I wrote a single line of code, I needed a basic product vision. I started by using GitHub Copilot on GitHub.com to generate a lightweight product requirements document (PRD) using GPT-4o. Here was my prompt: > “Describe a landing page for developers in simple terms.” Copilot returned a structured but simple outline of a PRD for a developer-focused landing page. I then passed this PRD into Claude 3.5 Sonnet and asked it to generate a design based on that prompt. Claude gave me a clean, organized layout with common landing page sections: a hero, feature list, API examples, a dashboard preview, and more. This was more than enough for me to get started. You can explore the full design that Claude built here; it’s pretty cool. Setting up the project For the tech stack, I chose Astro because of its performance and flexibility. I paired it with Tailwind CSS and React for styling and component architecture. I started in a blank directory and ran the following commands: npm create astro@latest npx astro add react npx astro add tailwind I initialized the project, configured Tailwind, and opened it in VS Code with GitHub Copilot agent mode enabled (learn how to enable it with our docs!). Once the server was running, I was ready to start building. Building section by section with Copilot agent mode Copilot agent mode really shines when translating visual designs into production-ready code because it understands both image and code context in your project. By attaching a screenshot and specifying which file to edit, I could prompt it to scaffold new components, update layout structure, and even apply Tailwind styles—all without switching tabs or writing boilerplate manually. For our project here, this meant I could take screenshots of each section from Claude’s design and drop them directly into Copilot’s context window. 💡 Pro tip: When building from a visual design like this, I recommend working on one section at a time. This not only keeps the context manageable for the model, but also makes it easier to debug if something goes off track. You’ll know exactly where to look! Creating the hero and navigation section I opened index.astro, attached the design screenshot, and typed the following prompt: > “Update index.astro to reflect the attached design. Add a new navbar and hero section to start the landing page.” Copilot agent mode then returned the following: Created Navbar.astro and Hero.astro Updated index.astro to render them Applied Tailwind styling based on the visual layout And here’s what I got: https://github.blog/wp-content/uploads/2025/04/dev-flow-final-landing.mp4#t=0.001 Now, this is beautiful! Though it doesn’t have the image on the right per the design, it did a very good job of getting the initial design down. We’ll go back in later to update the section to be exactly what we want. Commit early and often 💡 Pro tip: When building with AI tools, commit early and often. I’ve seen too many folks lose progress when a prompt goes sideways. And in case you didn’t know, GitHub Copilot can help here too. After staging your changes in the Source Control panel, click the ✨ sparkles icon to automatically generate a commit message. It’s a small step that can save you a lot of time (and heartache). https://github.blog/wp-content/uploads/2025/04/dev-flow-commit-code.mp4#t=0.001 Improve accuracy with Copilot custom instructions One of the best ways to improve the quality of GitHub Copilot’s suggestions—especially in multi-file projects—is by providing it with custom instructions. These are short, structured notes that describe your tech stack, project structure, and any conventions or tools you’re using. Instead of repeatedly adding this contextual detail to your chat questions, you can create a file in your repository that automatically adds this information for you. The additional information won’t be displayed in the chat, but is available to Copilot—allowing it to generate higher-quality responses. To give Copilot better context, I created a CopilotInstructions.md file describing my tech stack: Astro v5 Tailwind CSS v4 React TypeScript When Copilot agent mode referenced this file when making suggestions, I noticed the results became more accurate and aligned with my setup. Here’s what some of the file looked like: # GitHub Copilot Project Instructions ## Project Overview This is an Astro project that uses React components and Tailwind CSS for styling. When making suggestions, please consider the following framework-specific details and conventions. ## Tech Stack – Astro v5.x – React as UI library – Tailwind CSS for styling (v4.x)

iStock-2192759322-300x169-GdUpm1
tech blog

Maintain Device Trust with Dell

Lean on Dell as you refresh. Our PC telemetry, built-in security and new management capabilities are now available on more devices.   ​  ​Lean on Dell as you refresh. Our PC telemetry, built-in security and new management capabilities are now available on more devices. Endpoint Security Blog | Dell

Scroll to Top