tech blog

5 GitHub Actions every maintainer needs to know

Maintaining and contributing to open source projects can be rewarding—but it comes with a lot of small, repetitive tasks. The good news? GitHub Actions can automate the more tedious and error-prone parts of maintainership, freeing you up to focus on what matters: building and growing your community. Whether you’ve just launched your project or you’re looking to scale, here are a few of the most helpful actions to help you along your way. Pro tip: It’s best practice to audit the source code of any action you use, and pin actions to a full length commit SHA so that you always know what version of the code you’re using. Now, let’s get started. 1. Clean up your backlog with stale Managing issues or pull requests can be challenging, especially when users open issues that require additional information to resolve. If they don’t respond with what you need, these issues can pile up and make your backlog look daunting. Stale closes any issues or pull requests that lack activity after a set number of days, keeping your open issues list nice and tidy. 👉 Who uses it: DeepSeek-R1, opentelemetry-go, and more. 2. Let super-linter sweat the small stuff for you It’s awesome when someone takes the time to submit a pull request to your project. It’s not so awesome when you have to manually reject that pull request because of a small mistake. A linter is a tool that helps you enforce best practices and consistent formatting. Super-linter is a collection of linters for a variety of languages that can automate many of the chores associated with code reviews, including enforcing style guidelines, detecting syntax errors, identifying security vulnerabilities, and ensuring code consistency across multiple languages. 👉 Who uses it: Barman, frankenphp, and more. 3. Stop repeating yourself with create-or-update-comment Repetitive comments for common scenarios can become tedious. Create-or-update-comment offers a reprieve, enabling you to automate tasks, like sending welcome messages to new contributors or providing standardized feedback when linters and other automated processes detect problems. 👉 Who uses it: woocommerce, lucide, and more. 4. Create release notes with ease with Release Drafter After all the merging, testing, and other work that goes into preparing a release, writing up the release notes is often the last thing you want to do. The good news: Release Drafter automates the process for you. Each time you merge a pull request, it updates a draft text of your release notes, so they’ll be ready when it’s time to publish. 👉 Who uses it: LightGBM, Mealie, and more. 5. Stay organized with pull request labeler Overwhelmed with PRs? Pull request labeler automatically labels pull requests based on the files or branch modified, helping you triage work and maintain a consistent labeling system. 👉 Who uses it: Apache Lucene, Marvin, and more. Maintaining an open source project is a labor of love, but with the right tools, it doesn’t have to feel overwhelming. These actions are just a few examples of how automation can save time, reduce frustration, and help you focus on writing great code and growing your community. Why not give them a try and see how they can transform your open source journey? Your future self (and your contributors) will thank you! Find more actions on GitHub Marketplace. The post 5 GitHub Actions every maintainer needs to know appeared first on The GitHub Blog. ​ Maintainers, Open Source, GitHub Actions The GitHub Blog
tech blog

A maintainer’s guide to vulnerability disclosure: GitHub tools to make it simple

Imagine this: You’re sipping your morning coffee and scrolling through your emails, when you spot it—a vulnerability report for your open source project. It’s your first one. Panic sets in. What does this mean? Where do you even start? Many maintainers face this moment without a clear roadmap, but the good news is that handling vulnerability reports doesn’t have to be stressful. Below, we’ll show you that with the right tools and a step-by-step approach, you can tackle security issues efficiently and confidently. Let’s dig in. What is vulnerability disclosure? If you discovered that the lock on your front door was faulty, would you attach a note announcing it to everyone passing by? Of course not! Instead, you’d quietly tell the people who need to know—your family or housemates—so you can fix it before it becomes a real safety risk. That’s exactly how vulnerability disclosure should be handled. Security issues aren’t just another bug. They can be a blueprint for attackers if exposed too soon. Instead of discussing them in the open, maintainers should work with security researchers behind the scenes to fix problems before they become public. This approach, known as Coordinated Vulnerability Disclosure (CVD), keeps your users safe while giving you time to resolve the issue properly. To support maintainers in this process, GitHub provides tools like Private Vulnerability Reporting (PVR), draft security advisories, and Dependabot alerts. These tools are free to use for open source projects, and are designed to make managing vulnerabilities straightforward and effective. Let’s walk through how to handle vulnerability reports, so that the next time one lands in your inbox, you’ll know exactly what to do! The vulnerability disclosure process, at a glance Here’s a quick overview of what you should do if you receive a vulnerability report: Enable Private Vulnerability Reporting (PVR) to handle submissions securely. Collaborate on a fix: Use draft advisories to plan and test resolutions privately. Request a Common Vulnerabilities and Exposures (CVE) identifier: Learn how to assign a CVE to your advisory for broader visibility. Publish the advisory: Notify your community about the issue and the fix. Notify and protect users: Utilize tools like Dependabot for automated updates. Now, let’s break down each step. 1. Start securely with PVR Here’s the thing: There are security researchers out there actively looking for vulnerabilities in open source projects and trying to help. But if they don’t know who to report the problem to, it’s hard to resolve it. They could post the issue publicly, but this could expose users to attacks before there’s a fix. They could send it to the wrong person and delay the response. Or they could give up and move on. The best way to ensure these researchers can reach you easily and safely is to turn on GitHub’s Private Vulnerability Reporting (PVR). Think of PVR as a private inbox for security issues. It provides a built-in, confidential way for security researchers to report vulnerabilities directly in your repository. 🔗 How to enable PVR for a repository or an organization. Heads up! By default, maintainers don’t receive notifications for new PVR reports, so be sure to update your notification settings so nothing slips through the cracks. Enhance PVR with a SECURITY.md file PVR solves the “where” and the “how” of reporting security issues. But what if you want to set clear expectations from the start? That’s where a SECURITY.md file comes in handy. PVR is your front door, and SECURITY.md is your welcome guide telling visitors what to do when they arrive. Without it, researchers might not know what’s in scope, what details you need, or whether their report will be reviewed. Maintainers are constantly bombarded with requests, making triage difficult—especially if reports are vague or missing key details. A well-crafted SECURITY.md helps cut through the noise by defining expectations early. It reassures researchers that their contributions are valued while giving them a clear framework to follow. A good SECURITY.md file includes: How to report vulnerabilities (ex: “Please submit reports through PVR.”) What information should be included in a report (e.g., steps to reproduce, affected versions, etc.) Pairing PVR with a clear SECURITY.md file helps you streamline incoming reports more effectively, making it easier for researchers to submit useful details and for you to act on them efficiently. 2. Collaborate on a fix: Draft security advisories Once you confirm the issue is a valid vulnerability, the next step is fixing it without tipping off the wrong people. But where do you discuss the details? You can’t just drop a fix in a public pull request and hope no one notices. If attackers spot the change before the fix is officially released, they can exploit it before users can update. What you’ll need is a private space where you and your collaborators can investigate the issue, work on and test a fix, and then coordinate its release. GitHub provides that space with draft security advisories. Think of them like a private fork, but specifically for security fixes. Why use draft security advisories? They keep your discussion private, so that you can work privately with your team or trusted contributors without alerting bad actors. They centralize everything, so your discussions, patches, and plans are kept in a secure workspace. They’re ready for publishing when you are: You can convert your draft advisory into a public advisory whenever you’re ready. 🔗 How to create a draft advisory. By using draft security advisories, you take control of the disclosure timeline, ensuring security issues are fixed before they become public knowledge. 3. Request a CVE with GitHub Some vulnerabilities are minor contained issues that can be patched quietly. Others have a broader impact and need to be tracked across the industry. When a vulnerability needs broader visibility, a Common Vulnerabilities and Exposures (CVE) identifier provides a standardized way to document and reference it. GitHub allows maintainers to request a CVE directly from their draft security advisory, making the process seamless. What is a CVE, and why does it matter? A

tech blog

Mastering GitHub Copilot: When to use AI agent mode

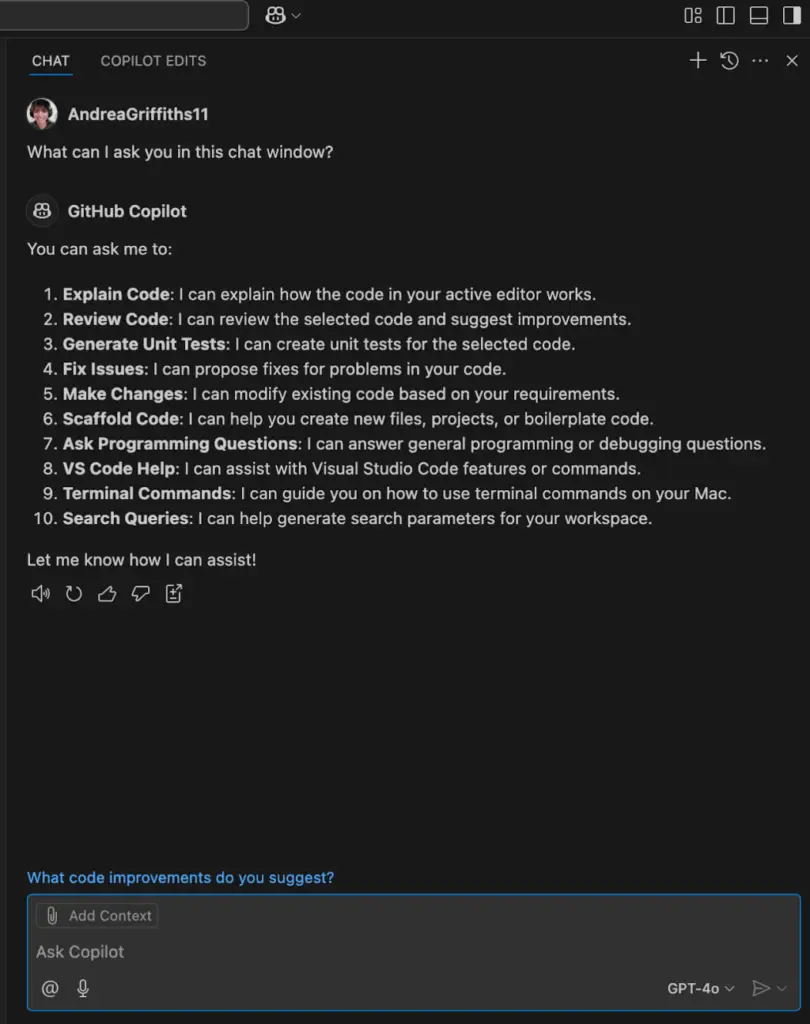
Ever find yourself staring at an AI coding assistant, wondering why it’s not quite nailing what you need? Maybe it’s spitting out code that’s close but not quite right, or you’re stuck wrestling with a problem that spans multiple files, wishing it could just get the bigger picture. Often, when developers hit these snags, it’s less about the tool, and more about knowing how to use it. So here’s the key question you should ask yourself: “Do I need a quick answer or a thoughtful conversation?” That’s the secret to unlocking AI coding tools like GitHub Copilot. Because different aspects of Copilot serve different needs, and we’re here to help you discern when is the best time for agent mode and when you should be using Copilot Edits instead. Both are powerhouse Copilot features, built to supercharge your coding, but they shine in different scenarios. Copilot Edits is your go-to for fast, precise tweaks—think refactoring a function, squashing a bug, or applying consistent changes across files without losing your flow. Agent mode, on the other hand, steps up as your AI collaborator for thornier, multi-file challenges—analyzing your codebase, proposing architectural fixes, and even running terminal commands while you steer the ship and approve each move. Figuring out which one fits your needs doesn’t just save time, it turns your AI assistant into a seamless extension of your own coding instincts. Copilot command center: Your chat window Before learning more about agent mode and Copilot Edits, it’s essential to understand the Copilot chat window in VS Code—your central hub for AI interactions. This is where you can: Ask coding questions like “How do I implement JWT authentication in Node.js?” Use /explain to understand complex code blocks Debug issues with /fix Generate tests with /tests Access both Edits and agent mode features With the chat window giving you a solid grasp of your code’s context, you’re in the driver’s seat to pick the perfect Copilot tool: Edits or agent mode, for whatever’s next. Let me take you through a real-world example of how I’ve been using GitHub Copilot to evolve my personal website. It started with a simple idea: create an interactive terminal-style easter egg that showcases my skills in a developer-friendly way. I began with a basic command processing function that handled a few simple commands: function processCommand(command) { try { if (!command?.trim()) { return ‘Please enter a command. Type “more” for available commands.’; } const sanitizedCommand = command.toLowerCase().trim(); switch (sanitizedCommand) { case ‘more’: return commands.more; case ‘about’: return commands.about; case ‘skills’: return commands.skills; case ‘projects’: return commands.projects; case ‘contact’: return commands.contact; default: return `Command not found: “${command}”. Type ‘more’ for available commands.`; } } catch (error) { console.error(‘[Terminal] Error processing command:’, error); return ‘An error occurred while processing the command.’; } } Initially, I used Copilot Edits to quickly add new features. For instance, I wanted to add a ‘github’ command to showcase my repositories: Copilot Edits made targeted changes to the switch statement in the processCommand function and added the new command to the commands object—a perfect example of quick, focused modifications to existing code. As my terminal interface matured, I wanted to implement several interactive features that would require more comprehensive improvements. To get animation effects, keyboard navigation controls, and an extensible theming system that spanned multiple files to work together seamlessly, I turned to agent mode. The agent mode advantage When we designed agent mode, we didn’t want to create a tool that’s a simple AI feature: We wanted to create an AI that could pair with you! Rather than working on specific, limited changes where you might be reinventing the wheel, you’re now providing higher-level direction while the AI tackles the implementation details across multiple files or systems. That being said, with agent mode, you’re still in control of the process. The AI has more latitude to explore your codebase and suggest comprehensive solutions, but you always review and approve the changes before they’re applied. It’s not about surrendering control, it’s about effectively delegating implementation details while you focus on the bigger picture. What makes agent mode special: Codebase search: It searches your codebase to find relevant files without you explicitly specifying them. Self-iteration: It can iterate on its own output to complete your entire request in one go. Error identification and repair: It automatically recognizes and fixes errors in suggested code. Terminal command execution: It suggests and runs terminal commands with your permission. Build and run capabilities: It can build and run your application to check if changes work correctly. I reach for agent mode when: Building complete features: “Add analytics tracking throughout the app” Navigating unfamiliar codebases: “Help me understand how authentication works in this project” Writing and verifying tests: “Write tests for the UserService and make sure they pass” Implementing terminal-heavy tasks: “Set up a new React project with TypeScript, Redux, and styled-components” Doing complex refactoring: “Refactor our API calls to use the new error handling pattern” Continuing with my terminal easter egg, let’s say I want to implement a much more extensive upgrade with multiple features, like adding a typing animation effect for responses, command history navigation with up/down arrows, and tab completion for commands. At the same time, I want to create a new TerminalThemes.css file with different color scheme options that users can switch between with a ‘theme’ command. This is where agent mode truly shines. The task spans multiple files, requires an understanding of the existing codebase, and involves creating entirely new functionality. Here, agent mode would: Search through the codebase to understand the terminal implementation. Create the new CSS file for themes. Add typing animation functionality to terminal responses. Implement keyboard handlers for history navigation. Build the tab completion system. Add the theme command to the switch statement. Test the implementation to ensure everything works correctly. This is the beauty of agent mode: it has a complex understanding of patterns and relationships in different parts of the codebase! Agent mode can ensure that the typing animation did

tech blog

Transforming Character Animation with NVIDIA Omniverse and AI Workstations

From their studio in Finland, Cineshare is developing new approaches to character animation and virtual production that balance visual quality with performance constraints.   ​  ​From their studio in Finland, Cineshare is developing new approaches to character animation and virtual production that balance visual quality with performance constraints. Precision Blog | Dell

tech blog

Exploring the Future of Media and Entertainment Insights

Discover how AMD empowers creators with AI, real-time rendering and virtual production tools, redefining the future of storytelling.   ​  ​Discover how AMD empowers creators with AI, real-time rendering and virtual production tools, redefining the future of storytelling. Media & Entertainment Blog | Dell

tech blog

Cybersecurity Lessons From Tolkien

Learn how to apply timeless strategies from Middle-earth to protect your systems from modern cybersecurity threats.   ​  ​Learn how to apply timeless strategies from Middle-earth to protect your systems from modern cybersecurity threats. Cyber Resiliency Blog | Dell

tech blog

Accelerating AI-Driven Innovation at Subaru with Dell PowerScale

Here’s how Subaru Corporation accelerates AI innovation for the next-gen AI-powered advanced driver assist system (ADAS) with Dell PowerScale.   ​  ​Here’s how Subaru Corporation accelerates AI innovation for the next-gen AI-powered advanced driver assist system (ADAS) with Dell PowerScale. PowerScale Blog | Dell

tech blog

Microsoft at 50: The journey and future of the partner ecosystem

As we celebrate Microsoft’s 50th anniversary, our annual State of the Partner Ecosystem moment is a great opportunity to reflect on the incredible journey we’ve shared with our partners, employees and customers. Together, we’ve harnessed technology as a force for good, transforming industries and communities. From our early days of revolutionizing personal computing to leading the way in cloud innovation and now AI, our shared milestones highlight the power of collaboration and reinvention. Fifty years ago, Microsoft started with a bold idea: the belief that technology could change the world. Thanks to the largest partner ecosystem in the industry, numbering 500,000 and growing, that vision became a reality, and I know we are just getting started. From the early days of distributing Windows PCs and Office to now delivering AI transformation strategies that solve the most complex customer challenges, our ability to stay at the forefront of innovation as technology evolves is a testament to our culture of continuous reinvention. According to IDC, for every $1 of Microsoft revenue, services partners earn $8.45, and software partners earn $10.93. This underscores the immense opportunity available to partners of all types. As we look ahead to the future, we know that generative AI (GenAI) is forecast to grow exponentially faster than the overall IT market. Partners generating at least 25% of their Microsoft-related revenue from AI can expect higher margins and revenue growth, unlocking even more potential for transformation and success.* Microsoft has always been a partner-led company. Our partners are core to our heritage and our future. Their innovation and collaboration have driven real transformation and customer success and will continue to shape the future of industries around the world. As we commemorate this historic moment, I want to take the opportunity to say Thank You to our partners for being on this incredible journey with us. Here are just a few ways you can join us to celebrate this milestone: Watch this video from Judson Althoff, Executive Vice President and Chief Commercial Officer, Microsoft. Join the Microsoft AI Skills Fest for 50 days of learning and discovery starting April 8! Gain skills that will empower you and your team to build innovative AI solutions with Microsoft’s apps and services. “For decades, Intel’s partnership with Microsoft has sparked innovation and delivered value to our customers. Together, we’ve revolutionized industries and established new benchmarks for excellence. We look forward to collaborating for the next 50 years — and beyond.” — Jim Johnson, Senior Vice President, Client Computing Group, Intel Preparing for the future with the Microsoft AI Cloud Partner Program (MAICPP) Microsoft succeeds when our partners succeed. MAICPP has evolved to enable partners worldwide to deliver customer outcomes across every industry, from small businesses to the largest enterprises. Our program is designed to provide our partners with the most relevant tools and resources they need to thrive in a rapidly changing market, and it serves as the home for all partner types. “As a proud Microsoft alum, I’ve seen firsthand how our collaboration has evolved to drive meaningful change for businesses across industries. From strategy through engineering and implementation, PwC and Microsoft drive innovation and deliver real business outcomes for clients worldwide.” — Stephanie Mosticchio, Principal, US and Global Microsoft Alliance Leader, PwC Through MAICPP, all partners can access updated benefits packages designed to accelerate growth and meet specific business needs. Software development companies are encouraged to explore ISV Success, a pathway offering additional benefits to expand development capabilities and shorten time to market. Whether building, publishing or growing sales, partners can leverage targeted offers to get the support they need. “As someone who has led global partnerships at several of the world’s leading technology companies, I am impressed by how Microsoft has leaned in with their partner ecosystem and taken a leadership position in cloud computing and AI. We, at Snowflake, are excited to continue to strengthen our partnership in the years to come, and we look forward to jointly driving customer success in the age of enterprise AI. Congratulations! — Tyler Prince, Senior Vice President of Worldwide Alliances & Channels, Snowflake Depending on business goals, partners may pursue a Solutions Partner designation or specialization, both of which provide tailored benefits to help differentiate their business in a competitive market. Achieving a designation unlocks valuable go-to-market resources, sales support, new incentives and product benefits to help expand customer reach, sharpen skills and drive growth. For software development companies, becoming a Solutions Partner** with certified software*** further enhances market presence by validating software capabilities in high-demand areas. “Having worked alongside every CEO of Microsoft in my career, I would like to personally congratulate Microsoft for its 50 extraordinary years of driving relentless innovation.” “Lenovo is proud to be a major part of this amazing journey with Microsoft and we are committed to this partnership for many more decades to come.” — Yuanqing Yang, Chairman and Chief Executive Officer, Lenovo For partners holding an Azure designation or Azure specialization, additional incentives are available through Azure Migrate and Modernize and Azure Innovate — both underpinned by Azure Essentials. With comprehensive resources, extensive coverage across scenarios and tailored incentives in one easy-to-navigate hub, Azure partners can better support customers from migration to innovation. Learn more in What’s new for Azure partner-led offerings: ISV Success and specialization updates. Our program offers benefits for partners aligned to their growth stage and across all customer segments. We have recently made the process of obtaining an Azure Solutions Partner designation more aligned to our partners who specialize in working with small and midsize customers. We are also expanding access to Azure Migrate and Modernize and Azure Innovate incentives for SMB pathways. Read more about the SMB path to Azure Solutions Partner designations. Cloud Solution Provider is our partner hero motion for small and medium enterprises In November at Microsoft Ignite, we highlighted the $661 billion total addressable market (TAM) opportunity for SME&C customers in FY25 and beyond. Cloud Solution Provider (CSP) partners are the trusted advisors who serve

tech blog

World Water Day: how GitHub Copilot is helping bring clean water to communities

March 22 is World Water Day—a day intended to educate, inspire, and promote action around the importance of clean and safe water. For organizations like charity: water, this is their mission year-round. They’re working to help the more than 700 million people worldwide who don’t have access to clean water, and they’re finding innovative ways of using technology to do it. We’ve seen entire communities transformed with access to clean water and the impact that brings, like the ability to grow your own food and start a small community business. These things really start to accelerate once people are not spending their time retrieving clean water. – Christa Stelzmuller, chief technology officer at charity: water How tech is changing the tide of the water crisis What else makes charity: water’s approach unique? They have an in-house engineering team, making them an innovator in the nonprofit space. This enables them to manage their own systems, ensuring they function correctly and evolve to have the greatest impact on their mission. Their developers are dedicated to changing the tide of the water crisis, and they know how impactful their work can be. And they have used this innovative mindset to help them do what they call “reinventing charity.” They want to create a space based on trust, proof, and integrity that makes donors feel connected to something that’s happening half a world away. They’ve done this by putting every single project onto a map with GPS coordinates and photos. Now, everyone who gives can see exactly how they’re making a difference. The impact of GitHub Copilot on their mission GitHub is an integral part of how their team collaborates and scales, but the adoption of GitHub Copilot has completely changed their workflow. Now, engineers can spend more time focused on solving business problems and doing things that require creative human thought. Copilot is like a magical autocomplete, it lets us focus more on what is the actual challenge we’re trying to solve, rather than worrying about the syntax. – Jasdeep Gosal, director of engineering at charity: water Here are their top three reasons why GitHub Copilot has been a gamechanger: Inline version of chat: they love the ease of telling it exactly what they want it to do Testing: every person on the team uses it to test, helping them keep 99% spec coverage Suggestions and corrections: they’re able to spend less time looking up syntax and correcting trivial errors GitHub Copilot helps us code about 10% faster, which across a team of 8, is extremely effective. – Jasdeep Gosal, director of engineering at charity: water Another thing that helps this small but mighty team to get the job done is relying on the power of open source. They know that developers are rarely solving a truly unique problem, which is where open source libraries come into their workflow. Collaborating with the open source community is almost the same as collaborating with our own teammates. – Jasdeep Gosal, director of engineering at charity: water From simplifying the workflow of a developer to having an impact on the global water crisis, technology and AI are reshaping the way we work. Dive into a better way of working by trying GitHub Copilot for free today, or if you are a nonprofit organization, check out GitHub for Nonprofits for exclusive discounts. GitHub and Microsoft are committed to charity: water’s work, which is why we have supported them, along with many other organizations, to help further their missions. We are dedicated to achieving our goal of replenishing more water than we consume by 2030, and invest in projects focused on land conservation, aquatic habitat restoration, water supply reliability, and water quality. Learn more about Microsoft’s Sustainability goals. The post World Water Day: how GitHub Copilot is helping bring clean water to communities appeared first on The GitHub Blog. ​ Open Source, community, social impact The GitHub Blog

tech blog

Powering Energy Innovation with AI at DISTRIBUTECH 2025

Join Dell Technologies at the annual DISTRIBUTECH event to see how we are delivering the modern grid in the AI era through secure and innovative technology.   ​  ​Join Dell Technologies at the annual DISTRIBUTECH event to see how we are delivering the modern grid in the AI era through secure and innovative technology. Events Blog | Dell

tech blog

Microsoft senior leadership update: EVP, Chief People Officer and EVP, Office of Strategy and Transformation

Satya Nadella, Chairman and CEO, shared the below communication with Microsoft employees this morning. As we’ve seen time and again throughout our 50-year history, times of great change for the world and for our industry require us to have a mindset that enables us to continually adapt and transform ourselves. There’s no question that we are at the forefront of another such moment, with the rapid changes across every industry and business function in this AI era.   This means we must have the right product portfolio, the right business models, attract and retain top talent, and optimize our processes to meet changing customer expectations and succeed in the marketplace.   With this context, I’ve asked Kathleen Hogan to transition to a new role focused on defining our overarching corporate strategy and structure and leading our continuous transformation as a company. Kathleen will assume a new role as EVP, Office of Strategy and Transformation, reporting to me.   It is hard to overstate the impact Kathleen has had on Microsoft as Chief People Officer. Over the past 10+ years, she has led our cultural transformation, as we embraced a growth mindset, positioning us to seize new opportunities with agility and attract and retain world-class talent. She is recognized externally as a consequential HR leader transforming culture and the world of work. Her more than 20-year tenure at Microsoft, including leading our global services business, paired with her prior experience as a McKinsey partner in Silicon Valley, and a development manager at Oracle, makes her uniquely suited to lead this work as we accelerate our pace of change across our people, processes, and portfolio. Kathleen will work across the SLT as we chart this next phase of our transformation, which requires both interpreting the outside and redefining the inside.   Kathleen and I have been discussing this transition and succession planning for some time, and we both agree this is the critical juncture to apply new focus and intention to this work.  With this transition, I’m very pleased to share that Amy Coleman will assume the role of EVP, Chief People Officer, leading our HR organization. She joins the senior leadership team reporting to me.   Amy has led HR for our corporate functions across the company for the past six years, following various HR roles partnering across engineering, sales, marketing, and business development spanning 25 years. In that time, she has been a trusted advisor to both Kathleen and to me as she orchestrated many cross-company workstreams as we evolved our culture, improved our employee engagement model, established our employee relations team, and drove enterprise crisis response for our people. Amy’s commitment to operational excellence and high performance will be key in driving our continued success, and I’m confident in the perspective, expertise, and thoughtful approach she’ll bring as we navigate the next phase of our journey.   Please join me in congratulating Kathleen and Amy on their new roles.   Satya   The post Microsoft senior leadership update: EVP, Chief People Officer and EVP, Office of Strategy and Transformation appeared first on The Official Microsoft Blog. ​Satya Nadella, Chairman and CEO, shared the below communication with Microsoft employees this morning. As we’ve seen time and again throughout our 50-year history, times of great change for the world and for our industry require us to have a mindset that enables us to continually adapt and transform ourselves. There’s no question that we… The post Microsoft senior leadership update: EVP, Chief People Officer and EVP, Office of Strategy and Transformation appeared first on The Official Microsoft Blog.  Recent News The Official Microsoft Blog

tech blog

Video: How to create checklists in Markdown for easier task tracking

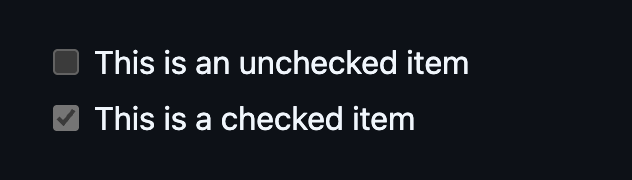
Have you ever wondered how the cool cats of the internet make Markdown checklists in their GitHub repositories, issues, and pull requests? Me too. And I’m here to say: you too can be a cool cat. Markdown checklists are handy for visualizing tasks that need to be done. Beyond that, GitHub can turn these checklists into task lists in your issues and pull requests to make your project tracking easier and better. Let’s learn how to make ‘em! How to create a checklist in Markdown Making a checklist is exactly like making a regular list in Markdown (a – starting each line), but you add [ ] or [x] after the -, like so: A regular list: – This is a list item – This is another list item A checklist: – [ ] This is an unchecked item – [x] This is a checked item When the checklist is rendered, it looks like this: Feel free to use the short Markdown checklist template above to get a list going for yourself. Markdown checklists are a great way to keep track of tasks in your README files. For example, you could mark down which features might be missing or which aspects of your project need contributors. You can also use these checklists for documentation (like for noting docs coverage), notes, issues, or pull requests. The best part: GitHub adds extra functionality to your Markdown checklists — and I’ll get to that right…now! From checklist to task list A task list on GitHub is a glorified Markdown checklist, allowing you to do even more project planning and tracking when it’s in an issue or pull request. For example, let’s say you make an issue to add some features to a project of yours, like so: – [ ] Update dependencies – [ ] Add archiving feature – [ ] Research design system It will render like this in the issue: It might look like a normal checklist, but if you hover over one of the bullet points, you’ll be able to drag and drop each task to re-order them: Or, if you hit the … menu on the right side, you can turn each of the individual checklist items into its own issue, sub-issue, or re-order from there! Turning those checklist items into issues and sub-issues means that you can turn that planned work into tracked tasks. Breaking down your existing issues into smaller pieces might seem daunting, but doing it in this way connects all the pieces together nicely as you break things up into more specific chunks. And let’s just say you did the exact same thing, but in a pull request. You still have the ability to re-order the tasks, and it will render the same way as it does in the issue: But now, because you’ve built this checklist in the pull request, you get more visibility into how many tasks have been completed and how many remain in the list of pull requests for your repository. Look just below the title of your pull request: You can see the status of your project right there! Where can I learn more? Love that you asked that question. Good job. Head over to the GitHub Docs to learn more about task lists on GitHub. Happy coding! The post Video: How to create checklists in Markdown for easier task tracking appeared first on The GitHub Blog. ​ Developer skills, GitHub, GitHub Task Lists, Markdown The GitHub Blog

tech blog

IssueOps: Automate CI/CD (and more!) with GitHub Issues and Actions

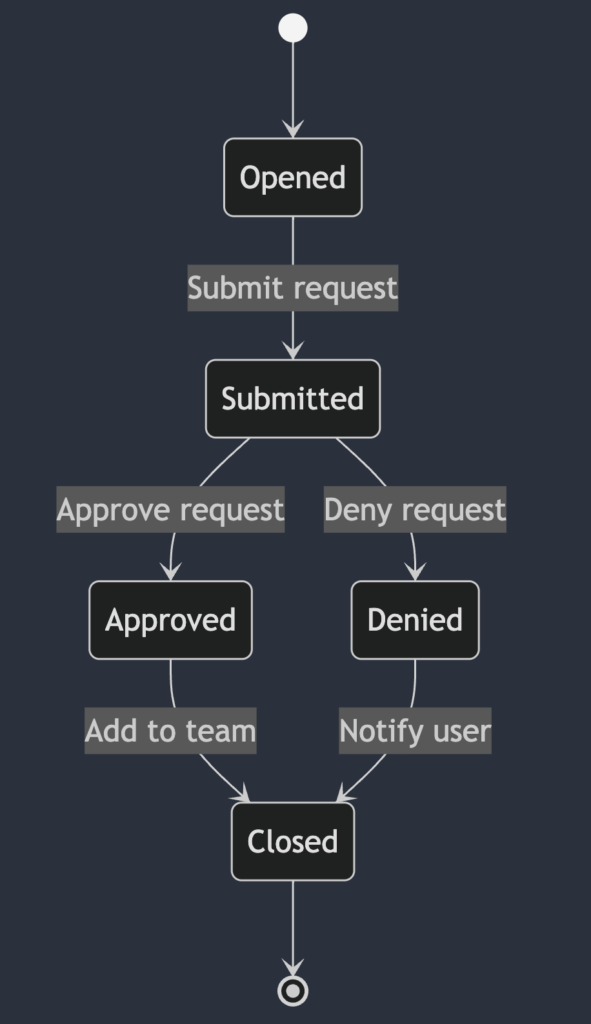
Software development is filled with repetitive tasks—managing issues, handling approvals, triggering CI/CD workflows, and more. But what if you could automate these types of tasks directly within GitHub Issues? That’s the promise of IssueOps, a methodology that turns GitHub Issues into a command center for automation. Whether you’re a solo developer or part of an engineering team, IssueOps helps you streamline operations without ever leaving your repository. In this article, I’ll explore the concept of IssueOps using state-machine terminology and strategies to help you work more efficiently on GitHub. After all, who doesn’t love automation? What is IssueOps? IssueOps is the practice of using GitHub Issues, GitHub Actions, and pull requests (PR) as an interface for automating workflows. Instead of switching between tools or manually triggering actions, you can use issue comments, labels, and state changes to kick off CI/CD pipelines, assign tasks, and even deploy applications. Much like the various other *Ops paradigms (ChatOps, ClickOps, and so on), IssueOps is a collection of tools, workflows, and concepts that, when applied to GitHub Issues, can automate mundane, repetitive tasks. The flexibility and power of issues, along with their relationship to pull requests, create a near limitless number of possibilities, such as managing approvals and deployments. All of this can really help to simplify your workflows on GitHub. I’m speaking from personal experience here. It’s important to note that IssueOps isn’t just a DevOps thing! Where DevOps offers a methodology to bring developers and operations into closer alignment, IssueOps is a workflow automation practice centered around GitHub Issues. IssueOps lets you run anything from complex CI/CD pipelines to a bed and breakfast reservation system. If you can interact with it via an API, there’s a good chance you can build it with IssueOps! So, why use IssueOps? There are lots of benefits to utilizing IssueOps. Here’s how it’s useful in practice: It’s event-driven, so you can automate the boring stuff: IssueOps lets you automate workflows directly from GitHub Issues and pull requests, turning everyday interactions—from kicking off a CI/CD pipeline and managing approvals to updating project boards—into powerful triggers for GitHub Actions. It’s customizable, so you can tailor workflows to your needs: No two teams work the same way, and IssueOps is flexible enough to adapt. Whether you’re automating bug triage or triggering deployments, you can customize workflows based on event type and data provided. It’s transparent, so you can keep a record: All actions taken on an issue are logged in its timeline, creating an easy-to-follow record of what happened and when. It’s immutable, so you do an audit whenever you need: Because IssueOps uses GitHub Issues and pull requests as a source of truth, every action leaves a record. No more chasing approvals in Slack or manually triggering workflows: IssueOps keeps everything structured, automated, and auditable right inside GitHub. Our quickstart guide to IssueOps Step 1: Define your triggers Identify the actions that should kick off your workflows—like opening an issue, adding a label, or merging a pull request. These events can serve as triggers for GitHub Actions. Step 2: Configure GitHub Actions Use GitHub Actions to define what happens when an event occurs. For example, if an issue is labeled deploy, you could trigger a deployment script. YAML never looked so good. Step 3: Test and iterate Like any good automation, IssueOps workflows should be tested and refined. Start small, see what works, and expand from there. Let’s go: Learn more in our repository. Defining IssueOps workflows and how they’re like finite-state machines Most IssueOps workflows follow the same basic pattern: A user opens an issue and provides information about a request The issue is validated to ensure it contains the required information The issue is submitted for processing Approval is requested from an authorized user or team The request is processed and the issue is closed Suppose you’re an administrator of an organization and want to reduce the overhead of managing team members. In this instance, you could use IssueOps to build an automated membership request and approval process. Within a workflow like this, you’d have several core steps: A user creates a request to be added to a team The request is validated The request is submitted for approval An administrator approves or denies this request The request is processed If approved, the user is added to the team If denied, the user is not added to the team The user is notified of the outcome When designing your own IssueOps workflows, it can be very helpful to think of them as a finite-state machine: a model for how objects move through a series of states in response to external events. Depending on certain rules defined within the state machine, a number of different actions can take place in response to state changes. If this is a little too complex, you can also think of it like a flow chart. To apply this comparison to IssueOps, an issue is the object that is processed by a state machine. It changes state in response to events. As the object changes state, certain actions may be performed as part of a transition, provided any required conditions (guards) are met. Once an end state is reached, the issue can be closed. This breaks down into a few key concepts: State: A point in an object’s lifecycle that satisfies certain condition(s). Event: An external occurrence that triggers a state change. Transition: A link between two states that, when traversed by an object, will cause certain action(s) to be performed. Action: An atomic task that is performed when a transition is taken. Guard: A condition that is evaluated when a trigger event occurs. A transition is taken only if all associated guard condition(s) are met. Here’s a simple state diagram for the example I discussed above. Now, let’s dive into the state machine in more detail! Key concepts behind state machines The benefit of breaking your workflow down into these components is that you can look for edge cases, enforce

tech blog

Simplify Enterprise AI Adoption and Scale With Agentic AI

Future-ready your business with Dell AI Factory with NVIDIA innovations—achieve top performance, scale and streamline insights.   ​  ​Future-ready your business with Dell AI Factory with NVIDIA innovations—achieve top performance, scale and streamline insights. AI Solutions Blog | Dell

Scroll to Top