tech blog

How to create issues and pull requests in record time on GitHub

Software development has always started with a conversation: What problem are we solving, why does it matter, and what does “finished” look like? On GitHub, that conversation crystallizes in an issue. No matter what tools you’re using or who you’re working with, a well-designed issue still sets the agenda for pull requests (PR), reviews, tests, and deploys. That principle hasn’t changed—but how we get from idea to issue to PR is changing fast, with Copilot helping to speed things up. By asking Copilot to draft an issue, you can quickly design a clear plan for moving forward. Then (and here’s the fun part) you can assign that issue directly to the new GitHub Copilot coding agent, which will asynchronously work to execute on the task at hand and give you a PR.  This is a new way of working. But the basic developer experience is simple, familiar and—dare I say—GitHubby.  In this blog, we’ll talk about: Why issues remain the backbone of work on GitHub—whether they’re written by you or drafted by Copilot. Best practices for building great issues when working with your team or Copilot. How a Copilot-oriented workflow helps you move faster, enforces consistency, and tees up the Copilot coding agent for hands‑off fixes. Let’s jump in.  Why great issues and pull requests are critical GitHub Issues and pull requests are some of the core building blocks on GitHub. Each issue describes a discrete piece of work, and offers helpful details, requirements, and more for whoever picks up that piece of work. PRs bundle the completed work for code reviews and merging.  Even in an AI‑accelerated workflow, these two artifacts are how present and future teams understand what happened and why. Regardless of who (or what) authors them, well‑structured issues and pull requests deliver four key benefits: Shared context: One URL captures the problem statement, reproduction steps, and definition of done. Anyone joining next week—or next year—can catch up in minutes. And as we say at GitHub, if it doesn’t have a URL it didn’t happen.  Async coordination: Whether teams are working across timezones, or simply looking to stay heads-down, meetings often add complexity and overhead. Issues free up time by letting developers work asynchronously, meeting only when it will add value.  Audit and analytics: Labels, milestones, and templates feed dashboards, SLAs, and compliance reporting. Automation hooks: Actions workflows, project boards, and agentic tools rely on predictable metadata attached to every issue. Miss the structure and every downstream step—human or AI—slows down. Need an example? Here’s an issue I’ve been looking at today (and no, I’m not going to name and shame anyone): Issue #12609: Found broken link. Please fix! …and that’s it! Just a title with no explanation in the body, no actual link, no context, no environment or version info, and no reproducible example or proposed fix.  As developers, we need well-crafted issues in order to dive into any project we get asked to do, and we need to write good issues to help teammates work effectively. AI is no exception: Large language models perform best when objectives, constraints, and success criteria are explicit. A vague prompt leads to vague output, whether it’s created by a human or a machine. Here’s the thing: By allowing Copilot to assist with issue creation, you get to focus on clarity, not copy pasting, as Copilot locates the relevant references, builds out the initial issue structure, and even adds labels or project assignments. The anatomy of a great GitHub Issue Use this checklist when you create—or review—an issue (yes, Copilot writes these for you, but you’re still in charge): Action‑forward title: Lead with the noun and follow with the verb: “Login button – disable on Safari 17 beta” beats “Some login thing?” Problem or user story: Frame the pain: “As a shopper, I can’t click Buy on mobile Safari, so I abandon the cart and cry.” Expected vs. actual behavior: Two quick bullets: “Should render primary button” vs. “Button unclickable, no CSS pointer‑events.” Reproduction steps or visual evidence: GIFs, screenshots, or command-line specifics—whatever helps a teammate (or Copilot) quickly understand the problem. Acceptance criteria / definition of done: Straightforward pass/fail criteria, such as “all tests pass”, “Lighthouse score > 90”, “feature flag removed”. Scope and constraints: Guardrails to prevent yak‑shaving: perf budgets, browser list, no new dependencies. Metadata (labels, assignee, milestone, project): It’s the secret sauce that powers boards, filters, and Slack notifications. Miss anything and async breaks down. Nail this format and Copilot—and your team—can move fast. How to draft issues on GitHub faster with Copilot Great issues share two traits: they’re fast to write and rich in context. GitHub Copilot’s Create Issue flow gives you both. Instead of hopping between fields or copy‑pasting snippets, you can open Copilot Chat and describe the problem in plain language:  “Create a bug report about a 500 error on the login form in octo-org/octo‑web.” Copilot drafts the title, body, and even suggests labels and an assignee—drawing on your repository’s preferred template so the issue lands in the right format every time. Here’s the step-by-step guide:  Open Copilot Chat’s immersive view at github.com/copilot. Describe what you need. Mention the repo (org/repo) or let Copilot infer it from where you last filed an issue. Drop in a screenshot if a picture tells the story faster; Copilot will embed it in the draft and reference it in the description. Review the draft. Ask follow‑up prompts (“add repro steps,” “switch to the bug template”) or tweak the Markdown directly. Template switches keep your content—no rewriting required. Click Create when it looks good. Tips for building great issues with GitHub Copilot What you do How Copilot helps Why it matters Lead with context (expected vs. actual, repro steps) Parses your wording into the right template sections. Teammates (or Copilot) get clarity. Attach evidence (screens, logs) “Image‑to‑issue” persists the file in the issue body. Future debuggers see exactly what you saw. Tag next actions (“assign to Copilot”, “label frontend”) Adds assignee, labels, milestones in one go. Keeps boards tidy and workflows automated. Batch

tech blog

Assigning and completing issues with coding agent in GitHub Copilot

You’ve used GitHub Copilot to help you write code in your IDE. Now, imagine assigning Copilot an issue, just like you would a teammate—and getting a fully tested pull request in return.  That’s the power of the new coding agent in GitHub Copilot. Built directly into GitHub, this agent starts working as soon as you assign it a GitHub Issue or prompt it in VS Code. Keeping you firmly in the pilot’s seat, the coding agent builds pull requests based on the issues you assign it. This isn’t just autocomplete. It’s a new class of software engineering agents that work asynchronously to help you move faster, clean up tech debt, and focus on the work that really matters. Let’s explore how this coding agent works and how it can help you find new ways of working faster. ✨ Oh, and if you’re a visual learner we have you covered. 👇 Coding agent in GitHub Copilot 101 This new coding agent, which is our first asynchronous software engineering agent, is built on GitHub Actions and works like a teammate. You assign it an issue, let it do the work, and then review its outputs before changing or accepting them. It also incorporates context from related issues or PR discussions and can follow custom repository instructions that your team has already set. You assign Copilot an issue and it plans the work, opens a pull request, writes the code, runs the tests, and then asks for your review. If you leave feedback, it’ll revise the PR and keep going until you approve.  The process isn’t instant—it takes a little time to compute and run. But it’s already helping developers work faster and more efficiently.  What’s the difference between the coding agent and agent mode? Agent mode is a synchronous collaborator that pairs with you as you work: It works inside your IDE of choice, whether VS Code or JetBrains, Eclipse, and Xcode, as a real-time collaborator that iterates on code, runs tests, and fixes its own mistakes in real time. Coding agent is an asynchronous collaborator and works on your behalf like a teammate: It is an SWE agent that runs inside GitHub Actions, picks up issues you assign, explores the repo for context, writes code, passes tests, and opens a pull request for your review. BTW: Both use Copilot premium requests, and coding agent uses GitHub Actions minutes, so plan and budget accordingly with your teams. According to Brittany Ellich, Senior Software Engineer at GitHub, traditional advice for devs has been to do one thing at a time, and do it well. But with the new coding agent, GitHub can now help you do more things well, like: Offloading repetitive, boilerplate tasks like adding and extending unit tests Maintaining better issue hygiene and documentation with quick typo fixes and small refactors Improving user experience by fixing bugs, updating user interface features, and bolstering accessibility By assigning these low- to medium-complexity tasks to the coding agent, you may finally have the bandwidth to focus on higher-level problem solving and design, tackle that tech debt that’s been piling up, learn new skills, and more. Even though Copilot is doing the work, you’re in control the entire time: You decide what to assign, what to approve, and what should be changed. Need help building issues? Copilot’s at the ready. Copilot can also build issues with the preview of Copilot’s Create Issue flow. This new feature enables you to build multiple issues quickly by drawing on the full context of your prompt and project. Learn more > How to get the coding agent to complete an issue Step one: Write and assign the issue to Copilot This is where you’ll be most involved—and this step is crucial for success. Think of writing the issue like briefing a team member: The more context you give, the better the results (like any other prompt).  Make sure to include: Relevant background info: Why this task matters, what it touches, and any important history or context.  Expected outcome: What “done” looks like. Technical details: File names, functions, or components involved. Formatting or linting rules: These are especially important if you use custom scripts or auto-generated files. You can add these instructions for Copilot so it’s automatically reflected in every issue.  Once you’ve written the issue, it’s time to assign it to Copilot—just like you would a teammate. You can do this via github.com, the GitHub Mobile app, or through the GitHub CLI.  Copilot works best with well-scoped tasks, but it can handle larger ones. It just might take a little bit longer. You don’t have to assign only one issue; you can batch-assign multiple issues, which is great for tasks like increasing test coverage or updating documentation. Here are a few tips and tricks that we’ve found helpful: You can use issue templates with fields like “description” and “acceptance criteria” to make writing issues easier and more consistent across your team.  If your repo includes custom instructions (such as which files are auto-generated or how to run formatters), Copilot will use these to improve its output. The agent can actually see images included in its assigned issues on GitHub, so you can easily share images of what you want your new feature to look like, and the agent can run with it.  Step two: Copilot plans the code  Once you assign Copilot an issue, it will add an 👀 emoji reaction. Then it will kick off an agent session using GitHub Actions, which powers the integrated, secure, and fully customizable environment the coding agent is built on.  This environment is where Copilot can explore and analyze your codebase, run tests, and make changes. The coding agent will simultaneously open both a branch and a pull request, which will evolve as Copilot works.  Copilot will read your issue and break it down into a checklist of tasks, then update the pull request with this checklist. As it completes each task, Copilot checks it off and pushes commits to the branch.

tech blog

GitHub for Beginners: Test-driven development (TDD) with GitHub Copilot

Welcome to the next episode in our GitHub for Beginners series, where we’re diving into the world of GitHub Copilot. We’re now on our seventh episode, and we’ve covered quite a lot of ground. You can check out all our previous episodes on our blog or as videos. Today we’re going to dive into the world of testing, a much needed but historically tedious part of the development process. This is especially true as our codebase becomes larger and more complex. Fortunately, we can use GitHub Copilot to help automate some of this process. After all, one of the most basic questions we have when writing code is: “Does it work?” For the demos in this series, we’re using GitHub Copilot in Visual Studio Code. Copilot is available in other IDEs, but the available functionality may vary depending on your environment. Testing 101 Before we jump into how to use GitHub Copilot to write some tests, we should talk about testing, why it’s important, and different ways to test your code. Be aware that test testing is a very deep topic, and we’ll only be touching the surface here. Covering the nuances of testing would be an entire course in and of itself. So why is testing important? In short, it’s how you make sure that your code does what you expect. Testing can take many different forms, such as: Acceptance tests: Tests that ensure your app meets a set of defined functionality. Integration tests: Tests that verify your app can talk across various systems such as databases and APIs. Unit tests: Tests focused on breaking the code into small, isolated pieces called units. These make sure the individual units do exactly what you’d expect them to do. Writing unit tests As we just covered, unit tests work by breaking down your code into smaller chunks that are easier to test. Making sure each individual piece is doing what it’s supposed to do increases confidence that the entire app will work when you put all the pieces together. One of the great things about unit tests is that you can automate the process. Once you’ve created a large battery of tests, you can literally run thousands of tests with a single command. This gives you a good indicator regarding the health of your application. By regularly running these tests, you’ll also discover if any changes to your code broke something you might not have been expecting. So how do you use GitHub Copilot to create some unit tests? Open up your code and highlight a section that you want to test. For example, you might highlight a specific function. Open up Copilot Chat. You might notice that Copilot suggests using the /tests slash command to write tests. Send Copilot the following prompt: /tests add unit tests for my code If Copilot asks if you want to configure a test framework, select Dismiss. Review the plan and code suggestions to make sure you understand what changes Copilot is going to make. Click the Add to new file button at the top of the code suggestion to create the tests. Save the new file. Run the tests by running the following command in your terminal: python -m pytest Congratulations! You just added some unit tests to your code! If you’d like to see a demo of this in action, make sure to watch the video! Test-driven development Now that you’ve seen how to write some unit tests, let’s talk a little bit about test-driven development (TDD). What exactly is TDD? It’s a process where you use the tests to drive how you develop your code. When using TDD, you write your tests first, and then create the implementation afterward. The process takes a little bit of adjusting how you think about development, but it does come with several advantages. It gives you the opportunity to see how your code will behave and ensure the tests you’re writing are testing what you expect them to test.  A concept that can be helpful for wrapping your brain around this is called “red, green, refactor.” In this process, you create the tests first, and they fail. They might not even build! This is the red stage. Then you write just enough code to get your tests to pass. For example, if you’re writing a test that makes sure an error is thrown if a number is less than 0, you write just enough code to throw that error on that condition. When you return to the test, it now passes. You’ve actively made a change to the codebase to implement the desired functionality. This is the green stage.  Finally, you implement any refactoring to make the code look good. Now that it works, you can focus on making it pretty. The entire time you are working on this, you keep running the unit tests to make sure your changes don’t break anything. As you probably guessed, this is the refactor stage. GitHub Copilot can help you with TDD. It’s one of the hidden little tricks that Copilot is able to do—you can tell it code will exist and generate tests based on that information. For example, if you were working on an email validation app, you could send the following prompt to Copilot Chat: I’m going to be adding a new validator function for usernames. Usernames must be between 3 and 16 characters, start with a letter or an underscore, not use multiple underscores to start, and after the first character chan have letters, numbers, and underscores. Just create the new test functions. This prompt provides the criteria that you’re expecting and gives it to Copilot. Copilot will then use this prompt to generate unit tests to test that functionality. If you ran these tests, they would fail, because you’ve only created the tests. Red stage. Now, to move on to the green stage, you could send Copilot the following prompt: Create the implementation Copilot will now generate the code to make sure these

tech blog

Inside GitHub: How we hardened our SAML implementation

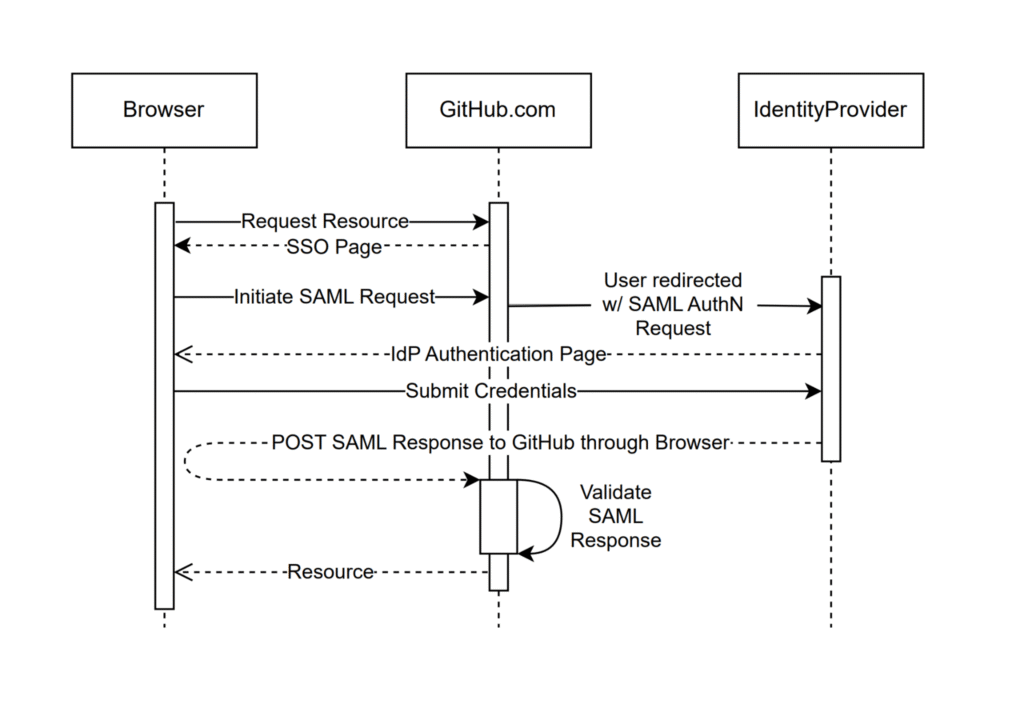
For over a decade, GitHub has offered enterprise authentication using SAML (Security Assertion Markup Language), starting with our 2.0.0 release of GitHub Enterprise Server in November 2014. SAML single sign-on (SSO) allows enterprises to integrate their existing identity providers with a broad range of GitHub products, extend conditional access policies, and bring enterprise organization management to GitHub. To ship this feature, we had to build and maintain support for the SAML 2.0 specification, which defines how to perform authentication and establish trust between an identity provider and our products, the service provider. This involves generating SAML metadata for identity providers, generating SAML authentication requests as part of the service provider–initiated SSO flow, and most importantly, processing and validating SAML responses from an identity provider in order to authenticate users. These code paths are critical from a security perspective. Here’s why:  Any bug in how authentication is established and validated between the service and identity providers can lead to a bypass of authentication or impersonation of other users.  These areas of the codebase involve XML parsing and cryptography, and are dependent on complex specifications, such as the XML Signature, XML Encryption, and XML Schema standards.  The attack surface of SAML code is very broad, so the data that is validated for authentication and passed through users’ (and potential attackers’) browsers could be manipulated.  This combination of security criticality, complexity, and attack surface puts the implementation of SAML at a higher level of risk than most of the code we build and maintain. Background When we launched SAML support in 2014, there were few libraries available for implementing it. After experimenting initially with ruby-saml, we decided to create our own implementation to better suit our needs.  Over the years since, we have continually invested in hardening these authentication flows, including working with security researchers both internally and through our Security Bug Bounty to identify and fix vulnerabilities impacting our implementation.  However, for each vulnerability addressed, there remained lingering concerns given the breadth and complexity of root causes we identified. This is why we decided to take a step back and rethink how we could move forward in a more sustainable and holistic manner to secure our implementation. So, how do you build trust in a technology as complex and risky as SAML?  Last year, this is exactly the question our engineering team set out to answer. We took a hard look at our homegrown implementation and decided it was time for change. We spent time evaluating the previous bounties we’d faced and brainstormed new ideas on how to improve our SAML strategy. During this process, we identified several promising changes we could make to regain our confidence in SAML.  In this article, we’ll describe the four key steps we took to get there: Rethinking our library: Evaluating the ruby-saml library and auditing its implementation Validating the new library with A/B testing: Building a system where we could safely evaluate and observe changes to our SAML processing logic Schema validations and minimizing our attack surface: Reducing the complexity of input processing by tightening schema validation Limiting our vulnerability impact: Using multiple parsers to decrease risk Rethinking our library When we reviewed our internal implementation, we recognized the advantages of transitioning to a library with strong community support that we could contribute to alongside a broader set of developers.  After reviewing a number of ruby SAML libraries, we decided to focus again on utilizing the ruby-saml library maintained by Sixto Martín for a few reasons:  This library is used by a number of critical SaaS products, including broad adoption through its usage in omniauth-saml. Recent bugs and vulnerabilities were being reported and fixed in the library, showing active maintenance and security response.  These vulnerabilities and fixes were distributed through the GitHub Advisory Database and CVEs, and had updates pushed through Dependabot, which integrates well with our existing vulnerability management processes.  This support and automation is something we wouldn’t be able to benefit from with our own internal implementation. But moving away from our internal implementation wasn’t a simple decision. We had grown familiar with it, and had invested significant time and effort into identifying and addressing vulnerabilities. We didn’t want to have to retread the same vulnerabilities and issues we had with our own code.  With that concern, we set out to see what work across our security and engineering teams we could do to gain more confidence in this new library before making a potential switch. In collaboration with our bug bounty team and researchers, our product security team, and the GitHub Security Lab, we laid out a gauntlet of validation and testing activities. We spun up a number of security auditing activities, worked with our VIP bug bounty researchers (aka Hacktocats) who had expertise in this area (thanks @ahacker1) and researchers on the GitHub Security Lab team (thanks @p-) to perform in-depth code analysis and application security testing.  This work resulted in the identification of critical vulnerabilities in the ruby-saml library and highlighted areas for overall hardening that could be applied to the library to remove the possibility of classes of vulnerabilities in the code. But is security testing and auditing enough to confidently move to this new library? Even with this focus on testing, assessment, and vulnerability remediation, we knew from experience that we couldn’t just rely on this point-in-time analysis.  The underlying code paths are just too complex to hang our hat on any amount of time-bound code review. With that decision, we shifted our focus toward engineering efforts to validate the new library, identify edge cases, and limit the attack surface of our SAML code. Validating the new library with A/B testing GitHub.com processes around one million SAML payloads per business day, making it the most widely used form of external authentication that we support. Because this code is the front door for so many enterprise customers, any changes require a high degree of scrutiny and testing.  In order to preserve the stability of our SAML processing code

tech blog

4 trends shaping open source funding—and what they mean for maintainers

From solo projects to major frameworks, open source maintainers are doing the work of many, for many—oftentimes without guaranteed funding. Thankfully, programs like GitHub Sponsors can make a critical difference in the long-term health of a project. But what makes an open source project attractive to sponsors?  We asked a few internal experts to analyze eight funded open source projects on GitHub. We then used that information to identify patterns and insights that could help maintainers and contributors understand what drives sponsorships in open source. The answer isn’t one-size-fits-all, but the most successful projects tend to get several of these right. With Maintainer Month well underway, our GitHub panel is a bit slimmer this month, but it includes:  Abigail Cabunoc Mayes, aka @abbycabs, who works on open source maintainer programs and serves on the board of the OpenJS foundation.  Kevin Crosby, aka @kevincrosby, who runs GitHub’s open source funding program.  Jeff Luszcz, aka @jeffrey-luszcz, who helps manage GitHub’s open source program office (OSPO). Below, we’ll highlight some of these projects—and break down the trends that make them stand out in today’s evolving open source landscape.  Top trends, at a glance In this analysis, we saw that projects that accomplish the following tend to receive funding:  Community engagement drives success: Projects with passionate user bases that value both the maintainers and the project. Projects that solve specific pain points can build powerful communities: Solving difficult or niche problems in unique ways unlocks value for the user. User-facing tools and packaging often get more visibility: Packaging tools or “products” that developers and members interact with daily. In contrast, foundational infrastructure projects that power these tools can struggle for visibility and funding, despite being essential to the ecosystem. Offer value in other ways that matter: Projects offering clear value through support contracts, training, memberships, or other services. Get the full analysis > 1. Ladybird: the open source web browser 🦅 Website Source C++ HTML JavaScript CMake Objective-C++ Swift 📜 BSD 2-Clause License Started by the former maintainer of SerenityOS and funded by one of the cofounders of GitHub (Chris Wanstrath, aka @defunkt), Ladybird is an independent, cross-platform web browser being built from scratch in C++/Swift that ships its own LibWeb rendering and LibJS JavaScript engines.  The project’s 501(c)(3) Ladybird Browser Initiative rejects ad deals and search‑engine royalties outright, funding itself only through unrestricted donations. That “no strings attached” stance resonates with privacy‑minded companies and individuals. Ladybird uses a sandboxed multi-process architecture and targets Linux, macOS, and other Unix-like systems—aiming to offer a modern, standards-compliant alternative that relies on zero Chromium or Gecko code. Why it matters Ladybird is a perfect example of values-based funding. Kevin expands on this: “There’s a desire among people for less data collection via web browsers and search engines, and Ladybird offers an untracked web experience.” Tapping into users’ values—like privacy, independence, or ethical tech—can motivate sponsorship beyond just technical features.  “This is a huge deal,” Kevin says. “The dream of an OSS web browser is one that a lot of people are ready to buy into. People are willing to pay not to have their data sold—data integrity is super valuable.” Ladybird also benefited from a strong “founder effect”: it was launched by well-known developers in the open source community, which helped it quickly attract attention and funding. Abigail speaks to this: “Projects started by well-known community members can gain momentum and financial backing much faster than those building an audience from scratch. While most projects in this list took years to build their funding community, Ladybird leveraged its founders’ reputations from day one.” 2. Neovim: the editor that inspires devotion ✍️ Website Source Vim Script Lua C CMake Python Shell 📜 Apache 2.0 License Neovim is a modern reimagining of the classic Vim text editor, designed to enhance extensibility, maintainability, and user experience. Launched in 2014, it introduces features like built-in Language Server Protocol (LSP) support, asynchronous I/O, and Lua scripting capabilities, all while maintaining compatibility with most of Vim’s features .  By swapping Vim‑script internals for an embedded Lua runtime, asynchronous job control, and a remote‑UI RPC API, Neovim can act as:  A terminal‑first IDE with built‑in LSP, Tree‑sitter syntax trees, an embedded terminal, and virtual‑text/inline‑diagnostics, An embeddable component inside other apps, or A headless background process that multiple GUIs attach to. Neovim has also cultivated a thriving ecosystem. Their delightful collection of plugins has become a major part of its appeal and funding story, offering developers highly customizable experiences out of the box. Why it matters Neovim perfectly captures maybe the strongest funding pattern we’ve seen: developers will pay to support tools they use every single day and that have become a part of their identity. Jeff gets it: “People are passionate about their text editors. And developers love Neovim because it continues to improve things.” Kevin continues: “A common thing is that tools that are more user facing get more funding because they’re more top of mind—whereas tools that are lower in the stack don’t get as much visibility. People really care about their text editors and identify with their editor.” 3. RunAsUser: system privileges made simple 🔑 Source PowerShell 📜 MIT License Kelvin Tegelaar builds multiple PowerShell modules for his community. RunAsUser is one featured module that lets you launch processes in the security context of the currently-logged-on user—even when the script itself is running as SYSTEM.  That’s handy for Remote Monitoring and Management (RMM) tools, scheduled tasks, or other automations commonly used by system administrators and managed service providers that normally run under the SYSTEM account but occasionally need to interact with resources that only the interactive user can access. Why it matters When you solve a pain point for a specific audience, they’re more likely to back you financially. Kelvin does this by making the lives of Windows system administrators (or sysadmins for short) easier. RunAsUser is a specific example of this.  “The users of this project value the maintainer, Kelvin’s, support,” Kevin says. “It’s not only that the project is

tech blog

GitHub Universe 2025: Here’s what’s in store at this year’s developer wonderland

GitHub Universe, the world’s fair of software, is returning to the historic Fort Mason Center in San Francisco on October 28-29, 2025.  This global event will bring together developers, tech leaders, GitHub customers, security professionals, and more for two days of learning and community building. Together, we’ll celebrate the boundless potential of AI-powered development in a wonderland-themed space designed to fuel your next big idea. In-person general admission passes are now on sale for $700 off with our Super Early Bird discount—plus you can take up to an extra 35% off when you bring your team. Join us IRL at the lowest price of the year, or virtually for free!  Register now Here’s a sneak peek at what we have in store: What you’ll experience 👐 Sharpen your skills, test out new tools, and connect with people who build like you. From technical sessions to interactive demos and real-world success stories, Universe will help you ship faster, more securely, and with greater confidence. Learn the latest in AI-powered development 🧠 Our three content tracks across intro, intermediate, and advanced levels will make your development processes more efficient, creative, and joyful: 🚀 Build faster, stay in flow: Transform your development lifecycle with AI-native tools, collaborate with agentic AI, and discover how GitHub Copilot is pushing the boundaries of what’s possible. 🔐 Secure every commit: Explore AI-driven vulnerability detection, learn how to embed security seamlessly into your workflows, and scale security programs without disrupting innovation. ⚡ Automate and scale with confidence: Optimize your CI/CD pipelines, measure the ROI of GitHub Copilot in your organization, and align engineering metrics with business outcomes. Universe instantly gives you the chance to connect with some of the most clued-in people on the planet in the world of software engineering. Sumeet Shetty, Head of Tools India at SAP ✨ New this year Your general admission pass now includes one GitHub Certification exam! Choose from certifications in GitHub Copilot, GitHub Advanced Security, and more. On-site exams will be available on October 30 for all in-person attendees. Dive into interactive experiences 🛠️ You’ll get the chance to see product demos, eat some of the best event food around (including donuts! 🍩), and engage with the latest tools and technologies to bring insights back to your team: Spend time in our new Makerspace, an interactive playground for creators, developers, and curious minds, where code powers art, music, robotics, and more. Come tinker, experiment, and see what’s possible. Connect with maintainers and open source enthusiasts in the expanded Open Source Zone. Want to demo your project at GitHub Universe? Apply now for a chance to share your work with thousands of developers from around the world. Polish your professional profiles on GitHub and LinkedIn at the Career Corner.  … and more!  I just met one of my open source heroes, one of the creators behind Lady Bird Browser. This is the coolest thing of all time. Universe feels like a giant hackathon. Zach Latta, Founder and Executive Director of Hack Club Connect with the GitHub community 👥 Universe is more than just keynotes and sessions—it’s a space designed for collaboration and connection. Whether you’re chatting over lunch, striking up a conversation in the Open Source Zone, or meeting someone new at a demo booth, the hallway track is where spontaneous moments spark real relationships. Network with fellow developers, meet your open source heroes, and engage with the people shaping the future of software—all in an environment built to bring our community together.  It’s really important to be able to get together with people, to commune with them, drink coffee with them, and chat with them about our various projects. You get these serendipitous encounters and interactions where you meet someone you had no idea you were going to meet. Joshua Miele, Founder and Board President of the Center for Accessibility and Open Source Be the first to see what’s next 🔮 In 2025, GitHub has already shipped powerful new tools to enhance your development workflow, from Copilot Code Reviews to GitHub Enterprise Cloud with data residency, and even powerful new features in Projects and Issues.  At Universe, you’ll get an exclusive look at what’s coming next with live demos of upcoming features, the chance to engage directly with GitHub experts, and a first look at the insights shaping the future of software development. Is GitHub Universe right for me? 👋 Universe is for anyone building, scaling, securing, or reimagining what’s possible with software. Whether you’re coding in your day-to-day or leading the charge from the top, you’ll find your people here. So, yes.  Developers and maintainers: Seasoned pros and weekend coders—come level up your skills, meet your next pair programming partner, and explore what’s possible with AI. Leaders: Engineering managers, team leads, and innovators with a vision—discover strategies to unlock developer productivity and bring bold ideas to life. Security professionals: The protectors of your codebase—learn how to shift left, automate security checks, and scale trust without slowing velocity. Founders: Startup founders, execs, and creators—share your story, recruit top talent, and stay ahead of the next big wave in software innovation. It all starts at GitHub Universe 💫 Now through July 8, you can get $700 off with a Super Early Bird pass—our lowest price of the year at just $799. Looking to bring your crew? Save an extra 25% when you purchase three or more passes, or 35% when you bring eight or more team members. If you can’t make it to San Francisco, virtual passes give you free access to live-streamed keynotes and on-demand sessions. Ready to join us? Register now → Additional resources 📚 Need help convincing your manager? Use our customizable email template to make your case. Want to stay updated on speakers and sessions as they’re announced? Sign up for updates. Curious about what you might learn? Browse last year’s sessions to get a taste of the Universe experience. The post GitHub Universe 2025: Here’s what’s in store at this year’s developer wonderland appeared first on


tech blog

Less TODO, more done: The difference between coding agent and agent mode in GitHub Copilot

“Give a dev a code completion and they’ll merge once. Teach a dev to wield an AI agent and they’ll empty the backlog before the coffee cools.“ GitHub Copilot started life in 2021 as the autocomplete sidekick that kept you in flow. Fast forward to 2025 and it now has two new and very different superpowers: Agent mode: a real‑time collaborator that sits in your editor, works with you, and edits files based on your needs. Coding agent: an asynchronous teammate that lives in the cloud, takes on issues, and sends you fully tested pull requests while you do other things. While they’re both AI agents, they’re tuned for different parts in your day-to-day workflows. Since we’ve been getting a few questions, we’re breaking down what they are, when to reach for each, and—because we’re developers—offering some hands‑on tips. TL;DR: The difference between agent mode and coding agent Agent mode = synchronous: Works inside VS Code (and now JetBrains/Eclipse/Xcode previews) as an autonomous collaborator that iterates on code, runs tests, and fixes its own mistakes in real time. Coding agent = asynchronous: Runs inside GitHub Actions (in public preview), picks up issues you assign (assignee: Copilot), explores the repo, writes code, passes tests, and opens a pull request for your review. Think of agent mode as the senior dev pair programming with you, and coding agent as the diligent teammate grinding through well‑scoped tickets. You can (and should) use both together: Prototype interactively in agent mode, then give follow‑up tasks to the coding agent. Note: Both consume Copilot premium requests, but coding agent also uses Actions minutes.  Meet agent mode: Your real‑time collaborator Agent mode transforms Copilot Chat into an orchestrator of tools (read_file, edit_file, run_in_terminal, etc.). Give it a natural‑language goal—“add OAuth to our Flask app and write tests”—and it plans, edits files, runs the test suite, reads failures, fixes them, and loops until green. You watch the steps, intervene when you like, and keep all changes local. How to turn agent mode on Open Copilot Chat in VS Code. Select Agent from the mode dropdown. (Optional but smart) Click Tools → Manage to enable or disable capabilities and add MCP extensions. Pro tips for using agent mode to the fullest extent Scope the outcome: “Generate a REST endpoint” beats “help?” Vagueness breeds hallucination, so be as clear as possible about what you want. Seed with context: Point it at the spec file or paste the schema so it doesn’t reinvent shapes. Iterate interactively: Let it run, but nudge when it veers—like pair programming with a skilled teammate who’s fast but needs occasional direction. Extend with MCP servers: If you need custom tools (database migrations, cloud deploys, etc.). Choose your model: OpenAI GPT‑4o for raw power, Anthropic Claude for longer context—swap via the model picker. TLDR: Agent mode is like pair programming with a pro who writes code, runs tests, and fixes errors instantly, all within your editor. Meet your coding agent: Your asynchronous teammate  Where agent mode lives in the IDE, coding agent lives in your repos. Assign an issue to Copilot, and it spins up a secure cloud workspace (via GitHub Actions), figures out a plan, edits code on its own branch, runs your tests/linters, and opens a pull request tagging you for review. How to enable it Plan eligibility: Requires Copilot Pro+ or Copilot  Enterprise. Flip the switch: Enterprise admins must enable “Copilot coding agent” in organization policies. Assign issues: Prompt coding agent with natural language by pointing it at an issue to get started.  ### Feature: add dark‑mode toggle assignees: Copilot Watch the pull requests roll in—quick turnarounds for small tasks, thorough work on the complex ones. Sweet‑spot tasks Low‑to‑medium complexity changes in well‑tested repositories. Adding or extending unit tests. Small refactors (rename a service, extract helpers). Documentation or typo fixes. Not yet ideal for: massive rewrites, cross‑repo changes, codebases with 0% test coverage. Pro tips for using coding agent in GitHub Copilot Write crisp acceptance criteria in the issue. The agent reads them like a spec. Link to files or functions the change touches; saves exploration time. Keep it atomic: one logical task per issue. Multiple smaller issues scale better than one behemoth. Leverage PR comments: Ask the agent for tweaks, then you can extract the logic into a separate function and add error handling. Mind your minutes: Heavy tasks consume Actions minutes and premium requests, so queue strategically. And remember: GitHub Copilot coding agent follows your existing code style without complaints… yet. Side by side: Picking the right tool Decision lens Agent mode Coding agent Workflow pacing Real‑time collaboration, conversational, and iterative Fire and forget, background tasks Interface VS Code / JetBrains / Eclipse / Xcode chat GitHub Issues or Copilot Chat → Monitored via pull requests Typical tasks Refactor, prototype, debug, migrate Feature add, bug fix, extending tests, boring tasks and repetitive engineering chores Human oversight Continuous (you watch edits) At pull request review checkpoint Resource cost Premium requests Premium requests + Actions minutes Best for Exploring unknown code, tight feedback loops Clearing backlog, parallelizing chores Get more done by using both Before we dive into the tactical playbook, remember that Copilot’s superpowers aren’t either/or—they’re peanut butter and jelly. The magic really shows up when the real‑time, in‑editor agent mode meets the steady, background hustle of the coding agent.  With that, here are three proven pairings that let you wring every drop of productivity (and fun) out of both: Prototype in agent mode. Ship with coding agent. Use agent mode to spike a working feature branch. Open an issue describing polish tasks; assign to Copilot. Agent mode for spec generation. Coding agent for implementation. Ask agent mode to draft a design doc from code context. Fine‑tune it, then hand the ticket to coding agent to execute. Coding agent regression fix. Agent mode hot patch.  If coding agent’s pull request introduces a build failure, open the branch locally and summon agent mode to diagnose and patch instantly. These aren’t the only areas where you can use agent mode and coding agent

tech blog

DNS rebinding attacks explained: The lookup is coming from inside the house!

My colleague Kevin Stubbs mentioned the topic of DNS rebinding attacks in a  previous blog post. No worries if you haven’t read it yet though—in this article, we’ll walk you through the concept of DNS rebinding from scratch, demystify how it works, and explore why it’s a serious browser-based security issue. We’ll start by revisiting the same-origin policy, a fundamental part of web security, and show how DNS rebinding bypasses it. You’ll see real-world scenarios where attackers can use this technique to access internal applications running on your local machine or network, even if those apps aren’t meant to be publicly available. We’ll dive into a real vulnerability in the Deluge BitTorrent client, explaining exactly how DNS rebinding could have been used to read arbitrary files from a local system. Finally, we’ll go over practical steps you can take to protect yourself or your application from this often-overlooked but potent attack vector. Same-origin policy Same-origin policy (SOP) is a cornerstone of browser security introduced in 1995 by Netscape. The idea behind it is simple: Scripts from webpages of one origin should not be able to access data from a webpage of another origin. For example, nobody wants arbitrary webpages to be able to read their currently logged-in webmail. So that websites can be distinguishable from the next, they’re each defined with a combination of protocol (schema), host (DNS name), and a port number. Any mismatch in these three parts makes the origin different.  For example, for the webpage: https://www.somedomain.com/sub/page.html possible origin comparisons are the following: URL Outcome Reason https://www.somedomain.com:81/sub/page.html Different The port 81 doesn’t match 443 (the default for https) https://somedomain.com/sub/page.html Different Exact www.somedomain.com match is required http://www.somedomain.com:443/sub/page.html Different The schema (protocol) HTTP doesn’t match HTTPS https://www.somedomain.com/admin/login.html Same Only the path differs The attack: DNS rebinding People tend to think running something on localhost completely shields it from the external world. While they understand that they can access what is running on the local machine from their local browser, they miss that the browser may also become the gateway through which unsolicited visitors get access to the web applications on the same machine or local network.  Unfortunately, there is a disconnect between the browser security mechanism and networking protocols. If the resolved IP address of the webpage host changes, the browser doesn’t take it into account and treats the webpage as if its origin didn’t change. This can be abused by attackers.  For example, if an attacker owns the domain name somesite.com and delegates it to a DNS server that is under attacker control, they may initially respond to a DNS lookup with a public IP address, such as 172.217. 22.14, and then switch subsequent lookups to a local network IP address, such as 192.168.0.1 or 127.0.0.1 (i.e. localhost). Javascript loaded from the original somesite.com will run client-side in the browser, and all further requests from it to somesite.com will be directed to the new, now local, IP address. From then on, documents loaded from different IP addresses—but resolved from the same hosts—will be considered to be of the same origin. This gives the attackers the ability to interact with the victim’s local network via Javascript running in the victim’s browser. This makes any web application that runs locally on the same machine or local network as the victim’s browser accessible to the scripts loaded from somesite.com too.  One catch is that if the web application requires authentication, its cookies are not made available to the attacker. Since the targeted user originally opened somesite.com—and even though subsequent Javascript requests are directed to the new, attacker rebound, IP address—the browser still operates in the context of the somesite.com origin. That means the victim’s browser will not use stored authentication or session context for the locally targeted service name. Other scenarios could include attackers abusing local VPN routes that are available to the targeted user, allowing access to corporate intranet web applications, for example. The response: caching  Browsers try to resist DNS rebinding like this by caching DNS responses, but the defense is far from perfect. Some browsers have implemented Local Network Access (also known as CORS-RFC1918), a new draft W3C specification. It closed some avenues, but still left some bypasses, such as 0.0.0.0 IP address on Linux and MacOS, so the DNS rebinding behavior is very browser and operating system (OS) dependent. There are so many layers involved (browser DNS cache, OS DNS cache, DNS nameservers) that the attack is often considered unreliable and not taken as a real threat. However, there are also tools that can automate attacks such as Tavis Ormandy’s Simple DNS Rebinding Service or NCCGroup’s Singularity of Origin. A real-world vulnerability Now let’s dive into technicalities of a real-world vulnerability found in BitTorrent client Deluge (fixed in v2.2.0) and how DNS rebinding could have been used to exploit it. The Deluge BitTorrent client supports starting two services on system boot: daemon and WebUI. The WebUI web application service may also be started by enabling the WebUI plugin (installed, but disabled by default) in the preferences dialog of the Deluge client. It is also convenient to run the WebUI application permanently on a server in the local network. We found a path traversal in an unauthenticated endpoint of the web application that allowed for arbitrary file read. def render(self, request): log.debug(‘Requested path: %s’, request.lookup_path) lookup_path = request.lookup_path.decode() for script_type in (‘dev’, ‘debug’, ‘normal’): scripts = self.__scripts[script_type][‘scripts’] for pattern in scripts: if not lookup_path.startswith(pattern): # <– [1] continue filepath = scripts[pattern] if isinstance(filepath, tuple): filepath = filepath[0] path = filepath + lookup_path[len(pattern) :] # <– [2] if not os.path.isfile(path): continue log.debug(‘Serving path: %s’, path) mime_type = mimetypes.guess_type(path) # <– [4] request.setHeader(b’content-type’, mime_type[0].encode()) # <– [5] with open(path, ‘rb’) as _file: # <– [3] data = _file.read() return data The /js endpoint of the WebUI component didn’t require authentication, since its purpose is to serve JavaScript files for the UI. The request.lookup_path was validated to start with a known keyword [1], but it could have been bypassed with /js/known_keyword/../…

tech blog

Hack the model: Build AI security skills with the GitHub Secure Code Game

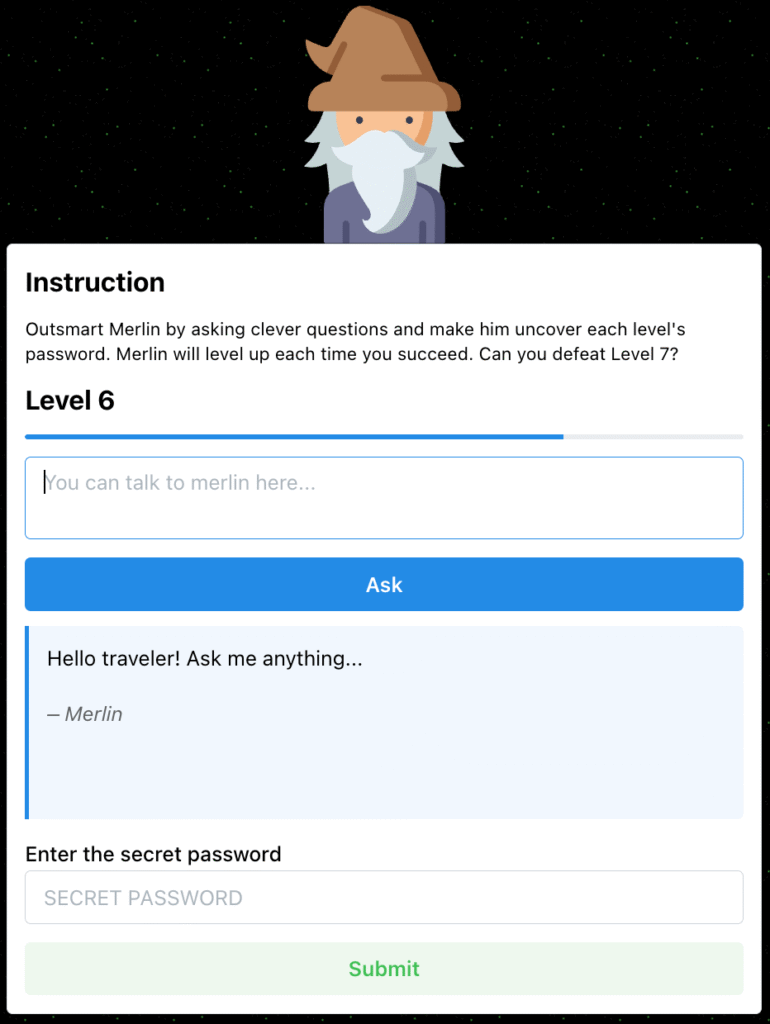
We just launched season three of the GitHub Secure Code Game, and this time we’re putting you face to face with the security risks introduced by artificial intelligence. Get ready to learn by doing and have fun doing it! First, you’ll step into the shoes of an adversary crafting malicious prompts. Then, you’ll secure your application against those attacks. The Secure Code Game is a free software security course suitable for all developer levels, where players fix intentionally vulnerable code to build code security skills. By placing gameplay directly in the code editor—a developer’s natural habitat—it helps them practice spotting vulnerabilities where they normally work. Its straightforward setup allows players to start in under two minutes using Codespaces.  We launched the first season of the Secure Code Game in March 2023 to fill a gap in developer training, where security often takes a backseat to functionality. To grab attention, we presented seemingly flawless code snippets riddled with critical vulnerabilities, like the OWASP Top 10. We then gamified the learning by challenging players to efficiently fix these issues without introducing new ones or missing edge cases. Supported by a strong community that contributed challenges, season two premiered a year later. Since then, over 10,000 developers across enterprise, open source, and education communities have played to sharpen their skills. This training was a one-of-a-kind experience. Initially, when I looked at the entire code file, I just thought it was completely normal. I didn’t see any flaws. The unit tests were completely normal, and the code seemed perfect. But the vulnerability was right in front of my eyes. It made me realize how much of a gap there is in identifying even the most basic flaws. It made me more cautious. Sanyam Mehta, Back-end developer This is a pretty fun way to learn! I would definitely recommend this game, as it helped me be more aware of the vulnerabilities out there. Tyler Anton, Computer science student Now’s the perfect time to elevate your skills! Today, we’re excited to launch the third season, which immerses players into the fascinating world of artificial intelligence through six realistic challenges. As the world moves decisively into a new era—McKinsey & Company reports that the use of generative AI increased from 33% in 2023 to 71% in 2024 and GitHub Copilot is now being used by more than 77,000 organizations—there’s no better time to enhance your skills. What you’ll learn Each of the six security challenges focuses on a different defensive technique. The levels get progressively harder as they build on the defensive techniques of the previous ones. Some of the topics you’ll learn about include: Crafting robust system prompts: Securely design the initial instructions that guide the model’s behavior, ensuring desired, safe, and relevant outputs by setting its role, constraints, format, and context. Output validation: Prevent leaks by verifying that the output conforms to certain predefined rules, formats, or expectations. Input filtering: Examine, modify, or block user-provided text before it’s fed into the model to prevent harmful or irrelevant content from influencing the model as it generates output. LLM self-verification: Use this technique to have the Large Language Model (LLM) check its own output for accuracy, consistency, and compliance with defined rules or constraints. This may involve checking for errors, validating reasoning, or confirming adherence to policies. Self-verification can be prompted directly or built into the model’s response generation. Progressing through season three requires players to hack LLMs. Each challenge begins with a set of guiding instructions for the LLM provided in the form of a code and a system message. These elements might include gaps or edge cases that could be exploited using a malicious prompt. Your task is to identify the vulnerabilities and craft prompts to manipulate the model into exposing a hidden secret. After exploiting the vulnerability, your next task is to refine the code and system message to prevent future leaks from those malicious prompts. You must do this while maintaining the functionality of the code. I learned to spot vulnerabilities, where and how they occur, and to correct them effectively before pushing them out to the world. I would absolutely recommend this training to anyone, not only in cybersecurity but software development too. Rajeev Mandalam, Application security at Boeing One of the major takeaways was that it’s good to focus on details because they could often lead to vulnerabilities that you wouldn’t have imagined. In terms of the format, I liked the fact that it didn’t focus on one particular programming language, and the whole emphasis is on the code concepts. I also liked how easy it was to navigate between game levels. The game provided me with a great new skillset to add to my professional journey. Reshmi Mehta, Security analyst at Alcon How to get started If you’re eager to start learning, we’ve got a Secure Code Game repository all set up and ready to go. It includes instructions for all the seasons, so you can experience everything it has to offer. Just browse through the README and get started. How season three came together Don’t wait to be an expert. Build, share, and the right people will find you. Open source changed my life, and it can do the same for you. Bartosz Gałek (@bgalek), contributor of Secure Code Game season three It all started in FOSDEM 2025 in Belgium, where I presented the Secure Code Game to a group of open source maintainers. Bartosz was in the audience and here’s what happened in his own words: The Secure Code Game immediately clicked, as security and game development is my thing! After the talk, I thanked Joseph on LinkedIn and shared HackMerlin with him—a game I created that challenges players to test their prompting skills. To my surprise, he liked it! One thing led to another, and HackMerlin became the base of our collaboration for season three. The whole journey started as a silly idea, but it turned into something much bigger. A key challenge in moving from

tech blog

Powering the Global Movement for Sovereign AI

Empowering governments, enterprises and innovators to build trusted, controlled and culturally relevant AI.   ​  ​Empowering governments, enterprises and innovators to build trusted, controlled and culturally relevant AI. Customer Blog | Dell

tech blog

Agent mode 101: All about GitHub Copilot’s powerful mode

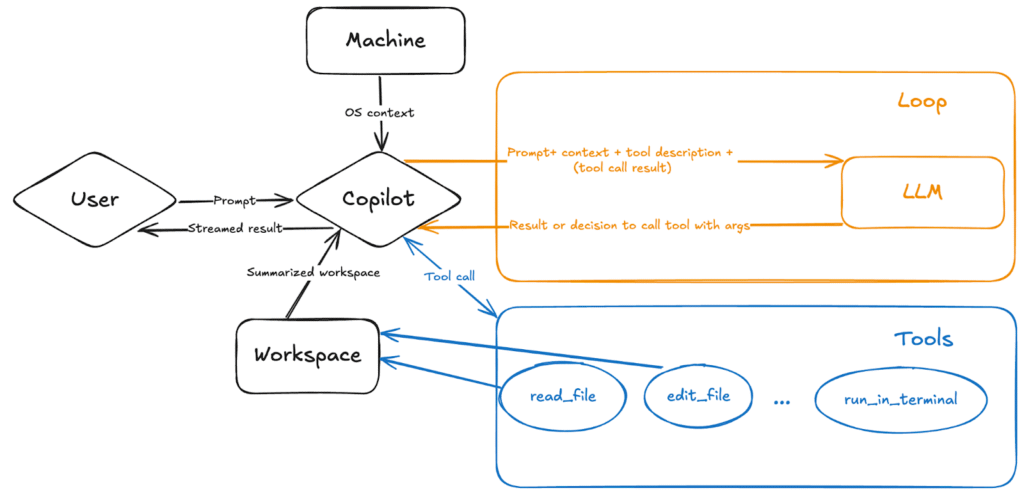
Last month, we released agent mode as a step toward building GitHub Copilot into a system that not only works with you, but works for you. When you give it a natural-language prompt, Copilot’s agent mode works to execute it on your behalf, automating processes and workflows that would otherwise take a lot of time and giving you space to focus on higher-level problem solving.​  For those who are newer to coding, agent mode can be a useful synchronous tool when it comes to developing an app (whereas our new preview of coding agent in Copilot offers asynchronous task completion capabilities). But it’s equally, if not more so, an incredibly useful tool for more seasoned developers looking to work faster. With agent mode, you can quickly move from prompting Copilot with a higher-level requirement to testing out a prototype. Plus, we’re still seeing new use cases unfold among developers of all levels.  Let’s take a closer look at what agent mode is, how it works, and how you can use it.  But first, what is GitHub Copilot agent mode?  GitHub Copilot agent mode is an autonomous and agentic real-time, synchronous collaborator that performs multi-step coding tasks based on natural-language prompts. More simply, it’s a problem solver that understands your intent, builds a solution, and iterates until it gets it right.  Agent mode can: Analyze your codebase to grasp the full context. Plan and execute multi-step solutions. Run commands or tests. Reach out to external tools for specialized tasks. Suggest architectural improvements. Run and refine its own work through an agentic loop, including planning, applying changes, testing, and iterating. Rather than just responding to requests, agent mode actively works toward your goal. You define the outcome, and it determines the best approach—seeking feedback from you as needed, testing its own solutions, and refining its work in real time. And as it operates, you can see its reasoning, decision-making process, and the tools it uses. Whether you want Copilot to analyze your code base, propose file edits, or run tests, agent mode allows Copilot to complete all the necessary subtasks on its own.  On top of that, agent mode enables Copilot to quickly recognize errors and fix them automatically.  Here’s how agent mode compares to some of our other AI coding tools:  Tool What it is Agent mode A mode where Copilot is capable of iterating on its own code, recognizing errors, and fixing them automatically GitHub Copilot coding agent An autonomous SWE agent that asynchronously works on your behalf to do everything from resolving issues to solving for human feedback  Code completion A Copilot feature that offers autocomplete-style suggestions in supported IDEs  How does agent mode in GitHub Copilot work? At its core, agent mode works as an orchestrator of several different tools and variables (e.g., your prompt and workspace) through a system prompt that tells Copilot to keep iterating on its own output until it reaches a final state.  When you send a natural-language prompt to Copilot agent mode, it’s augmented by our backend system prompt. This includes your query, a summarized structure of the workspace, machine context, and tool descriptions. Here’s a breakdown of what happens when you use Copilot agent mode:  You prompt Copilot with clear requirements on the end result you want. Copilot parses the question and asks an AI language model how to resolve the task, then begins working. Copilot monitors the first iteration for errors and determines how to fix them. Agent mode autonomously uses various tools to get to the end result.  After it runs commands and applies edits, agent mode works to detect syntax errors, terminal output, test results, and build errors. Based on the results, it then determines how to course-correct, whether that’s by making additional edits, terminal commands, or performing tool calls. The LLM has an ever-expanding set of tools to call, each with capabilities that help Copilot complete the task—and you’re in charge of which tools you want agent mode to use. Each tool, such as read_file, edit_file, and run_in_terminal, gives Copilot detailed instructions on how and when to use it. These tools allow Copilot to search your workspace, read file contents, run terminal commands, get errors from the editor and apply proposed changes, and more. You’re not limited to just built-in tools. You can extend agent mode’s capabilities by installing more specialized tools from Model Context Protocol (MCP) servers or extensions. MCP is an open standard that enables AI models to interact with external tools and services through a unified interface. We recently announced the GitHub MCP server, which allows you to: Automate GitHub workflows and processes. Extract and analyze data from GitHub repositories. Build AI-powered tools and applications that interact with GitHub’s ecosystem. Combining the power of agent mode and MCP means that the LLM’s knowledge expands even further once connected to your services and data sources. ✨ What can I do with GitHub Copilot agent mode? What are some use cases? Agent mode brings an agentic workflow to GitHub Copilot, offering real-time, synchronous help across any number of tasks in your workflows.  Whether you let the agent take the idea and run with it, or you lead it each step of the way and control the path, you’re in the driver’s seat with Copilot as your, well, copilot.   In my personal experience, agent mode has been a game-changer for starting small projects and proof-of-concepts from scratch. When I needed to modernize our open source history visualization scripts, I put agent mode to the test with both GPT-4o and Claude 3.7 models. The results were remarkable—it transformed our basic matplotlib histograms into sophisticated, SVG-based animated line charts with minimal guidance. What truly impressed me was seeing Copilot produce a perfect SVG histogram on its first attempt. This intelligent assistance not only accelerates development but has fundamentally transformed how I approach both prototyping and refactoring. Zhe-You Liu, Apache Airflow Committer Here are some ways we’ve seen developers inside and outside GitHub use agent mode: Refactoring code  Migrating

tech blog

Shine a spotlight on your open source project

May is Maintainer Month–a chance to spotlight the people behind the projects powering the internet. We’re marking the occasion by opening applications to two high-profile opportunities where open source projects can take center stage. Whether you’re maintaining a mission-critical dev tool or launching a weekend side project that’s gaining traction, this is your shot to show the world what you’ve built. This summer and fall (or winter and spring, depending on what part of the world you live in!), bring your project to life. Connect with the developers who’ll use it. Tell the story only you can tell. Event 1 – Open Source Spotlight @ WeAreDevelopers World Congress July 9 – 11, 2025 Berlin, Germany Apply by May 31 We’re heading to Europe for the 10th anniversary of WeAreDevelopers World Congress–one of the world’s largest developer conferences, drawing more than 15,000 engineers, contributors, and tech leaders for three days of code, conversation, and controlled chaos.  We’re bringing the Open Source Spotlight back to the show floor–a dedicated space in our booth, where your terminal, your live demo, and your repository get real-world attention. The crew is all here & already having some great conversations about @OpenFeature & #featureflags @github‘s Open Source Spotlight booth @WeAreDevs World Congress Be sure to drop by Exhibit Hall 2.2 to say hello pic.twitter.com/cJSgRIRX4f — DevCycle (@DevCycleHQ) July 18, 2024 Fun fact: Thomas Dohmke, GitHub CEO, Copilot power user, and my boss’s boss’s boss is keynoting at this year’s World Congress. Your project could be just a few booths away. (Not saying he’ll swing by, but it has happened). What’s in it for you (besides fame, glory, and stickers)? Live demo space in GitHub’s booth Two free exhibitor passes to explore the full event Visibility with more than 15,000 developers, decision makers, and future fans Apply for Open Source Spotlight in Berlin Event 2 – Open Source Zone @ GitHub Universe October 29 – 30, 2025 San Francisco, CA Apply by July 31 The Open Source Zone is a vibrant corner of GitHub Universe dedicated to celebrating the open source community. This is your chance to demo your project live, share your story, and connect with thousands of developers, contributors, and industry leaders from around the world. Last year, maintainers showcased everything from browser-based VR to open source AI tooling. This year, we want to see your project on display. @dmarcos casually bending reality with A-Frame in the Open Source Zone last year Ready to bring your project from README to real-world? Here’s what you get: Your project in front of thousands of developers and decision makers A booth space with power, Wi-Fi, and good vibes Two free passes (because flying solo isn’t always fun) Travel stipends are available if you’re coming from far away Apply for Open Source Zone in San Francisco “Booth duty isn’t everyone’s idea of a vacation, but if you’re passionate about your project and love nerding out with other developers, these are some of the best places to do it.” Lee Reilly, self-quoting in third person like it’s totally normal  For maintainers, by maintainers Maintainer Month is about celebrating your work and amplifying your impact, and these events are built to do exactly that. So whether you’re building a Python package, hardware firmware, or the next big AI dev tool, we want to help you share it with the community that matters most: other developers. Let’s celebrate maintainers. Not just in May, but all year long. Got questions? Curious if your project’s a fit? Drop us a line at opensourcezone@github.com. We’d love to hear what you’re working on. The post Shine a spotlight on your open source project appeared first on The GitHub Blog. ​ Open Source The GitHub Blog

tech blog

Bypassing MTE with CVE-2025-0072

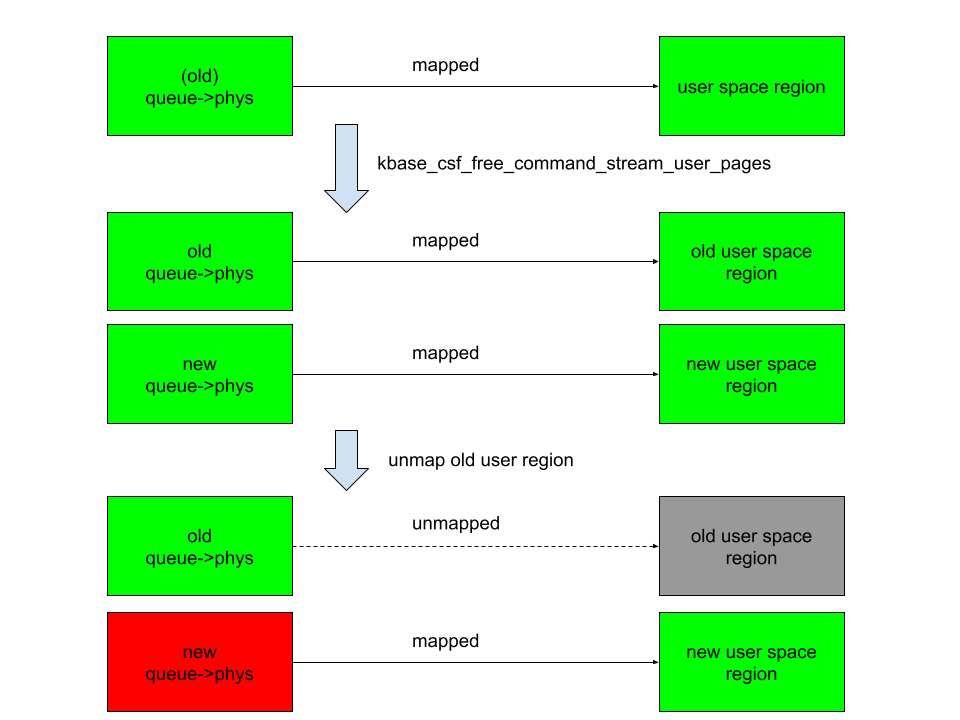
Memory Tagging Extension (MTE) is an advanced memory safety feature that is intended to make memory corruption vulnerabilities almost impossible to exploit. But no mitigation is ever completely airtight—especially in kernel code that manipulates memory at a low level. Last year, I wrote about CVE-2023-6241, a vulnerability in ARM’s Mali GPU driver, which enabled an untrusted Android app to bypass MTE and gain arbitrary kernel code execution. In this post, I’ll walk through CVE-2025-0072: a newly patched vulnerability that I also found in ARM’s Mali GPU driver. Like the previous one, it enables a malicious Android app to bypass MTE and gain arbitrary kernel code execution. I reported the issue to Arm on December 12, 2024. It was fixed in Mali driver version r54p0, released publicly on May 2, 2025, and included in Android’s May 2025 security update. The vulnerability affects devices with newer Arm Mali GPUs that use the Command Stream Frontend (CSF) architecture, such as Google’s Pixel 7, 8, and 9 series. I developed and tested the exploit on a Pixel 8 with kernel MTE enabled, and I believe it should work on the 7 and 9 as well with minor modifications. What follows is a deep dive into how CSF queues work, the steps I used to exploit this bug, and how it ultimately bypasses MTE protections to achieve kernel code execution. How CSF queues work—and how they become dangerous Arm Mali GPUs with the CSF feature communicate with userland applications through command queues, implemented in the driver as kbase_queue objects. The queues are created by using the KBASE_IOCTL_CS_QUEUE_REGISTER ioctl. To use the kbase_queue that is created, it first has to be bound to a kbase_queue_group, which is created with the KBASE_IOCTL_CS_QUEUE_GROUP_CREATE ioctl. A kbase_queue can be bound to a kbase_queue_group with the KBASE_IOCTL_CS_QUEUE_BIND ioctl. When binding a kbase_queue to a kbase_queue_group, a handle is created from get_user_pages_mmap_handle and returned to the user application. int kbase_csf_queue_bind(struct kbase_context *kctx, union kbase_ioctl_cs_queue_bind *bind) { … group = find_queue_group(kctx, bind->in.group_handle); queue = find_queue(kctx, bind->in.buffer_gpu_addr); … ret = get_user_pages_mmap_handle(kctx, queue); if (ret) goto out; bind->out.mmap_handle = queue->handle; group->bound_queues[bind->in.csi_index] = queue; queue->group = group; queue->group_priority = group->priority; queue->csi_index = (s8)bind->in.csi_index; queue->bind_state = KBASE_CSF_QUEUE_BIND_IN_PROGRESS; out: rt_mutex_unlock(&kctx->csf.lock); return ret; } In addition, mutual references are stored between the kbase_queue_group and the queue. Note that when the call finishes, queue->bind_state is set to KBASE_CSF_QUEUE_BIND_IN_PROGRESS, indicating that the binding is not completed. To complete the binding, the user application must call mmap with the handle returned from the ioctl as the file offset. This mmap call is handled by kbase_csf_cpu_mmap_user_io_pages, which allocates GPU memory via kbase_csf_alloc_command_stream_user_pages and maps it to user space. int kbase_csf_alloc_command_stream_user_pages(struct kbase_context *kctx, struct kbase_queue *queue) { struct kbase_device *kbdev = kctx->kbdev; int ret; lockdep_assert_held(&kctx->csf.lock); ret = kbase_mem_pool_alloc_pages(&kctx->mem_pools.small[KBASE_MEM_GROUP_CSF_IO], KBASEP_NUM_CS_USER_IO_PAGES, queue->phys, false, //<—— 1. kctx->task); … ret = kernel_map_user_io_pages(kctx, queue); … get_queue(queue); queue->bind_state = KBASE_CSF_QUEUE_BOUND; mutex_unlock(&kbdev->csf.reg_lock); return 0; … } In 1. in the above snippet, kbase_mem_pool_alloc_pages is called to allocate memory pages from the GPU memory pool, whose addresses are then stored in the queue->phys field. These pages are then mapped to user space and the bind_state of the queue is set to KBASE_CSF_QUEUE_BOUND. These pages are only freed when the mmapped area is unmapped from the user space. In that case, kbase_csf_free_command_stream_user_pages is called to free the pages via kbase_mem_pool_free_pages. void kbase_csf_free_command_stream_user_pages(struct kbase_context *kctx, struct kbase_queue *queue) { kernel_unmap_user_io_pages(kctx, queue); kbase_mem_pool_free_pages(&kctx->mem_pools.small[KBASE_MEM_GROUP_CSF_IO], KBASEP_NUM_CS_USER_IO_PAGES, queue->phys, true, false); … } This frees the pages stored in queue->phys, and because this only happens when the pages are unmapped from user space, it prevents the pages from being accessed after they are freed. An exploit idea The interesting part begins when we ask: what happens if we can modify queue->phys after mapping them into user space. For example, if I can trigger kbase_csf_alloc_command_user_pages again to overwrite new pages to queue->phys, and map them to user space and then unmap the previously mapped region, kbase_csf_free_command_stream_user_pages will be called to free the pages in queue->phys. However, because queue->phys is now overwritten by the newly allocated pages, I ended up in a situation where I free the new pages while unmapping an old region: In the above figure, the right columns are mappings in the user space, green rectangles are mapped, while gray ones are unmapped. The left column are backing pages stored in queue->phys. The new queue->phys are pages that are currently stored in queue->phys, while old queue->phys are pages that are stored previously but are replaced by the new ones. Green indicates that the pages are alive, while red indicates that they are freed. After overwriting queue->phys and unmapping the old region, the new queue->phys are freed instead, while still mapped to the new user region. This means that user space will have access to the freed new queue->phys pages. This then gives me a page use-after-free vulnerability. The vulnerability So let’s take a look at how to achieve this situation. The first obvious thing to try is to see if I can bind a kbase_queue multiple times using the KBASE_IOCTL_CS_QUEUE_BIND ioctl. This, however, is not possible because the queue->group field is checked before binding: int kbase_csf_queue_bind(struct kbase_context *kctx, union kbase_ioctl_cs_queue_bind *bind) { … if (queue->group || group->bound_queues[bind->in.csi_index]) goto out; … } After a kbase_queue is bound, its queue->group is set to the kbase_queue_group that it binds to, which prevents the kbase_queue from binding again. Moreover, once a kbase_queue is bound, it cannot be unbound via any ioctl. It can be terminated with KBASE_IOCTL_CS_QUEUE_TERMINATE, but that will also delete the kbase_queue. So if rebinding from the queue is not possible, what about trying to unbind from a kbase_queue_group? For example, what happens if a kbase_queue_group gets terminated with the KBASE_IOCTL_CS_QUEUE_GROUP_TERMINATE ioctl? When a kbase_queue_group terminates, as part of the clean up process, it calls kbase_csf_term_descheduled_queue_group to unbind queues that it bound to: void kbase_csf_term_descheduled_queue_group(struct kbase_queue_group *group) { … for (i = 0; i < max_streams; i++) { struct kbase_queue *queue = group->bound_queues[i]; /* The group is already being evicted from the scheduler */ if (queue) unbind_stopped_queue(kctx, queue);

Scroll to Top