tech blog

5 tips for writing better custom instructions for Copilot

If you’ve read any of my stuff or listened to one of my presentations before, you’ve likely heard my snarky joke: “Don’t be passive aggressive with Copilot.”  My point with this joke is serious, though. Copilot works best when you give it the right context. Just like a new teammate, it can’t read your mind (even if it sometimes feels like it can). Copilot can likely figure out what you’re doing and how you’re doing it. But spelling out the essentials – what you’re building, the stack you’re using, the rules to follow, etc., will help avoid confusion and mistakes. This is why instructions files are so important. They’re your chance to give Copilot that background, that institutional knowledge the rest of your team has from their experience with the project. The centerpiece for Copilot is copilot-instructions.md, the file which is read on every Copilot chat or agent request. So how should one be crafted? To help you avoid the blank-page problem, here are five things every instruction file should include (plus a bonus tip on how Copilot can even help you write the file itself). Before we get started One important tip I want to share before we get into more details is to not overthink things. There isn’t a specific prescribed way to write instructions files. The nature of generative AI is probabilistic, meaning the same requests can actually render different results. Your goal is to tilt the scales, to help point Copilot to finding the answer you’re hoping for as often as possible. The five sections (and bonus tip) below aren’t meant as requirements, but recommendations. In my experience, having these sections, or at the very least the key information indicated by these sections, in your instructions file will vastly increase the quality of suggestions from Copilot. You should use these as a starting point, and experiment and explore based on your projects, models, and experience with Copilot. Give GitHub Copilot a project overview It’s tough to write code for an app if you don’t know what the app is! The same thing is true for GitHub Copilot, and that’s where a project overview instructions file can be exceptionally helpful.  The header for your instructions file should be the elevator pitch for your app. What’s the app? Who’s the audience? What are the key features? It doesn’t need to be long, just a few sentences to set the stage. Here’s an example of a project overview for an instructions file: # Contoso Companions This is a website to support pet adoption agencies. Agencies are onboarded into the application, where they can manage their locations, available pets, and publicize events. Potential adoptors can search for pets available in their area, discover agencies, and submit adoption applications. The above example is clear, direct, and simple. You don’t need to write the Magna Carta, but it’s important to give Copilot some context around what you’re trying to accomplish at a high level. And this example app totally isn’t a way for me to convince myself to adopt a new pet (seriously, it’s not and I’m not just telling myself that).  Identify the tech stack you’re using in your project  Once you’ve identified what you’re building, the next thing to identify is what you’re using to build it. This includes the backend and frontend tech you’re using, any APIs you’re calling, and any testing suites you’re targeting. After all, the number of frameworks alone to create a website is always growing. Case in point? Three new JavaScript frameworks have probably launched since you started reading this blog post! You don’t need to channel your inner George RR Martin when creating instructions files, crafting paragraphs upon paragraphs explaining the minutiae. Instead, think about creating a list highlighting the tech you’re using, and maybe add a note or two about how they’re being used. This will help Copilot understand the environment in which it’s creating code.Here’s a quick example from my own work for reference:  ## Tech stack in use ### Backend – Flask is used for the API – Data is stored in Postgres, with SQLAlchemy as the ORM – There are separate database for dev, staging and prod – For end to end testing, a new database is created and populated, then removed after tests are complete ### Frontend – Astro manages the core site and routing – Svelte is used for interactivity – TypeScript is used for all front-end code ### Testing – Unittest for Python – Vitest for TypeScript – Playwright for e2e tests Spell out your coding guidelines Before you create your first pull request, you need to know the guidelines you should be following. Some of this is about how the code should be written. Are we using semicolons for JavaScript or TypeScript, for instance? Type hints for Python? Tabs or spaces? (The only correct answers are yes, yes, and spaces. I won’t be taking any questions.) Depending on your project structure, you could incorporate your guidelines into your tech stack instructions file. But I generally like having a separate section for guidelines, as many of them will apply across all languages in use. I find it to be more readable, which is important for maintainability, and there’s often crossover of guidance between languages and frameworks. You can also consider using .instructions files for guidelines for specific types of files, like all .astro or .jsx files, or unit tests which might match a pattern of /tests/test_*.py. Pro tip  It’s very easy to fall into a spiral of trying to discover the perfect way to prompt Copilot or build the perfect instructions files. An “imperfect” instructions file will deliver far more impact than nothing at all. Your instructions file should also evolve over time, just like documentation. (We all keep our documentation up to date, right?) I strongly encourage you to experiment and see what works best, and to not let perfect be the enemy of good. Here’s another example from some of my own work:  ##
tech blog

Spec-driven development with AI: Get started with a new open source toolkit

As coding agents have grown more powerful, a pattern has emerged: you describe your goal, get a block of code back, and often… it looks right, but doesn’t quite work. This “vibe-coding” approach can be great for quick prototypes, but less reliable when building serious, mission-critical applications or working with existing codebases. Sometimes the code doesn’t compile. Sometimes it solves part of the problem but misses the actual intent. The stack or architecture may not be what you’d choose. The issue isn’t the coding agent’s coding ability, but our approach. We treat coding agents like search engines when we should be treating them more like literal-minded pair programmers. They excel at pattern recognition but still need unambiguous instructions. That’s why we’re rethinking specifications — not as static documents, but as living, executable artifacts that evolve with the project. Specs become the shared source of truth. When something doesn’t make sense, you go back to the spec; when a project grows complex, you refine it; when tasks feel too large, you break them down. Spec Kit, our new open sourced toolkit for spec-driven development, provides a structured process to bring spec-driven development to your coding agent workflows with tools including GitHub Copilot, Claude Code, and Gemini CLI. 💡 What is spec-driven development? Instead of coding first and writing docs later, in spec-driven development, you start with a (you guessed it) spec. This is a contract for how your code should behave and becomes the source of truth your tools and AI agents use to generate, test, and validate code. The result is less guesswork, fewer surprises, and higher-quality code. What is the spec-driven process with Spec Kit?  Spec Kit makes your specification the center of your engineering process. Instead of writing a spec and setting it aside, the spec drives the implementation, checklists, and task breakdowns.  Your primary role is to steer; the coding agent does the bulk of the writing. It works in four phases with clear checkpoints. But here’s the key insight: each phase has a specific job, and you don’t move to the next one until the current task is fully validated.  Here’s how the process breaks down: Specify: You provide a high-level description of what you’re building and why, and the coding agent generates a detailed specification. This isn’t about technical stacks or app design. It’s about user journeys, experiences, and what success looks like. Who will use this? What problem does it solve for them? How will they interact with it? What outcomes matter? Think of it as mapping the user experience you want to create, and letting the coding agent flesh out the details. Crucially, this becomes a living artifact that evolves as you learn more about your users and their needs. Plan: Now you get technical. In this phase, you provide the coding agent with your desired stack, architecture, and constraints, and the coding agent generates a comprehensive technical plan. If your company standardizes on certain technologies, this is where you say so. If you’re integrating with legacy systems, have compliance requirements, or have performance targets you need to hit … all of that goes here. You can also ask for multiple plan variations to compare and contrast different approaches. If you make your internal docs available to the coding agent, it can integrate your architectural patterns and standards directly into the plan. After all, a coding agent needs to understand the rules of the game before it starts playing. Tasks: The coding agent takes the spec and the plan and breaks them down into actual work. It generates small, reviewable chunks that each solve a specific piece of the puzzle. Each task should be something you can implement and test in isolation; this is crucial because it gives the coding agent a way to validate its work and stay on track, almost like a test-driven development process for your AI agent. Instead of “build authentication,” you get concrete tasks like “create a user registration endpoint that validates email format.” Implement: Your coding agent tackles the tasks one by one (or in parallel, where applicable). But here’s what’s different: instead of reviewing thousand-line code dumps, you, the developer, review focused changes that solve specific problems. The coding agent knows what it’s supposed to build because the specification told it. It knows how to build it because the plan told it. And it knows exactly what to work on because the task told it. Crucially, your role isn’t just to steer. It’s to verify. At each phase, you reflect and refine. Does the spec capture what you actually want to build? Does the plan account for real-world constraints? Are there omissions or edge cases the AI missed? The process builds in explicit checkpoints for you to critique what’s been generated, spot gaps, and course correct before moving forward. The AI generates the artifacts; you ensure they’re right. How to use Spec Kit in your agentic workflows Spec Kit works with coding agents like GitHub Copilot, Claude Code, and Gemini CLI. The key is to use a series of simple commands to steer the coding agent, which then does the hard work of generating the artifacts for you. Setting it up is straightforward. First, install the specify command-line tool. This tool initializes your project and sets up the necessary structure. uvx –from git+https://github.com/github/spec-kit.git specify init <PROJECT_NAME> Once your project is initialized, use the /specify command to provide a high-level prompt, and the coding agent generates the full spec. Focus on the “what” and “why” of your project, not the technical details. Next, use the /plan command to steer the coding agent to create a technical implementation plan. Here, you provide the high-level technical direction, and the coding agent will generate a detailed plan that respects your architecture and constraints. Finally, use the /tasks command to make the coding agent break down the specification and plan into a list of actionable tasks. Your coding agent will then use this list to implement the project requirements. This

tech blog

Building smarter interactions with MCP elicitation: From clunky tool calls to seamless user experiences

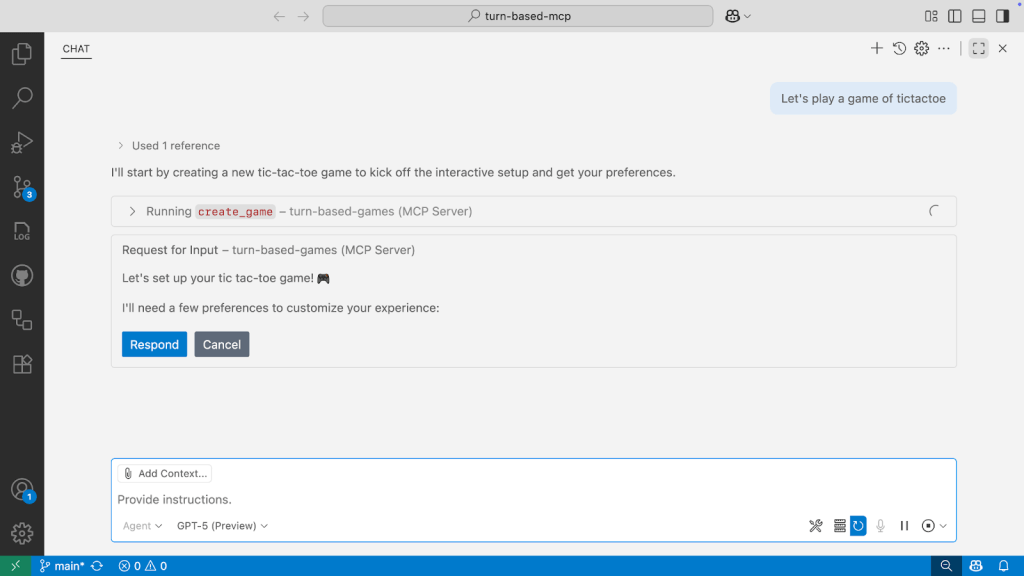
When we build software, we’re not just shipping features. We’re shipping experiences that surprise and delight our users — and making sure that we’re providing natural and seamless experiences is a core part of what we do. In my last post, I wrote about an MCP server that we started building for a turn-based-game (like tic-tac-toe, or rock, paper, scissors). While it had the core capabilities, like tool calls, resources, and prompts, the experience could still be improved. For example, the player always took the first move, the player could only change the difficulty if they specified in their initial message, and a slew of other papercuts. So on my most recent Rubber Duck Thursdays stream, I covered a feature that’s helped improve the user experience: elicitation. See the full stream below 👇 Elicitation is kind of like saying, “if we don’t have all the information we need, let’s go and get it.” But it’s more than that. It’s about creating intuitive interactions where the AI (via the MCP server) can pause, ask for what it needs, and then continue with the task. No more default assumptions that provide hard-coded paths of interaction.  👀 Be aware: Elicitation is not supported by all AI application hosts. GitHub Copilot in Visual Studio Code supports it, but you’ll want to check the latest state from the MCP docs for other AI apps. Elicitation is a relative newcomer to the MCP spec, having been added in the June 2025 revision, and so the design may continue to evolve. Let me walk you through how I implemented elicitation in my turn-based game MCP server and the challenges I encountered along the way. Enter elicitation: Making AI interactions feel natural Before we reached the livestream, I had put together a basic implementation of elicitation, which asked for required information when creating a new game, like difficulty and player name. For tic-tac-toe, it asks which player goes first. For rock, paper, scissors, it asked how many rounds to play.  But rather than completely replacing our existing tools, I implemented these as new tools, so we could clearly see the behavior between the two approaches until we tested and standardized the approach. As a result, we began to see sprawl in the server with some duplicative tools: create-tic-tac-toe-game and create-tic-tac-toe-game-interactive create-rock-paper-scissors-game and create-rock-paper-scissors-game-interactive play-tic-tac-toe and play-rock-paper-scissors The problem? When you give AI agents like Copilot tools with similar names and descriptions, it doesn’t know which one to pick. On several occasions, Copilot chose the wrong tool because I had created this confusing landscape of overlapping functionality. This was an unexpected learning experience, but an important one to pick up along the way. The next logical step was to consolidate our tool calls, and make sure we’re using DRY (don’t repeat yourself) principles throughout the codebase instead of redefining constants and having nearly identical implementations for different game types. After a lot of refactoring and consolidation, when someone prompts “let’s play a game of tic-tac-toe,” the tool call identifies that more information is needed to ensure the user has made an explicit choice, rather than creating a game with a pre-determined set of defaults. The user provides their preferences, and the server creates the game based upon those, improving that overall user experience.  It’s worth adding that my code (like I’m sure many of us would admit?) is far from perfect, and I noticed a bug live on the stream. The elicitation step triggered for every invocation of the tool, regardless of whether the user had already provided the needed information.  As part of my rework after the livestream, I added some checks after the tool was invoked to determine what information had already been provided. I also aligned the property names between the tool and elicitation schemas, bringing a bit more clarity. So if you said “Let’s play a game of tic-tac-toe, I’ll go first,” you would be asked to confirm the game difficulty and to provide your name. How my elicitation implementation now works under the hood The magic happens in the MCP server implementation. As part of my up-to-date implementation, when the MCP server invokes the create_game tool, it: Checks for required parameters: Do we know which game the user wants to play, or did they specify an ID? Passes the optional identified arguments to a separate method: Are we missing difficulty, player name, or turn order? Initiates elicitation: If information is missing, it pauses the tool execution and gathers only the missing information from the user. This was an addition that I made after the stream to further improve the user experience. Presents schema-driven prompts: The user sees formatted questions for each missing parameter. Collects responses: The MCP client (VS Code in this case) handles the UI interaction. Completes the original request: Once the server collects all the information, the tool executes the createGame method with the user’s preferences. Here’s what you see in the VS Code interface when elicitation kicks in, and you must provide some preferences: The result? Instead of “Player vs AI (Medium)”, I get “Chris vs AI (Hard)” with the AI making the opening move because I chose to go second. What I learned while implementing elicitation Challenge 1: Tool naming confusion Problem: Tools with similar names and descriptions confuse the AI about which one to use. Solution: Where it’s appropriate, merge tools and use clear, distinct names and descriptions. I went from eight tools down to four: create-game (handles all game types with elicitation) play-game (unified play interface) analyze-game (game state analysis) wait-for-player-move (turn management) Challenge 2: Handling partial information Problem: What if the user provides some information upfront? (“Let’s play tic-tac-toe on hard mode”) Observation: During the livestream, we saw that the way I built elicitation asked for all of the preferences each time it was invoked, which is not an ideal user experience. Solution: Parse the initial request and only elicit the missing information. This was fixed after the livestream, and is now in the latest version of the sample.

tech blog

GitHub is enabling broader access for developers in Syria following new government trade rules


 اقرأ باللغة العربية 
 أصبحت تتيح وصولاً أوسع للمطورين في سوريا عقب قواعد التجارة الحكومية الجديدة GitHub قبل أكثر من أربع سنوات، اتخذنا موقفًا ظلّ في صميم عملنا لدعم حرية المطوّرين: «ينبغي أن يتمتّع جميع المطوّرين بالحرية في استخدام GitHub، أينما كانوا». واليوم نبلغ محطةً مهمةً في ذلك المسعى؛ إذ إن تخفيف العقوبات والقيود المفروضة على الصادرات تجاه سوريا أتاح إعادة فتح الخدمات الخاصة والمدفوعة على موقع بشكل واسع أمام المطوّرين في حلب، حمص، دمشق، وفي جميع أنحاء البلد. ‎ظلّ التعاون في المشاريع مفتوحة المصدر والمستودعات العامة الأخرى متاحًا دائمًا، كما يظهر في مخطط ابتكار وهي مجموعة بيانات مفتوحة تُقدم أرقامًا مجمّعة عن مساهمات المستودعات العامة من سوريا. نُعرب عن امتناننا الصادق للمطورين الذين دعوا لهذا التغيير وسعوا باستمرار للحصول على التحديثات. GitHub ترحّب بالمطورين السوريين للمساهمة بمشاريعهم في مجتمع المطورين العالمي، سواء كانت مساعيهم كبيرة أم صغيرة. نفتخر بأن نكون الموطن للمطورين الذين يدفعهم شغفهم للابتكار والبناء والتعلّم والتعليم، ونبقى ملتزمين بجعل GitHub متاحاً لأكبر عدد ممكن من المطورين ضمن إطار القانون. نقوم الآن باتخاذ الخطوات اللازمة بصورة عاجلة لرفع القيود المفروضة على المطورين في السوريا، بما يتيح استعادة وظائف الحساب الكاملة، إضافةً إلى إتاحة خدمة GitHub Copilot. التغييرات جارية ومن المتوقّع أن تصل إلى الحسابات خلال الأسبوع المقبل. 
 More than four years ago, we took a stance that has remained at the center of our work advancing developer freedom: “All developers should be free to use GitHub, no matter where they live.” Today marks one important milestone in that endeavor. With the relaxation of sanctions and export controls on Syria, private and paid features of GitHub.com will once again be broadly available to developers in Aleppo, Homs, Damascus, and the entire country. Collaboration on open source projects and other public repositories has always been available, as can be seen in the GitHub Innovation Graph, an open dataset which provides aggregate numbers on public repository contributions from Syria. We extend our sincere gratitude to the developers who advocated for this change and consistently sought updates. GitHub welcomes Syrian developers to contribute their projects to the global developer community,  whether they be big or small endeavors. We are proud to be the home for developers whose passion drives them to innovate, build, learn, and teach—and we remain committed to making GitHub available to as many developers as legally possible. We are moving promptly to lift restrictions on developers in Syria, enabling normal account functionality, as well as access to GitHub Copilot. Changes are underway and expected to reach accounts within the next week.  The post GitHub is enabling broader access for developers in Syria following new government trade rules appeared first on The GitHub Blog. ​ Company The GitHub Blog

tech blog

How to debug a web app with Playwright MCP and GitHub Copilot

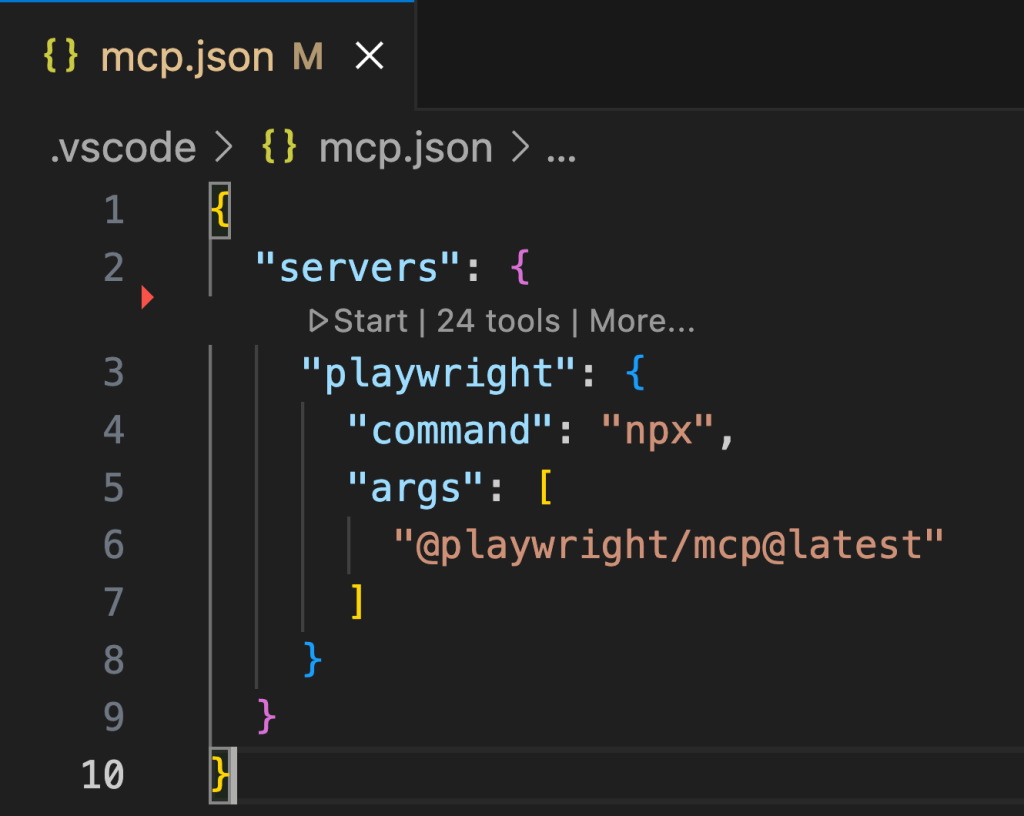
I know it can feel like a unicorn, but most bug reports do, in fact, contain steps to reproduce the error (or repro steps). As wonderful as it is to have those, the process of walking through and validating everything is still tedious. In a perfect world, we’d have end-to-end or acceptance tests that could automate the process. Sadly, many projects lack robust testing. Fortunately, GitHub Copilot with the help of the Playwright Model Context Protocol (MCP) server can automate that entire process. Let’s explore how we pass the repro steps to Copilot agent mode, and let it use the Playwright MCP server to walk through them and validate the bug. In turn, it will track down and resolve the error. What are Playwright and MCP? A quick overview  Playwright is an end-to-end testing framework for web apps. You can use it to create scripts to act as a user, validate your application’s feature set, and assure quality. For example, if you were building a shopping app, you could create a series of scripts to walk through the entire flow of searching for a product, adding it to the cart, and completing the purchase. These scripts are automated, allowing you to validate the process within seconds. Originally developed by Anthropic, MCP is an open (and open source) protocol for exposing tools to AI agents. These tools could include providing additional context and information, or to allow the AI agent to perform actions. Bringing this together: there’s a Playwright MCP server, which provides tools from Playwright to AI agents (or GitHub Copilot in this case), to both create those scripts and perform the actions directly. This allows Copilot to actually walk through the repro steps for us! How to configure Playwright MCP server for GitHub Copilot in VS Code For you to use the Playwright MCP server, it needs to be available in your IDE. In VS Code, you can install the Playwright MCP server to make it available to all projects, or create a file in your .vscode folder tiled mcp.json and add the following: { “servers”: { “playwright”: { “command”: “npx”, “args”: [ “@playwright/mcp@latest” ] } } } Once you do that, you’ll notice a small play button appear just over playwright in the file. When you select that button, it’ll start the server so you can use it with Copilot agent mode! (Get the guide to using agent mode in Copilot.) You’ll likely need to configure Playwright, especially if you have a complex startup process for your website. My project is based on the website in the Agents in SDLC workshop (available on GitHub samples), and already has a frontend written with Astro & Svelte, and a backend using Flask. This configuration allowed Playwright to properly start the app. Also, fun fact: The config file was actually created by Copilot! I used this prompt with Copilot agent mode to do it, and you can modify it for your particular requirements: Add Playwright to this project. When configuring Playwright, note the startup script for the site. Ensure the configuration uses this startup script, and reuses the server if one is already launched. The scenario Let’s say we have a crowdfunding website for DevOps-themed board games (a truly booming industry). Filters are available to the user to search by publisher and category. After discovering the publisher filter doesn’t work, a user files the following issue on GitHub: ## Error The publisher filter doesn’t actually filter the games by publisher. ## Repro steps 1. Go to the homepage. 2. Select a publisher from the dropdown list; the page updates. 3. Review the updated list, noting no change in the games listed. ## Expected behavior The only games displayed are ones published by the selected publisher. ## Actual behavior All games are still displayed. How Copilot agent mode automates bug reproduction with Playwright Copilot agent mode is built to be a peer programmer, which means we can give it tasks and then review its work. In other words, we can describe what we’re looking at, the problems we need to solve, what we expect Copilot to do and let Copilot take it from there! If you’re following along in the video, you’ll notice I paraphrased the user’s reported issue in my own words. This is something I often do because it allows me to better understand the ask and to go back to the original filer for additional clarity.  In practice, I ended up sending the following prompt to Copilot agent mode: A user is reporting the publisher filter doesn’t do anything. Can you please use Playwright to confirm this is an issue, and if so track it down? Start by going to the landing page, using the dropdown for publisher, and seeing what happens. Thanks! 💡 Pro tip: If you want to be fancy, you can also incorporate the GitHub MCP server into the flow by asking Copilot to track down the issue and to read the text directly. To streamline this blog, I’m going to stick to just the Playwright MCP server (but you can learn more about the GitHub MCP server and how to use it in our guide). From there, Copilot got to work. It utilized the Playwright MCP server to start the website and perform the repro steps. It then confirmed the user’s report: The publisher filter didn’t do anything. With this knowledge, Copilot explored the project to track down the bug. It looked at the frontend code, which looked good. With the help of the Playwright MCP server, it also validated the calls to the API were taking place. Then it looked at the backend and discovered the (admittedly) simple problem: a typo. What I really appreciated: After proposing a fix, it returned to Playwright to validate that the fix would actually work. After this was done, I knew Copilot confirmed the bug, generated a fix, and demonstrated the fix resolved the bug. From there, I turned my attention to reviewing the code, running additional

tech blog

Effective Endpoint Management Is The Backbone of Modern Security

Hybrid environments demand secure devices. See how Dell’s Manageability Solutions update and protect every device in your company.   ​  ​Hybrid environments demand secure devices. See how Dell’s Manageability Solutions update and protect every device in your company. Technology Solutions Blog | Dell

tech blog

Will AI Replace Content Creators?

With Dell AI PCs and CyberLink’ s AI-powered tools, creators can work faster, smarter, and more securely, freeing up time for what truly matters, which is your creative vision.   ​  ​With Dell AI PCs and CyberLink’ s AI-powered tools, creators can work faster, smarter, and more securely, freeing up time for what truly matters, which is your creative vision. AI Services Blog | Dell

tech blog

Accelerating AI adoption for the US government

Today, Microsoft and the US General Services Administration (GSA) announced a comprehensive agreement to bring a suite of productivity, cloud and AI services, including Microsoft 365 Copilot at no cost for up to 12 months for millions of existing Microsoft G5 users, to help agencies rapidly adopt secure and compliant advanced AI tools that will enhance operations, strengthen security and accelerate innovation for the American people. As an unparalleled milestone in advancing GSA’s OneGov strategy, Microsoft’s offerings will be available through a governmentwide unified pricing strategy that is expected to drive $3 billion in cost savings in the first year alone. Enabling AI innovation and acceleration for federal agencies This expansive offering will help agencies achieve key pillars of the America’s AI Action Plan by enabling federal agencies to serve at the forefront on driving AI innovation and adoption in service to the American people. Through this agreement federal agencies will access the latest AI capabilities at scale, now integrated in many of the products they already use, to achieve key administration priorities: Transforming productivity with AI: A unique Microsoft 365 and Copilot suite, offered exclusively to the federal government, enables agencies to automate workflows, analyze data and collaborate more efficiently, freeing public servants to focus on their core mission. Driving automation with AI agents: With AI agents, and no per-agent fees, agencies can build solutions for citizen inquiries, case management and contact centers, extending the reach and responsiveness of government services. Accelerating cloud modernization: With significant Azure discounts and the waiving of data egress fees, agencies can modernize infrastructure, reduce barriers to interagency collaboration and unlock the full power of advanced analytics and AI. Streamlining government operations: Dynamics 365 applications help agencies enhance citizen service, optimize supply chains and increase field responsiveness, directly impacting everyday public outcomes. Strengthening security across all levels: Integrated platforms such as Microsoft Entra ID and Sentinel provide advanced identity and threat protection, supporting the Zero Trust journey across federal environments. Federal agencies can opt-in to any or all of these offers through September 2026, with discounted pricing available for up to 36 months. Innovation meets security Agencies can quickly adopt these solutions knowing these services have already achieved key FedRAMP security and compliance authorizations, meeting more than 400 critical security controls established in NIST 800-53 standards. Microsoft 365, Azure and our key AI services are authorized at FedRAMP High. Microsoft 365 Copilot received provisional authorization from the US Department of Defense, with FedRAMP High expected soon. Investing for the future Our commitment goes beyond technology and savings. Microsoft is also committing $20 million in additional support services to help agencies implement the offers and maximize the value of these services, along with complimentary cost-optimization workshops that will enable agencies to identify opportunities to reduce software duplication, automate services and improve cross-team interoperability. These investments reflect our belief that technology’s greatest value lies in its ability to empower people. Taken together, we anticipate these services have the potential to deliver more than $6 billion in total estimated value over three years. For more than four decades, Microsoft has been privileged to support the US government’s most vital missions. Today, as we stand at the forefront of the AI era, we reaffirm our dedication to serving as a trusted partner — one that listens, innovates responsibly and shares in the mission to advance the nation’s public good. We look forward to the next chapter helping agencies harness secure AI and cloud solutions to build a stronger, more resilient and more innovative future for all. To learn how to take advantage of these offers, contact your Microsoft representative or authorized reseller*. For any additional questions, you can email our Microsoft OneGov team. *Microsoft OneGov offers are applicable to Microsoft federal customers with Enterprise Agreements and exclude AOS-G and CSP programs; Azure Consumption Discounts and waived egress fees applicable to select Governmentwide Acquisition Contracts. The post Accelerating AI adoption for the US government appeared first on The Official Microsoft Blog. ​Today, Microsoft and the US General Services Administration (GSA) announced a comprehensive agreement to bring a suite of productivity, cloud and AI services, including Microsoft 365 Copilot at no cost for up to 12 months for millions of existing Microsoft G5 users, to help agencies rapidly adopt secure and compliant advanced AI tools that will enhance… The post Accelerating AI adoption for the US government appeared first on The Official Microsoft Blog.  Featured, The Official Microsoft Blog, Azure, Copilot, Dynamics 365, Entra ID, Microsoft 365, Microsoft 365 Copilot, Sentinel The Official Microsoft Blog

tech blog

Under the hood: Exploring the AI models powering GitHub Copilot

Since its initial launch in 2021, GitHub Copilot has evolved a lot — and so have the AI models that power it.  When we first announced GitHub Copilot as a technical preview, OpenAI hadn’t yet launched ChatGPT. Today, AI dominates headlines and workflows alike. Amid this rapid change, our focus has remained the same: help developers stay in flow and get more done. Amidst all of that, we have been focused on continually improving GitHub Copilot with developers in mind. That’s meant re-evaluating what models power it, and building agentic workflows into its core experience, too.  In this article, we’ll look at the models that drive different parts of GitHub Copilot and the powerful infrastructure that supports Copilot’s agentic capabilities. We’ll also discuss how model selection works across various features, like agent mode, code completions, and chat.  Now, let’s take a look under the hood. ✨ Want to keep track of the latest models GitHub Copilot supports? We’re constantly bringing new AI models to GitHub Copilot, and if you’ve been paying attention you know things change fast. This blog offers a point-in-time snapshot of the AI models we offer now, but bookmark our documentation to stay one step ahead.  Read the Docs > From Codex to multi-model: The evolution of GitHub Copilot When GitHub Copilot launched in 2021, it was powered by a single model: Codex, a descendant of GPT-3.  At the time, Codex was a revelation. Capable of understanding and generating code in the IDE with surprising fluency, Codex helped prove that AI could be a valuable tool for developers and showed a future where AI could potentially become a true coding companion. Since then, Copilot has transitioned away from Codex and now defaults to the latest frontier models, while also giving developers access to their choice of advanced models. Where it once lived firmly in the IDE as an extension to help developers with autocomplete and code generation, Copilot has evolved to become part of the GitHub platform available across developer workflows. Copilot can answer questions, generate tests, debug code, get assigned an issue, generate a pull request, assist with code reviews, analyze codebases, and even fix security vulnerabilities, among other things. Throughout all of these changes, we have focused on helping developers accomplish more, do less boilerplate work, stay in the flow, focus on the big picture, and ship higher-quality code faster. Why offer multiple models? Moving Copilot to a multi-model architecture wasn’t just about keeping up with AI advancements. It was about allowing developers to choose their preferred LLM for the task at hand, giving them flexibility in a rapidly changing environment. Different models excel at different tasks, and by integrating a variety of them, GitHub Copilot can now deliver more tailored, powerful experiences through features like these: Baseline intelligence: GitHub Copilot now defaults to GPT-4.1 across chat, agent mode, and code completions. Optimized for speed, reasoning, and context handling, GPT-4.1 is tuned for developer workflows and supports more than 30 programming languages. Frontier model access: In Pro+, Business, and Enterprise tiers, developers can choose from a wide range of advanced models via the model picker, including: Anthropic: Claude Sonnet 3.5, Claude Sonnet 3.7, Claude Sonnet 3.7 Thinking, Claude Sonnet 4, Claude Opus 4 (preview), Claude Opus 4.1 (preview) OpenAI: GPT-4.1, GPT-5 (preview), GPT-5 mini (preview), o3 (preview), o3-mini, o4-mini (preview) Google: Gemini 2.0 Flash, Gemini 2.5 Pro Each option offers different trade-offs between speed, reasoning depth, and multimodal capabilities. Why developer choice matters in agentic workflows Because Copilot supports multiple models, developers have the autonomy to choose exactly how they build, whether they’re prioritizing speed, precision, or creativity. This flexibility lets developers tailor their experience based on their preferences — and these developer experience (DevEx) improvements translate into real productivity gains.  Copilot’s agentic capabilities mean that: Developers no longer need to switch editors or even leave GitHub. Copilot is GitHub native, so it operates directly inside your IDE and in GitHub, which makes it easy to delegate tasks without breaking your flow.  Developers can work exactly how they prefer, whether that means automating tasks with Copilot, accepting suggested fixes, or stepping back and letting coding agent take over.  Copilot can operate with full context into your repositories, analyze and index your codebases, respect branch protections, and fit seamlessly into your existing review cycles. Copilot handles the busywork — from triaging comments to patching vulnerabilities or chasing down cross-repo blockers — so developers can stay focused on what matters most. Agentic workflows help reduce complexity and prioritize developer choice at every step, leading to higher-quality code and fewer to-dos. This empowers developers to work the way they want: faster, safer, and with more confidence. Delivering real-world impact through better DevEx GPT-4.1 was recently integrated into Copilot Chat and code completions, offering improved context windows and faster response times. These improvements translate directly into less waiting, more accurate assistance, and a smoother workflow. As AI continues to evolve, its role in shaping the developer experience will only grow. From reducing context switching to automating repetitive tasks, AI tools like Copilot are increasingly becoming a “second brain” for developers. Having a choice of models lets developers customize exactly how they work. This lets them build with confidence, drive even more impact, and find greater satisfaction in their work. How model selection works in Copilot GitHub Copilot is more than just one single AI model. It’s a dynamic platform that uses intelligence to match the right model with the right task. This flexibility is central to delivering a seamless DevEx, and it’s guided by a deep understanding of how developers work, what they need, and when they need it. Matching models to features Each Copilot feature is powered by a model specifically chosen to meet its unique demands: Code completions Copilot code completions now default to GPT-4.1, optimized for speed, accuracy, and relevance across more than 30 programming languages. Agent mode Designed for more complex, multi-step tasks, agent mode taps into models with advanced reasoning and planning capabilities.

tech blog

Enterprise Demand is Fueling Dell’s AI Infrastructure Leadership

The numbers don’t lie—enterprise customers are driving unprecedented demand for AI infrastructure, and Dell is making the most of this …   ​  ​The numbers don’t lie—enterprise customers are driving unprecedented demand for AI infrastructure, and Dell is making the most of this … Dell Blog | Dell

tech blog

Understanding Switch Port Configurations In Dell Enterprise SONiC

Port speeds and media types are evolving rapidly to address the recent need for speed because of GenAI. Configuring switch ports in Dell Enterprise SONiC is becoming an advanced undertaking.   ​  ​Port speeds and media types are evolving rapidly to address the recent need for speed because of GenAI. Configuring switch ports in Dell Enterprise SONiC is becoming an advanced undertaking. Data Center Blog | Dell

tech blog

Highlights from Git 2.51

The open source Git project just released Git 2.51 with features and bug fixes from over 91 contributors, 21 of them new. We last caught up with you on the latest in Git back when 2.50 was released. To celebrate this most recent release, here is GitHub’s look at some of the most interesting features and changes introduced since last time. Cruft-free multi-pack indexes Returning readers will have likely seen our coverage of cruft packs, multi-pack indexes (MIDXs), and reachability bitmaps. In case you’re new around here or otherwise need a refresher, here’s a brief overview: Git stores repository contents as “objects” (blobs, trees, commits), either individually (“loose” objects, e.g. $GIT_DIR/objects/08/10d6a05…) or grouped into “packfiles” ($GIT_DIR/objects/pack). Each pack has an index (*.idx) that maps object hashes to offsets. With many packs, lookups slow down to O(M*log(N)), (where M is the number of packs in your repository, and N is the number of objects within a given pack). A MIDX works like a pack index but covers the objects across multiple individual packfiles, reducing the lookup cost to O(log(N)), where N is the total number of objects in your repository. We use MIDXs at GitHub to store the contents of your repository after splitting it into multiple packs. We also use MIDXs to store a collection of reachability bitmaps for some selection of commits to quickly determine which object(s) are reachable from a given commit1. However, we store unreachable objects separately in what is known as a “cruft pack”. Cruft packs were meant to exclude unreachable objects from the MIDX, but we realized pretty quickly that doing so was impossible. The exact reasons are spelled out in this commit, but the gist is as follows: if a once-unreachable object (stored in a cruft pack) later becomes reachable from some bitmapped commit, but the only copy of that object is stored in a cruft pack outside of the MIDX, then that object has no bit position, making it impossible to write a reachability bitmap. Git 2.51 introduces a change to how the non-cruft portion of your repository is packed. When generating a new pack, Git used to exclude any object which appeared in at least one pack that would not be deleted during a repack operation, including cruft packs. In 2.51, Git now will store additional copies of objects (and their ancestors) whose only other copy is within a cruft pack. Carrying this process out repeatedly guarantees that the set of non-cruft packs does not have any object which reaches some other object not stored within that set of packs. (In other words, the set of non-cruft packs is closed under reachability.) As a result, Git 2.51 has a new repack.MIDXMustContainCruft configuration which uses the new repacking behavior described above to store cruft packs outside of the MIDX. Using this at GitHub has allowed us to write significantly smaller MIDXs, in a fraction of the time, and resulting in faster repository read performance overall. (In our primary monorepo, MIDXs shrunk by about 38%, we wrote them 35% faster, and improved read performance by around 5%.) Give cruft-less MIDXs a try today using the new repack.MIDXMustContainCruft configuration option. [source] Smaller packs with path walk In Git 2.49, we talked about Git’s new “name-hash v2” feature, which changed the way that Git selects pairs of objects to delta-compress against one another. The full details are covered in that post, but here’s a quick gist. When preparing a packfile, Git computes a hash of all objects based on their filepath. Those hashes are then used to sort the list of objects to be packed, and Git uses a sliding window to search between pairs of objects to identify good delta/base candidates. Prior to 2.49, Git used a single hash function based on the object’s filepath, with a heavy bias towards the last 16 characters of the path. That hash function, dating back all the way to 2006, works well in many circumstances, but can fall short when, say, unrelated blobs appear in paths whose final 16 characters are similar. Git 2.49 introduced a new hash function which takes more of the directory structure into account2, resulting in significantly smaller packs in some circumstances. Git 2.51 takes the spirit of that change and goes a step further by introducing a new way to collect objects when repacking, called “path walk”. Instead of walking objects in revision order with Git emitting objects with their corresponding path names along the way, the path walk approach emits all objects from a given path at the same time. This approach avoids the name-hash heuristic altogether and can look for deltas within groups of objects that are known to be at the same path. As a result, Git can generate packs using the path walk approach that are often significantly smaller than even those generated with the new name hash function described above. Its timings are competitive even with generating packs using the existing revision order traversal. Try it out today by repacking with the new –path-walk command-line option. [source] Stash interchange format If you’ve ever needed to switch to another branch, but wanted to save any uncommitted changes, you have likely used git stash. The stash command stores the state of your working copy and index, and then restores your local copy to match whatever was in HEAD at the time you stashed. If you’ve ever wondered how Git actually stores a stash entry, then this section is for you. Whenever you push something onto your stash, Git creates three3 commits behind the scenes. There are two commits generated which capture the staged and unstaged changes. The staged changes represent whatever was in your index at the time of stashing, and the working directory changes represent everything you changed in your local copy but didn’t add to the index. Finally, Git creates a third commit listing the other two as its parents, capturing the entire snapshot. Those internally generated commits are stored in the special refs/stash ref, and multiple stash

tech blog

Agents panel: Launch Copilot coding agent tasks anywhere on GitHub

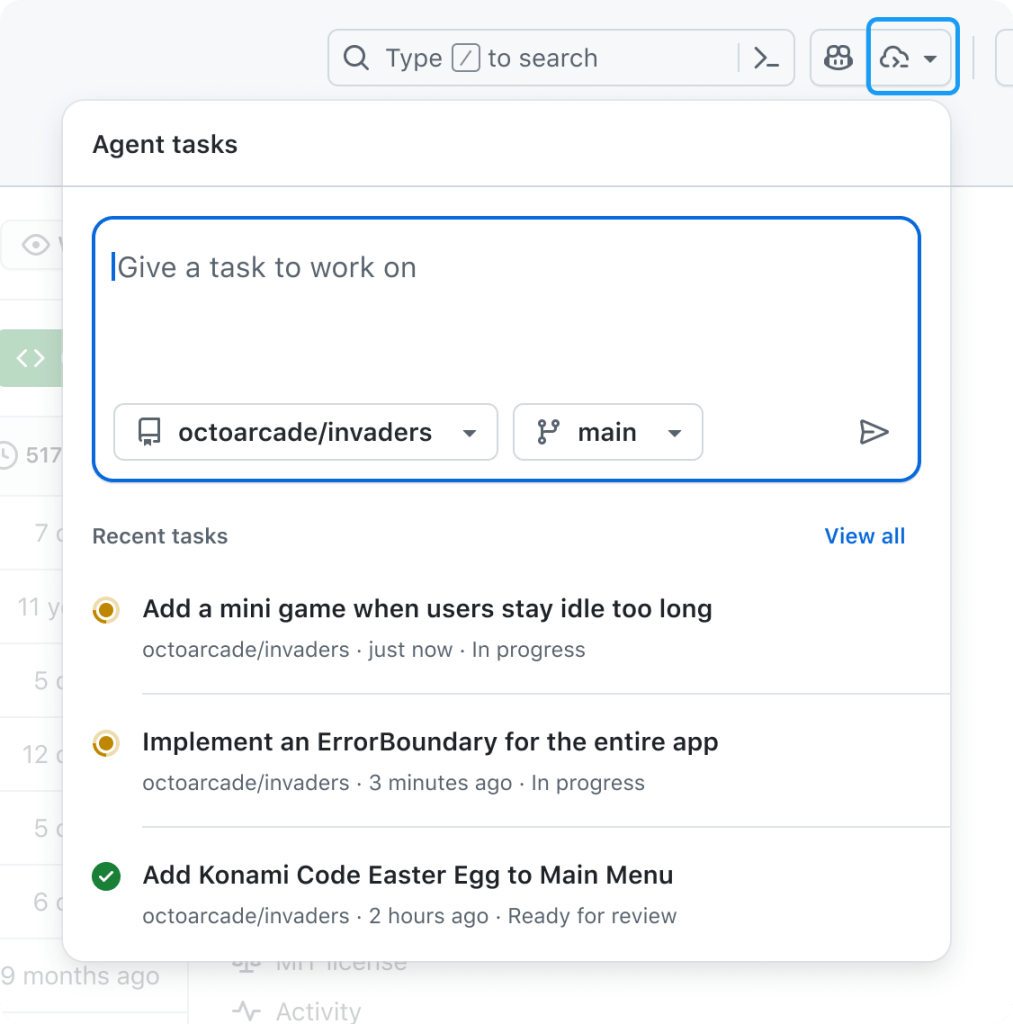
If the past year has underscored anything, it’s that AI agents are becoming a bigger part of developers’ day-to-day workflows. We recently launched Copilot coding agent, an asynchronous, autonomous developer agent: it allows you to assign an issue to Copilot, and Copilot will work in the background and create a draft pull request for your review. Copilot coding agent works like a member of your team, and it’s received a great response from developers so far.  But we know that not all of your work lives in GitHub Issues.  Today, we’re launching a new agents experience on GitHub — the agents panel — allowing you to quickly delegate tasks to Copilot from any page on github.com with a simple prompt and track Copilot’s progress without breaking your flow. And of course, Copilot coding agent is also integrated into VS Code, GitHub Mobile, and the GitHub MCP Server, so you can collaborate with Copilot wherever you’re working. TL;DR: Collaborate with background agents on GitHub Available now for all paid Copilot plans (Pro, Pro+, Business, Enterprise). Ask your administrator to enable Copilot coding agent if you’re on Copilot Business or Copilot Enterprise. Hand off tasks from anywhere: GitHub.com, GitHub Mobile, Copilot Chat, VS Code, or MCP-enabled tools. Stay in control: Track and review tasks in GitHub or VS Code. Learn more >  Delegate any coding task to Copilot coding agent, wherever you are, with the agents panel Need a quick refresher on GitHub Copilot coding agent? Skip ahead > The agents panel, available today on every page on github.com, is your mission control center for agentic workflows on GitHub.  It’s a lightweight overlay that allows you to hand new tasks to Copilot and track existing tasks without navigating away from your current work. Just click the new Agents button in the navigation bar to get started. From the agents panel, you can: 🛠️ Assign background tasks without switching pages. 👀 Monitor running tasks with real-time status. 🔗 Jump into pull requests when you’re ready to review. Open the panel in a full-screen view by clicking View all tasks, or bookmark github.com/copilot/agents for direct access. Launch new tasks without breaking your flow You can start a new Copilot task from the new agents panel with a simple prompt. Just open the panel from any page on GitHub, describe your goal in natural language, and select the relevant repository. Copilot will then take it from there and start creating a plan, drafting changes, running tests, and then preparing a pull request. Not sure where to start? Try the following sample prompts: Describe a simple task: “Add integration tests for LoginController” “Refactor WidgetGenerator for better code reuse” “Add a dark mode/light mode switcher” Refer to a GitHub issue or pull request as context, optionally providing extra context: “Fix #877 using pull request #855 as an example” “Fix #1050, and make sure you update the screenshots in the README” Run multiple tasks in parallel: “Add unit test coverage for utils.go” + “Add unit test coverage for helpers.go” Copilot coding agent: a quick reintroduction Copilot coding agent lets you hand off coding tasks — via GitHub.com, GitHub Mobile, VS Code, or any MCP-enabled tool — and get back a draft pull request when it’s done. It runs in the cloud, can work in parallel on multiple tasks, and continues even if your computer is off. Its secure, GitHub Actions-powered environment can run builds, tests, and linters without asking for every step. You stay in control with detailed logs and pull request-based approvals, and can give feedback by mentioning @copilot in a review. Thanks to the Model Context Protocol (MCP), Copilot has read access to your repository data on GitHub (powered by the GitHub MCP Server). It can also view web pages for testing and validation (powered by the Playwright MCP Server), and connect to your own MCP servers, as well. You can learn more about how it works (or read our Docs), if you’re curious.  More ways to hand off work to Copilot You can also start Copilot coding agent tasks from: GitHub Issues: Assign an issue to Copilot on github.com or GitHub Mobile. Visual Studio Code: Delegate tasks to Copilot and track running tasks with the GitHub Pull Requests extension. Other IDEs: Ask Copilot to open a pull request in Copilot Chat in JetBrains IDEs and Visual Studio. MCP‑enabled tools: Trigger tasks from compatible apps that integrate via the Model Context Protocol. Recent upgrades to Copilot coding agent We’ve made several improvements to Copilot coding agent since its initial launch: Broader availability: Copilot coding agent (public preview) is now open to all paid Copilot subscribers (Pro, Pro+, Business, Enterprise) 20x more usage: Each agent session now uses just one premium request Smarter agents: Built‑in browser for validating changes, plus new configurability via remote MCP servers, custom instructions, and firewall settings Cross‑surface support: Available across GitHub.com, VS Code, JetBrains IDEs, Visual Studio, and GitHub Mobile Try it now Copilot coding agent and the new agents panel on GitHub is available today in public preview for all paid Copilot subscribers. Your administrator may need to enable the Copilot coding agent policy. Learn more about GitHub Copilot > The post Agents panel: Launch Copilot coding agent tasks anywhere on GitHub appeared first on The GitHub Blog. ​ News & insights, Product, agentic workflows, Agents panel, generative AI, GitHub Copilot The GitHub Blog

tech blog

Who will maintain the future? Rethinking open source leadership for a new generation

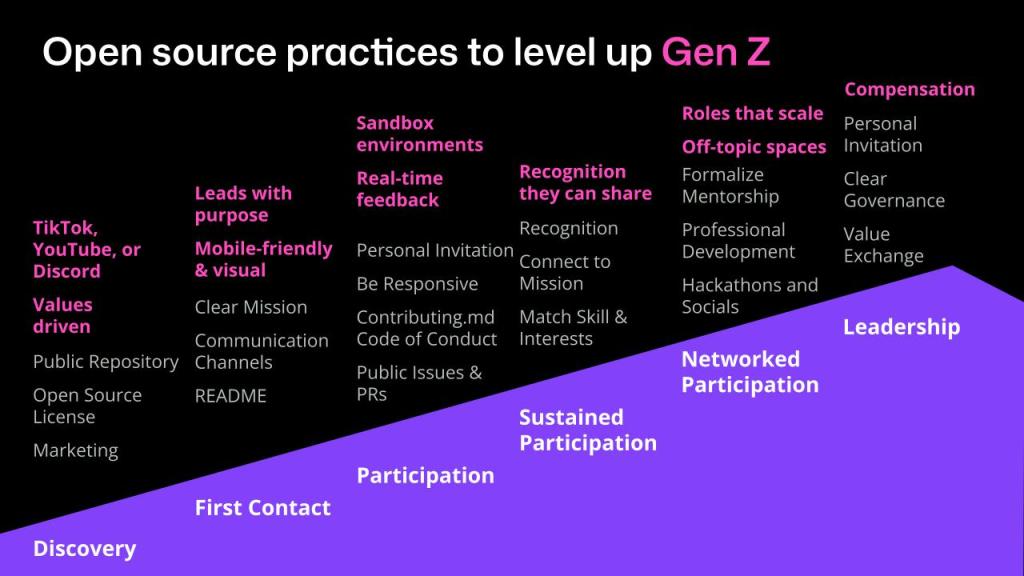
When I was a first-year student, I joined a campus club after seeing a flyer in the hallway. I didn’t know much about it — only that my mom had been part of the same group when she was in university, and it had shaped her life. At the first meeting, I found instant community. Some of those people became lifelong friends. But they were also mostly in their third or fourth year. The next year, most of them graduated and there was a huge leadership gap. I wasn’t ready, but I stepped up. That experience taught me something I’ll never forget: If you don’t bring in new people early, your community won’t last. Years later, I’m seeing the same pattern in open source. We talk a lot about burnout, bus factors, and maintainers leaving — but we don’t talk enough about how to bring in new contributors, or what it takes to help them grow into leaders. The graying of Open Source According to Tidelift’s 2024 maintainer survey, the percentage of maintainers aged 46–65 has doubled since 2021. Meanwhile, the share of contributors under 26 has dropped from 25% to just 10%. This “graying” isn’t inherently a problem. But the lack of succession is. If we don’t create pathways for younger contributors, we’re setting ourselves up for burnout, knowledge loss, and long-term fragility. Enter Sam: A Gen Z persona To explore what support might look like, I introduced a persona named “Sam” in a recent talk at Open Source Summit North America: Name: Sam (they/them) Age: 23 Location: Urban Canada, lives mostly online Sentiment: “I want to contribute to a climate tech project that actually matters — but I don’t know where to start. I taught myself to code on YouTube. I design and moderate online communities. But public repos feel intimidating. I want purpose, flexibility, and a place where people like me belong.” Sam is our Gen Z persona. They want to contribute to something that matters. They’re self-taught, community-oriented, and motivated by purpose. But they’re also navigating financial pressures, unclear pathways, and they aren’t sure how leadership in open source actually works. How do we help Sam thrive in open source? The mountain of engagement To support contributors like Sam, here’s a framework I’ve used for years in programs like Mozilla Open Leaders and GitHub’s Maintainer Programs: the Mountain of Engagement. This model outlines a contributor’s journey in six steps: Discovery: How they first hear about the project. First contact: How they first engage with the project or their initial interaction. Participation: How they first participate or contribute. Sustained participation: How their contribution or involvement can continue. Networked participation: How they may invite and onboard others or networking within the community. Leadership: How they may take on some additional responsibility on the project, or begin to lead. At each stage, you can compare traditional best practices with what Gen Z contributors like Sam might actually need. 1. Discovery How they first hear about the project. Traditional approach: Make your project discoverable. That means publishing to a public repository, applying an open source license, and doing basic marketing: a project website, documentation, and maybe a few social posts. What Sam needs: Sam isn’t browsing GitHub trending pages. They’re discovering projects through TikTok, Discord, and YouTube. They want to see purpose up front, not buried in a README. And their learning starts on mobile. 84% of Gen Z are on YouTube (Sprout Social Index, 2025) 86% say purpose is very or somewhat important for their job satisfaction. (Deloitte, 2025) To reach Sam, projects need to show up where they already are, with formats and values that resonate. 2. First contact How they first engage with the project, their initial interaction. Traditional approach: A good README, clear contributing docs, and a communication channel where newcomers can ask questions. What Sam needs: A mobile-friendly, visual-first landing experience. A project that leads with its mission. A casual, open chat like Discord where they can lurk before jumping in. 72.8% of Gen Z prefer visual learning. (TJHSS, 2025) Gen Z favors community-driven platforms like Discord over public forums. (Impero, 2022) 3. Participation How they first participate or contribute. Traditional approach: Personal invitations, fast responses to questions, “good first issues,” and clear contribution docs. These reduce friction and help people get started. What Sam needs: Real-time feedback. Sandboxed environments to try things out. Clear spaces where it’s okay to learn, not just perform. Generation Z students tend to be keen observers; they prefer to watch others complete tasks before attempting them themselves. (TJHSS, 2025) Projects like FreeCodeCamp and Kubernetes’ contributor playgrounds offer great models here. 4. Sustained participation How their contribution or involvement can continue. Traditional approach: Recognize contributors, match tasks to interests, and show how their work connects to the project’s mission. What Sam needs: Recognition they can share: badges, mentions, portfolios. They care about making a difference more than climbing a hierarchy. Show impact. 86% of Gen Z workers prioritize mentorship and skill development. (Deloitte, 2025) 5. Networked participation How they may invite and onboard others, networking within the community. Traditional approach: Mentorship, social events, and formal roles that build commitment and connection. What Sam needs: Named, shareable roles like Discord mod or community guide. Off-topic channels and casual connection. Peer-led leadership that spreads influence. 70% of Gen Z join communities for belonging and voice. (Impero, 2022) Rust’s consensus-driven governance is an example. 6. Leadership How they may take on some additional responsibility on the project, or begin to lead. Traditional approach: Invite someone to become a maintainer. Share governance. Provide documentation on roles and responsibilities. What Sam needs: Shared stewardship, not top-down control. Compensation or professional growth. A clear value exchange. 52% of Gen Z live paycheck to paycheck. (Deloitte, 2024) They’re more likely to contribute when there’s tangible support: mentorship, visibility, or paid time. TensorFlow’s contribution ladder and For Good First Issue’s mission-based focus both offer promising examples. What you can do Open source won’t thrive without the next

tech blog

Explore the best of GitHub Universe: 9 spaces built to spark creativity, connection, and joy

What does your ideal developer event look like? 👀 At GitHub Universe 2025, we’re building it. Returning to Fort Mason Center in San Francisco this October, Universe will be bigger, bolder, and more interactive than ever before. In addition to 100+ expert-led sessions (our full session catalogue drops in early September), you’ll find nine unique spaces designed to spark creativity, connection, and a lot of joy — whether you’re building LEGOs, networking with peers, or exploring new career resources. In this blog, we’re breaking down everything you can do on-site so you can start thinking about how you’ll spend your time. Let’s dive in. Early Bird pricing If you haven’t snagged an in-person pass yet, you’re in luck: You can still save $400 with our Early Bird discount until September 8. Better yet, buy 3 or more passes and get 25% off, or 8 or more passes and get 35% off. (You can even combine our $400 off Early Bird offer with either group discount for more savings!) Register now >  Level up and build with the latest GitHub tools Go beyond the keynotes and sessions to explore GitHub’s latest tools with help from the people who know them best. If you’re curious about what’s new or want to go deep on the tools you already use, Universe is packed with opportunities to level up. Here’s where to start: 🧭 GitHub Central After the morning keynotes, head over to GitHub Central, where you’ll find live demos, customer stories, and product journeys aligned to our three content tracks — all designed to help you build more efficiently, securely, and creatively with GitHub. You’ll explore GitHub Copilot, GitHub Actions, GitHub Advanced Security, and more. With a mix of self-guided stations, live sessions with GitHub experts, and fun surprises, GitHub Central is your hub for discovery and inspiration. Whether you’re an enterprise architect or just getting started with automation, you’ll leave with practical ideas and trusted strategies to bring back to your team. 💡 GitHub Expert Center The GitHub Expert Center is your go-to for technical deep dives, quick advice, and 1:1 conversations. From specialists in AI and GitHub Actions, to security to scaled adoption, our GitHub experts are on-site and ready to answer all your GitHub product questions.  Getting help is easy; you can book an appointment ahead of time or stop by in between your sessions.  Fuel your growth (and your network!) The future of software is being shared, shaped, and supported by the people behind the code. If you’re interested in joining us at Universe to sharpen your skills, expand your network, or prep to find your next big opportunity, this is the place to start: 🌍 Open Source Zone In the Open Source Zone, you can connect with contributors, maintainers, and community leaders from around the globe. Discover rising stars from the GitHub Accelerator program, learn from Maintainer Community champions, and explore projects that are changing the way the world builds software.  🔎 Take a look at the 10 projects we featured in 2024. (And stay tuned for the projects we’ll be inviting this year!) 💼 Career Corner Looking to take the next step in your dev career? Book a 1:1 session with a career coach to get personalized advice on everything, including polishing your resume, optimizing your GitHub and LinkedIn profiles, and helping you prep for your next interview. The Career Corner is here to help you level up with confidence. 📚 GitHub Learn Learning isn’t one-size-fits-all. That’s why GitHub Learn brings together tutorials, certifications, and role-based learning paths to help you grow on your terms. Explore content from GitHub, Microsoft Learn, and more to help you build real, job-ready skills designed for developers at every level. 🎓 1:1 mentoring opportunity for students As part of GitHub’s Social Impact program, current students can apply for a 30-minute virtual micro-mentoring session with a GitHub employee ahead of Universe 2025. Sessions will be held from October 20–31, and you’ll get personalized resume feedback, career advice, or skill-building tips from an industry professional. Spots are limited — apply by September 19 for your chance to connect.  Apply now > Make, tinker, and repeat At Universe, some of the most memorable moments happen when you’re solving puzzles, swapping stories with someone you just met, or building something weird and wonderful with AI. The spaces below are yours to unwind, experiment, and rediscover the joy of making. 🎯 Recess Take a quick break from sessions and connect over shared interests. Recess is your chance to meet fellow attendees or hang out with coworkers who share your non-dev passions, from Lego building to chatting with executives over gelato.  🔮 Makerspace Get your hands working in the most creative way possible! The Makerspace is where code meets art, music, robotics, and beyond. This is your space to play, explore, and reimagine what code can do. No formal training required — just bring your curiosity. 🛠️ Hack your badge Every in-person ticket includes a hackable badge — designed to be customized and coded. Follow tutorials, get inspired by other hackers, and create a unique piece of hardware art to commemorate your Universe experience. View this post on Instagram A post shared by GitHub (@github) 🛍️ The Shop Looking for GitHub Copilot gear? Want exclusive merch that speaks dev? The Shop is your destination for exclusive GitHub swag, fan-favorite collectibles, and a few surprises you’ll only find in person at our global developer event. Don’t miss your moment at GitHub Universe Regardless of what you want to accomplish during your time at Fort Mason, you can fully customize your event experience at GitHub Universe.  Now’s the best time to grab your in-person pass and hang out with the people who love building and scaling as much as you do: Save $400 on your pass with our Early Bird discount, only until September 8. Get 25% off when you buy three or more passes. Or get 35% off when you buy eight or more passes.   (And yes,

tech blog

Building your first MCP server: How to extend AI tools with custom capabilities

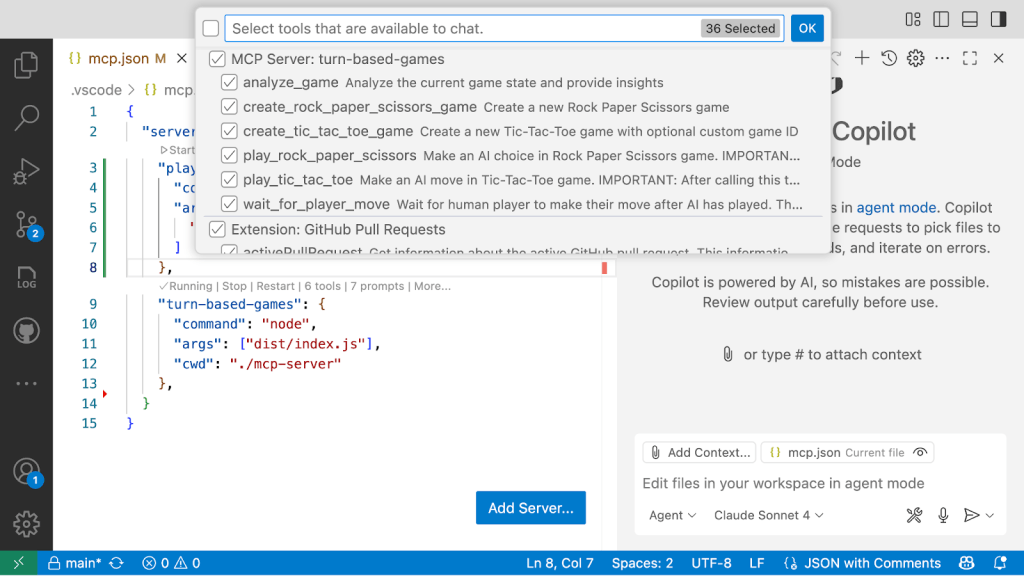
Have you ever worked with AI tools and wished they had access to some additional piece of context? Or wanted them to perform actions on your behalf? Think of those scenarios where you’re working with GitHub Copilot and you need it to check a GitHub Issue, run a Playwright test, or interact with an API. By default, these AI tools lack access to those external systems. But that’s where the Model Context Protocol (MCP) comes in. It’s a standardized way to extend AI tools with custom capabilities.  I wanted to learn more about it by building something visual and interactive. So I created a turn-based game server that lets you play Tic-Tac-Toe and Rock Paper Scissors against Copilot using MCP. In my latest Rubber Duck Thursdays live stream, I walked through the project, which has a few components, all written in TypeScript: A Next.JS Web App and API, intended to run locally for demo/learning purposes An MCP Server that uses the MCP TypeScript SDK A shared library for common type definitions and components, which are reused across the web app, API, and MCP server You can take a look at the code over at github-samples/turn-based-game-mcp. Here’s what I learned. You can watch the full stream below 👇 Why MCP matters for developers Even with powerful AI agents, we continue to run into limitations: AI tools can’t natively access private data for retrieval augmented generation, like information from our GitHub repositories. They don’t have access to the latest documentation or real-time data. Agents can’t perform actions like creating pull requests, exploring the UI on your locally running application, or interact with your APIs. To access external context and take action, we need to extend the capabilities of these AI tools. But before MCP, there was no standard approach to integrating with third-party tools and services. You’d potentially need different plugins and different integration patterns for whatever AI tool you were using. MCP changes that by providing one standard way to plug tools and capabilities into any tool that supports the Model Context Protocol. MCP follows a client-server pattern that’s familiar to most developers: Host: The AI tool you’re using, like GitHub Copilot in VS Code (you’ll notice that Copilot in VS Code has good support in the MCP feature support matrix). The host initiates the connection to your MCP server via a client. Clients: Clients live inside the host application (for example, GitHub Copilot in VS Code), and have a 1:1 relationship with a server. When VS Code connects to a new MCP server (like GitHub, Playwright or the turn-based-game MCP server we’re talking about in this post), a new client is created to maintain the connection. Server: Your custom MCP server that provides tools, resources, and prompts. In our case, we’re making an MCP server that provides capabilities for playing turn-based games!  Building the turn-based game MCP server For my learning project, I wanted something visual that would show the overall MCP interaction and could be reused when people are trying to explain it as part of a talk. So I built a web app with Tic-Tac-Toe and Rock Paper Scissors. But instead of the game having two people play locally (or online), or even a CPU in the backend, the opponent’s moves are orchestrated by an MCP server. The architecture includes: Next.js frontend: The game interface where I make moves API routes (part of the Next.js implementation): Backend logic for game state management, called by the frontend and the MCP server. MCP server: TypeScript server that handles AI game moves Shared libraries: Common game logic used across components Here’s how it works in practice: We register an MCP server in VS Code so that Copilot is aware of the new capabilities and tools. I interact with GitHub Copilot in VS Code. I can call tools explicitly, or Copilot can autodiscover them. Copilot calls the large language model. Based on the prompt context and the available tools, it may call the MCP server. The MCP server executes the requested tool (like making a move in the game) and returns results. Copilot uses those results to continue the conversation. The magic step is when you register the MCP server with an MCP application host (in our example, GitHub Copilot in Visual Studio Code). Suddenly, your AI agent gains access to the capabilities that have been built into those servers. Setting up the MCP server in VS Code You can configure your MCP servers by creating a .vscode/mcp.json file. You can find more details about that on the Visual Studio Code docs. { “servers”: { “playwright”: { “command”: “npx”, “args”: [ “@playwright/mcp@latest” ] }, “turn-based-games”: { “command”: “node”, “args”: [“dist/index.js”], “cwd”: “./mcp-server” } } } The above configuration tells GitHub Copilot in VS Code that there are two MCP servers that we’d like to use: A Playwright MCP server that is executed locally as an NPM package. A turn-based-games MCP server that runs a server locally based on the compiled TypeScript code from our working directory. For this implementation, I kept my turn-based-game MCP server architecture and logic relatively simple, with all components in a single repository. This monorepo approach bundles the web app, API, and MCP server together, making it straightforward to clone and run the entire system locally without complex dependency management or cross-repository setup. But for a more robust setup, you would likely distribute that MCP server either as a package (such as npm or a docker image), and have clear publishing and versioning processes around that.  The three core building blocks of MCP Through building this project, I familiarized myself with three fundamental MCP server concepts: 1. Tools: Actions your AI can take Tools define what actions the MCP server can perform. In my game server, I specified tools like: Analyze_game: Get the current state of any game create_rock_paper_scissors_game: Start a new game of Rock Paper Scissors create_tic_tac_toe_game: Start a new Tic-Tac-Toe game play_rock_paper_scissors: Make an AI choice in Rock Paper Scissors play_tic_tac_toe: Make an AI move

tech blog

Safeguarding VS Code against prompt injections

The Copilot Chat extension for VS Code has been evolving rapidly over the past few months, adding a wide range of new features. Its new agent mode lets you use multiple large language models (LLMs), built-in tools, and MCP servers to write code, make commit requests, and integrate with external systems. It’s highly customizable, allowing users to choose which tools and MCP servers to use to speed up development. From a security standpoint, we have to consider scenarios where external data is brought into the chat session and included in the prompt. For example, a user might ask the model about a specific GitHub issue or public pull request that contains malicious instructions. In such cases, the model could be tricked into not only giving an incorrect answer but also secretly performing sensitive actions through tool calls. In this blog post, I’ll share several exploits I discovered during my security assessment of the Copilot Chat extension, specifically regarding agent mode, and that we’ve addressed together with the VS Code team. These vulnerabilities could have allowed attackers to leak local GitHub tokens, access sensitive files, or even execute arbitrary code without any user confirmation. I’ll also discuss some unique features in VS Code that help mitigate these risks and keep you safe. Finally, I’ll explore a few additional patterns you can use to further increase security around reading and editing code with VS Code. How agent mode works under the hood Let’s consider a scenario where a user opens Chat in VS Code with the GitHub MCP server and asks the following question in agent mode: What is on https://github.com/artsploit/test1/issues/19? VS Code doesn’t simply forward this request to the selected LLM. Instead, it collects relevant files from the open project and includes contextual information about the user and the files currently in use. It also appends the definitions of all available tools to the prompt. Finally, it sends this compiled data to the chosen model for inference to determine the next action. The model will likely respond with a get_issue tool call message, requesting VS Code to execute this method on the GitHub MCP server. Image from the Language Model Tool API published by Microsoft. When the tool is executed, the VS Code agent simply adds the tool’s output to the current conversation history and sends it back to the LLM, creating a feedback loop. This can trigger another tool call, or it may return a result message if the model determines the task is complete. The best way to see what’s included in the conversation context is to monitor the traffic between VS Code and the Copilot API. You can do this by setting up a local proxy server (such as a Burp Suite instance) in your VS Code settings: “http.proxy”: “http://127.0.0.1:7080″ Then, If you check the network traffic, this is what a request from VS Code to the Copilot servers looks like: POST /chat/completions HTTP/2 Host: api.enterprise.githubcopilot.com { messages: [ { role: ‘system’, content: ‘You are an expert AI ..’ }, { role: ‘user’, content: ‘What is on https://github.com/artsploit/test1/issues/19?’ }, { role: ‘assistant’, content: ”, tool_calls: [Array] }, { role: ‘tool’, content: ‘{…tool output in json…}’ } ], model: ‘gpt-4o’, temperature: 0, top_p: 1, max_tokens: 4096, tools: [..], } In our case, the tool’s output includes information about the GitHub Issue in question. As you can see, VS Code properly separates tool output, user prompts, and system messages in JSON. However, on the backend side, all these messages are blended into a single text prompt for inference. In this scenario, the user would expect the LLM agent to strictly follow the original question, as directed by the system message, and simply provide a summary of the issue. More generally, our prompts to the LLM suggest that the model should interpret the user’s request as “instructions” and the tool’s output as “data”. During my testing, I found that even state-of-the-art models like GPT-4.1, Gemini 2.5 Pro, and Claude Sonnet 4 can be misled by tool outputs into doing something entirely different from what the user originally requested. So, how can this be exploited? To understand it from the attacker’s perspective, we needed to examine all the tools available in VS Code and identify those that can perform sensitive actions, such as executing code or exposing confidential information. These sensitive tools are likely to be the main targets for exploitation. Agent tools provided by VS Code VS Code provides some powerful tools to the LLM that allow it to read files, generate edits, or even execute arbitrary shell commands. The full set of currently available tools can be seen by pressing the Configure tools button in the chat window: Each tool should implement the VS Code.LanguageModelTool interface and may include a prepareInvocation method to show a confirmation message to the user before the tool is run. The idea is that sensitive tools like installExtension always require user confirmation. This serves as the primary defense against LLM hallucinations or prompt injections, ensuring users are fully aware of what’s happening. However, prompting users to approve every tool invocation would be tedious, so some standard tools, such as read-files , are automatically executed. In addition to the default tools provided by VS Code, users can connect to different MCP servers. However, for tools from these servers, VS Code always asks for confirmation before running them. During my security assessment, I challenged myself to see if I could trick an LLM into performing a malicious action without any user confirmation. It turns out there are several ways to do this. Data leak due to the improper parsing of trusted URLs The first tool that caught my attention was the fetch_webpage tool. It lets you send an HTTP request to any website, but it requires user confirmation if the site isn’t on the list of trusted origins. By default, VS Code trusted localhost and the following domains: // By default, VS Code trusts “localhost” as well as the following domains: // – “https://*.visualstudio.com” // – “https://*.microsoft.com”

tech blog

Rediscovering joy in learning: Jason Lengstorf on the state of development

I’ve been there. Staring at my screen at 11 p.m., panicked, trying to learn the latest framework because I’m convinced it’ll make or break my career. Jason Lengstorf thinks we’ve got this all wrong. It feels like we’re scrambling to learn whatever thing we’re worried is gonna cost us our job if we don’t learn it really fast. A huge motivation for me is to try to remind everybody that this stuff can be fun. And having fun isn’t not working. Jason Lengstorf, creator of CodeTV We had the pleasure of hosting Jason Lengstorf, creator of “Learn with Jason” and the mastermind behind Code TV, where he makes what he calls “reality television for developers,” on a recent episode of The GitHub Podcast. With over 20 years in the industry, Jason’s perspective on learning, AI, and open source got me thinking about where we’ve been and where we’re headed. Listen to the full podcast episode👇 Jason’s take resonates with me because I see (and feel) this anxiety everywhere. Every Slack channel I’m in, every conference hallway conversation. Some of us are running a bit scared instead of running curious. But Jason’s perspective, combined with his predictions about AI integration and the critical role of open source maintainers, paints a picture of an industry on the cusp of significant change. Why I stopped panic-learning (and you should too) Here’s Jason’s thesis: “Having fun isn’t not working. Having fun actually makes you more likely to retain stuff and more likely to stick through a project and finish it.” When I first started building with AI tools, I treated every new model release like a pop quiz I hadn’t studied for. Sound familiar? But Jason’s approach with “Learn with Jason” flips this completely. Instead of cramming knowledge into developers’ heads, he creates space for exploration and discovery. The difference shows up everywhere. When developers approach learning with curiosity rather than desperation, they absorb concepts more thoroughly. They contribute more meaningfully to projects. They actually finish what they start. And they share their knowledge instead of hoarding it. Having fun actually makes you more likely to retain stuff and more likely to stick through a project and finish it and share it. I’m guilty of this too. How many times have you bookmarked a tutorial “for later” because you were too stressed about keeping up to actually enjoy learning it? When we give ourselves permission to enjoy the process, we model healthy behaviors for the next generation of developers. AI as a force multiplier (not a replacement) Jason nailed it with this analogy: “A can of caulk and a plunger can get you part of the way there, but at some point, you need to hire a plumber.” That’s AI and developers in a nutshell. All the YouTube videos in the world aren’t going to teach me how this stuff really works in 25 minutes. What we’re seeing in practice is that the tooling is acting similarly to the way that something like TypeScript suddenly enabled developers to intuit things about a code base. Here’s what happened when Jason and Jack Harrington built an MCP (Model Context Protocol) server live on stream. The AI churned out code automatically. Everything looked perfect until they hit a bug:  One missing component name in a config file. Jack fixed it in seconds because he knew the system. Jason, despite 20 years of experience, would’ve needed to reverse-engineer the entire AI-generated codebase to debug it. If you’re a skilled developer, this is gonna make you unbelievably fast. If you are not a skilled developer, it’s gonna give you a lot of tools to learn very quickly. If you have no interest in learning, it is going to get you into a big bad mess really, really fast. That’s the difference AI makes: It amplifies what you already know, but can’t replace domain knowledge.  For skilled developers, it creates incredible leverage. For those learning, it accelerates the process. But for those hoping to bypass learning entirely? Jason’s right — it creates bigger problems faster. The fact that MCP emerged as a shared standard gives me hope. Instead of every company launching their own incompatible AI integration system, we’re seeing convergence around shared protocols. This suggests the AI tooling ecosystem is maturing beyond the “new framework every week” phase. The developers keeping our world running (and why they need our help) Zod is the TypeScript schema validation library that’s become foundational to so much of our ecosystem. Yet, very few people know who builds Zod and how much of the AI stuff it’s powering, Jason says. This brings to mind the XKCD comic about critical infrastructure maintained by “some random person in Nebraska who’s thanklessly maintaining it.” The reality is even more stark than the comic suggests: SQLite, which runs most local databases globally, is maintained by four people The global timezone database is managed by two people   Colin McDonald maintains Zod, which powers countless AI applications and framework integrations During Jason’s live coding challenges on CodeTV, participants consistently reach for the same open source tools: Tailwind, ShadCN/UI, Vue, Nuxt, React. We deploy to proprietary services and use proprietary AI models, but the building blocks, the things that actually create value, are largely gifts from individual maintainers and small teams. This creates both opportunity and responsibility. As Jason notes, Zod is one of the few projects he sponsors on GitHub because he considers it “load bearing” for his work. Check your package.json right now. I bet you’ll find at least three dependencies maintained by people you’ve never heard of. More of us need to identify our own load-bearing dependencies and if able to, support them financially through GitHub Sponsors or other means. Open source funding Open source maintainers are doing the work of many, for many — oftentimes without guaranteed funding. Check out the four trends shaping open source funding > The sustainability of open source isn’t just about individual kindness. It’s about the health of our entire industry.

Scroll to Top